


Would you like your AS/400 to store and print images of products for your bills of materials? How about capturing signatures for those payroll checks? You can do it with Client Access/400’s AFP printer driver.
This article was prompted by an email from Dennis Leon at United Automobile Underwriters. He needed to capture images and store them on the AS/400 for use with RPG DDS keywords and wrote to ask for advice. This article will show you what you need to do to convert an image captured or created on a PC into an page segment (a bitmapped raster image) file that can be stored on the AS/400 and printed by an RPG program. The process can be also be used to create overlays (layouts, grids, and forms) that can become an integrated part of your company’s database. Since the AS/400’s native imaging technology was originally inherited from larger mainframes and was designed to take advantage of IPDS printers, you’ll probably feel a bit at sea with all the file transformations that are required. Don’t fear! I’ll map out each step as we go along and give you some extra tips, too.
Preparation
There are essentially five steps in this image-capturing process:
1. The one-time setup of the environment
2. The capture of an image file
3. The generation of a PC page segment source file
4. The conversion of that source file to an actual page segment
5. The printing and viewing of the final image from the AS/400
Step 1: Setting Up a Production Environment
There are only a few things you need before you can capture an image: the Client Access/400 AFP printer driver, a PC program you can use to create or capture an image, a mapped drive to a QDLS folder, and a source physical file on the AS/400. If you set up
these items in the beginning, you won’t have to think about them later on. If you’ve got lots of images to convert, it’s better to get this heavy lifting out of the way.
Install AFP Printer Driver to Windows 95
The AFP printer driver comes as part of Base Support for Client Access/400, so you don’t need a Client Access/400 license in order to use it. If it’s not on your Windows 95 PC already, you’ll need to click the Selective Setup icon in the Client Access/400 Accessories folder. The Selective Setup Wizard first checks your system for installed components, then offers you the opportunity to add or remove components to your CA/400 configuration. Check the selection box labeled Printer Drivers, and then click the button labeled Change. There will be a SNA Character Stream (SCS) printer driver and an AFP printer driver listed. Make certain that the selection box for the AFP printer driver has been checked. Click OK and let the setup program do its thing. At the end of this particular setup process, CA/400 prompts you to reboot the computer. Unless you’ve installed other communications-dependent components, it’s not necessary to reboot at this time.
Configure Printer Driver to Output to File
Click the Windows 95 Start button and choose Settings, then Printers. Click the Add Printer icon and create a new local printer. Locate the manufacturer labeled IBM (not IBM/Lexmark) and choose an AFP printer model. I’ve always chosen the IBM AFP 3812 model, but you may want to play around and experiment with a different one. Once you’ve made your selection, you should be asked by the Add Printer Wizard to identify the port the driver will be attached to; select File. This tells Windows that all output printed by this driver will be redirected to a file on the PC itself. Click Next and give the driver the name of your choice. When the Add Printer Wizard has finished, you’ll have the capability to convert any printed output into an AFP data stream file. Now there are just a couple more steps to finish the configuration of the driver.
Right-click on the new driver and select Properties. Now select the Details tab and click the Setup button. Here you’ll find the AFP configuration properties for printing an image in either portrait or landscape mode. Click the Options button and configure the output to generate a page segment data stream file. The selection of the appropriate data stream output will be important when you convert the file to a native AS/400 page segment. Later, if you decide to create an overlay data stream (for forms or grids), you can reconfigure the driver in the same manner.
About the QDLS File System
I’m going to show you how to take an image file from the PC and create a page segment data stream source file using the AFP printer driver, but first you need to answer an important question: Where should you place the resulting source file? Ultimately, you want it to end up on the AS/400, but how do you get it there? Well, although there are a thousand different ways to transfer a PC file to the AS/400, there’s only one way to move this particular kind of data stream file into a particular kind of AS/400 source file—by using the old PC Support/400 shared folders QDLS File System. Why? I’ll tell you in a minute, but for now you’ll have to trust me. What’s most important at this juncture is to make certain you have a folder available for your use in the QDLS file system.
To create a QDLS folder using the AS/400 Create Folder (CRTFLR) command, go to an AS/400 command line and type CRTFLR [MyFolder]. Next, you need to map a logical drive letter from your PC to this newly created folder. You can only map to a shared folder using Windows Explorer, so start the Explorer, go to the toolbar and select Tools/Map Network Drive. Choose a drive letter to be identified with the QDLS folder, and then key in a network path to connect to that folder. The path syntax is:
MyAS400QDLSMyFolder When you click OK, your QDLS shared folder will be mapped to the drive letter of your choice.
Create a Source Physical File on the AS/400 to Hold the AFP Code
The next thing you need to set up is a physical file on the AS/400 to hold the data stream for the page segment’s source. Now I want you to think about what I just wrote: set up a physical file for the page segment’s source. That doesn’t sound like it could be right, but it is. Page segments on the AS/400 are actually compiled, like programs, from a specific kind of AS/400 database file. An interesting concept, no? It’s extremely important to understand that the success or failure of this entire application depends on the structure of this file. It’s not just your ordinary, run-of-the-mill DB2/400 physical file. (Nine out of ten emails I’ll receive over the next three months will be about mistakes made at this juncture.)
To construct this physical file, use the Create Physical File (CRTPF) command. Look at Figure 1 to examine the parameters of this command. The file name can be any memorable name. In my example, I’ve used the name PAGESEG, and I’ve said that it will go into the STOTOM library. The Source file name, Source library, and Source member name parameters are superfluous because you’re going to create the file without using DDS specifications. We accomplish this by placing a specific file length in the Record length field. The exact record length must be 32766 bytes. The File type must be *DATA and not *SRC. The only other parameter is the Record format level check. This must be set to *NO. When you press Enter, an empty skeletal data file with a record length of 32766 bytes and no level checking will be created. This will be the container on the AS/400 for your AFP page segment source data.
Note that once you’ve completed this entire process, the physical file will become useless and can be deleted once the actual page segment has been created. However, in a production environment in which you might be bringing up multiple AFP page segment sources, you would probably choose to keep the file around and reuse it as a work area.
Step 2: Creating the Image
Okay! So now you’re all installed, setup, and configured, with our QDLS folder attached as a Windows drive letter and a special physical file created on the AS/400 to hold the AFP page segment source. What next? You’re almost ready to roll; you just need to obtain an image for conversion.
Obtain an Image
Since you’ll be using Windows and the AFP printer driver, you can use any Windows-compatible program to create an image. It can be something as simple as the Windows PAINT.EXE accessory or as sophisticated as Corel Draw. You can even grab an image off the Internet with a standard Web browser and print it as your image source. Any of these image sources will work as long as the program that displays them on your Windows desktop has the capability to print to a Windows printer.
If you’re building a production system in which you’ll be collecting images for multiple page segments, you may want to invest in a scanner. Obviously, the better the scanner, the better the resolution of the image that you obtain. Most scanners on the market use the standard Windows Acquire method to connect to Windows software, and most scanner manufacturers provide their own software for manipulating the image. More- sophisticated image manipulators can be obtained off the Internet as shareware. Paint Shop Pro is a good choice: It works with almost every scanner, and you can use it for a while to test its capabilities. If it suits your needs, you can license the program for a small fee. Best of all, it will give you some very powerful image-handling tools.
In the example I’m providing, I’m using a GIF file from my Web page. GIFs work, but the resolution is pretty grainy. TIF files are substantially larger, with better resolution. But again, the choice of your image’s source is really up to you. The AFP printer driver does the real work.
Step 3: Printing the Image to the AFP Printer Driver
Now that you’ve got an image, it’s time to create the AFP page segment source code. How do you do that? It’s simple: You merely have to print the image using the AFP printer. From within the program that is displaying the image, select File and then Print. Choose the AFP printer as the output device. When the image is sent out to the printer driver, you’ll be prompted for a name of a file. Direct the printer output to a file on your networked drive located in the previously defined QDLS folder. Give the file an eight-and-three
(xxxxxxxx.xxx) DOS-style file name such as MyPgeSeg.PSG. (Don’t use Windows 95 long file names here.) IBM recommends that you use the file extension PSG for page segments and OVL for overlays, but this isn’t a requirement. The actual printing to the file shouldn’t take very long, but it will depend upon the size of the graphic and the speed of your network connection to the QDLS folder. If you’re creating an overlay rather than a page segment, you’ll want to check the configuration of your AFP printer driver again. You should be able to do this from within the Windows application itself by selecting File, then Print, and clicking the Properties button, followed by the Options button.
Step 4: Converting the Image to an AS/400 Page Segment
Congratulations, you’re nearly there! If all has gone well, you should now have a page segment PC source file (MyPgeSeg.PSG) in the QDLS folder on the AS/400. The next step is to move it from a PC file format to an AS/400 database file format. To accomplish this, you will run the old PC Support Copy from PC Document (CPYFRMPCD) command. CPYFRMPCD is one of those legacy CL commands that was invented by the geniuses of IBM’s old PC Support Developer’s Group. It allows you to take a PC file out of a QDLS shared folder and directly import it into a DB2/400 database file. There isn’t another command exactly like it in the entire constellation of commands that IBM supplies. This is the reason why you need to use the QDLS file system in this process. Look at Figure 2 to see the exact parameters to run this import mechanism. Notice that the file you’re importing the AFP page segment source into is the same AS/400 DB2 file that you created with such care. Also note that you will be importing this file without using a translation table. That is, the Translate table option is set to *NONE. That’s because the AFP printer driver has generated actual AS/400 code from your image, code that is raring to be converted into a real AS/400 page segment. When the CPYFRMPCD command is completed, you may want to look at the resulting database file just to satisfy your innate curiosity about what this code looks like. Alas, it doesn’t look like much, but then it hasn’t been turned into a page segment yet. That’s next.
The command to accomplish the final compilation is called Create Page Segment (CRTPAGSEG). Note that if you were compiling an overlay instead, you would use the Create Overlay (CRTOVRLAY) command. These two commands are very similar in their parameter structures, but their output is very different. Look at Figure 3 and study the parameters of the CRTPAGSEG command. You provide a Name parameter and a Library parameter into which you want to store the resulting AS/400 object. My personal choice is to store all my page segments in their own special library. That way, some compulsively organized programmer who follows me won’t clean out the objects because he or she is unfamiliar with what a page segment is. (It happens, believe me!) Also note that the Member name parameter used in the example is the same as the File name parameter (i.e., PAGESEG) representing the AS/400 database file you created. At this moment of compilation, using the CRTPAGSEG command, it’s important to know exactly what this member name is. If you don’t enter the right member name, the page segment will not compile successfully.
When you press Enter, you should have a successful AS/400 page segment on your AS/400. If for some reason you don’t, go back to your AS/400 database file and verify that you set the length to 32766 bytes. If you did, make certain that the AFP printer driver is set to generate page segments and not documents. (These are the two most common mistakes people make.)
If you follow these steps, you can quickly develop a complete library of images on the AS/400. You can very easily run the CPYFRMPCD and CRTPAGSEG commands from your own custom CL program and accomplish everything in a single step. With this setup, a person could successively print images to the AFP printer driver, run your customized CL command, and very quickly build a library portfolio of all your converted product images on the AS/400. These page segments could later be used to illustrate bills of materials, product brochures, or whatever you like.
Step 5: Printing the Page Segment on IPDS or ASCII Printers
You’ll probably want to see what your final AS/400 page segment looks like. There are a number of ways to accomplish this. The traditional way is to build an RPG program to print the page segment using the appropriate DDS keywords. A second way—if you have the licensed IBM Advanced Function Print Utilities for OS/400—is to use the Start AFP Utilities (STRAFPU) command, select option 23 (Work with Page Segments), and then use option 6 to print the image. A third method is to print the source data that’s contained in the DB2 physical file (PAGESEG) using the Print AFP Data (PRTAFPDTA) command (see Figure 4). The output will go first to the outque of your choice and then to an IPDS printer or—using the Host Print Transform facility of OS/400—to an ASCII printer attached to your system. Unfortunately, I don’t have room here to go into all the details associated with printing page segments or overlays on various printer architectures, but perhaps I’ll make room in a future issue of the newsletter if there’s enough interest.
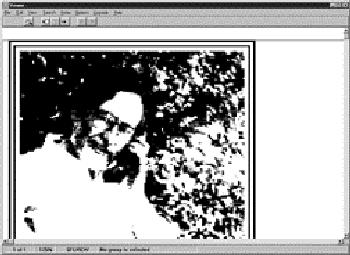
Once the spool file has been created, you can view it with the AFP Viewer that comes with Client Access/400. This feature of CA/400 is an important tool, because you cannot display an AFP spool file in a normal 5250 emulation green-screen display. The AFP Viewer overcomes this limitation by letting you retrieve the spool file and format it for your PC’s display screen. To do this, start the Operations Navigator, click on the icon representing your AS/400, and follow the expanding tree to the Output icon. When you click on the spool file created from your page segment, it will pull the printer codes to your PC and give you a rendering of the image itself. Once again, remember that the quality of the printed or displayed image is greatly dependent upon the quality of the original source image that you converted and compiled. TIFs usually have the highest resolution, and GIFs have the lowest. You can see the display of my GIF file in the AFP Viewer by looking at Figure 5.
Did You Take the AFP Challenge?
So there you have it, PC image to AS/400 image. You’ve walked through a conversion that makes you a real expert on PC-to-AS/400 connectivity. Now that you have a process for converting images and storing them on the AS/400, you can actually use RPG to incorporate the pictures into your printed reports. Try it! You’ll discover that the AS/400 is really a good platform for integrating images and forms with your company’s DB2/400 data.
References IBM AS/400 Support Line Technical Document Number 5184341
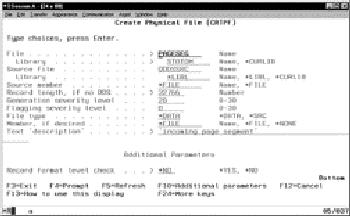
Figure 1: Creating a folder in the QDLS file system
Figure 2: Creating a special physical file for the page segment source
Figure 3: Compiling the page segment with the CRTPAGSEG command
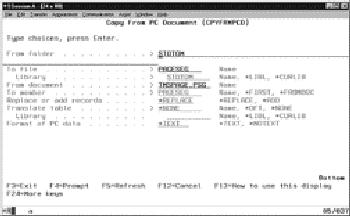
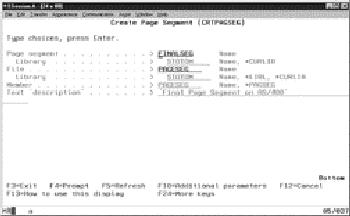
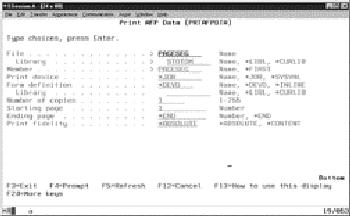
Figure 4: Printing the page segment source data with the PRTAFPDTA command
Figure 5: Viewing the page segment with the AFP Viewer


 More than ever, there is a demand for IT to deliver innovation. Your IBM i has been an essential part of your business operations for years. However, your organization may struggle to maintain the current system and implement new projects. The thousands of customers we've worked with and surveyed state that expectations regarding the digital footprint and vision of the company are not aligned with the current IT environment.
 TRY the one package that solves all your document design and printing challenges on all your platforms. Produce bar code labels, electronic forms, ad hoc reports, and RFID tags – without programming! MarkMagic is the only document design and print solution that combines report writing, WYSIWYG label and forms design, and conditional printing in one integrated product. Make sure your data survives when catastrophe hits. Request your trial now! Request Now.
 Forms of ransomware has been around for over 30 years, and with more and more organizations suffering attacks each year, it continues to endure. What has made ransomware such a durable threat and what is the best way to combat it? In order to prevent ransomware, organizations must first understand how it works.
 Disaster protection is vital to every business. Yet, it often consists of patched together procedures that are prone to error. From automatic backups to data encryption to media management, Robot automates the routine (yet often complex) tasks of iSeries backup and recovery, saving you time and money and making the process safer and more reliable. Automate your backups with the Robot Backup and Recovery Solution. Key features include:
 Business users want new applications now. Market and regulatory pressures require faster application updates and delivery into production. Your IBM i developers may be approaching retirement, and you see no sure way to fill their positions with experienced developers. In addition, you may be caught between maintaining your existing applications and the uncertainty of moving to something new.
 IT managers hoping to find new IBM i talent are discovering that the pool of experienced RPG programmers and operators or administrators with intimate knowledge of the operating system and the applications that run on it is small. This begs the question: How will you manage the platform that supports such a big part of your business? This guide offers strategies and software suggestions to help you plan IT staffing and resources and smooth the transition after your AS/400 talent retires. Read on to learn:
LATEST COMMENTS
MC Press Online