


If you have a Microsoft Windows NT server on the same LAN or WAN as your AS/400, you can quickly, easily, and inexpensively set up a dial-up access service for remote access to your AS/400 and the rest of your network. Remote computers using this connection can be configured to perform many tasks in the same way a user would be able to execute them at the office. These tasks include using the Internet and email, display and printer emulation, file transfer and FTP, mapping network drives, and accessing AS/400 data using Access or Excel via an ODBC driver.
In this article, I will describe a dial-in solution and tell you how you can use the free Remote Access Service (RAS) that comes with your Windows NT server to implement it. Included on your Windows NT CD-ROM, RAS is easy to install and configure, and it provides remote access via analog phone lines and asynchronous modems (up to 256 per server). You can also provide various levels of security for your dial-in connections by using Windows NT’s administrator options.
My Test Environment
Since network configurations vary from location to location, having some knowledge about my testing environment is very helpful. My NT server, AS/400, and the remote computer all use the TCP/IP protocol. The NT server and the AS/400 can see each other on the LAN, and the AS/400 is not generally accessible via the Internet. For this article, I used the following software versions:
• NT Server 4 with Service Pack 3
• OS/400 V4R1
• Windows 95 (at the remote computer) running Client Access V3R1M3 with the most recent service pack installed
Performance Considerations
What about performance? Bandwidth is very limited when dialing in from a remote computer as compared to a local connection. Tasks requiring a minimal amount of network transmission, including email and AS/400 display and printer emulation, perform quite well. Running network-based applications (stored on the server and transmitted to the remote computer before opening) are not practical. One good way to leverage your
bandwidth is to install static networking software such as email, emulation, and office applications on the remote computer’s hard drive.
RAS Installation
Installing RAS on an NT server is very easy. To keep it simple, I’ll describe how you attach a single external modem to the NT server’s COM2 port. To view a list of modems (and multiport serial devices) compatible with NT, open and view the file named HCL.HLP in the Support folder on the NT CD-ROM. RAS Installation requires rebooting the server, so be sure to install during off-hours if the server is in production.
First, connect your modem to the COM2 port and the phone jack and turn the modem on. Next, place your NT Server CD-ROM in the NT Server drive that was used during initial NT Server installation.
To begin installing the RAS software, go to the Control Panel and start the Network applet. Click the Services tab and the Add button. Locate and select Remote Access Service and click OK. Follow the instructions on the screen.
During your initial installation, no modem drivers will exist, and the install program will ask you if you wish to run the Modem Installer. Choose Yes, and RAS will attempt to detect your modem. Whether it detects your modem or you select it from a list, it will eventually request you to select which port to install it on. In this case, I selected COM2. After the modem installation phase, a confirmation window titled Add RAS Device will be displayed. The correct modem and port should be shown, so click OK.
At this point, the Remote Access Setup window (Figure 1) is shown. This is a summary of the ports and devices (modems, in this case) available to RAS. Verify that the new port/device is configured to only receive calls by selecting the port/device and clicking Configure. Choose Receive calls only on the Configure Port Usage screen that appears. Click OK to save your changes.
Next, configure the RAS network settings by clicking the Network button on the Remote Access Setup window.
The Network Configuration window (Figure 2) will be shown. Ignore the Dial out Protocols since you have configured the server to receive calls only. Click the NetBEUI and TCP/IP check boxes for remote clients, and then click the TCP/IP Configure button.
The RAS Server TCP/IP Configuration window is shown next (Figure 3). To make sure your AS/400 can be accessed through RAS, click on the Entire network radio button. The remainder of the window deals with assigning Internet Protocol (IP) addresses to remote computers that dial in. The simplest method is to use a static address pool. For example, if you have eight modems for receiving calls, enter a range spanning eight IP addresses. If you already use Dynamic Host Configuration Protocol (DHCP) to assign IP addresses for local computers, you can choose this option instead. There can be some (solvable) quirks with DHCP and RAS, so be prepared to troubleshoot them. (The Microsoft Support Online Knowledge Base on the Web at http://support.microsoft.com/support/c.asp can be very helpful with troubleshooting tasks.) Click OK.
Upon returning to the Network Configuration window (Figure 2), notice the encryption settings. The most secure option on this screen, Require Microsoft encrypted authentication combined with Require data encryption, is available only if all remote users are NT clients. If your remote users include Windows 95 clients, select Require encrypted authentication. Click OK.
At the Remote Access Setup window (Figure 1), click Continue. Follow the instructions on the screen and reboot the server when requested. By default, the RAS service is configured for automatic startup. As with other services, you can stop and start RAS as needed or you can reconfigure RAS for manual startup.
Granting User Access to RAS
Besides the basic software and hardware requirements, a remote user must have a user account on the NT server. Furthermore, the user’s account must specify that RAS access is permitted. Additional security measures are also available.
For example, RAS can be configured to immediately disconnect the remote computer and call it back at a preset telephone number stored in the user account. This prevents connections from unauthorized locations. Once connected to RAS, the rights in the user’s account will be honored as if the user signed on locally.
One way to grant RAS access permissions is with the User Manager for Domains program. On a particular user’s account, click the Dialin button to display the Dialin information screen shown in Figure 4. Specify that dial-in permission is granted. You may also specify callback options as mentioned earlier. For now, specify No Call Back. Configuration on the server is now complete.
Preparing the Remote Computer
The Windows 95 Dial-Up Networking software is used to establish a connection with RAS. If you don’t see Dial-Up Networking under My Computer, use the Add/Remove Programs applet in the Control Panel to install it. In the Add/Remove Programs applet, Dial-Up Networking can be installed from the Communications programs under the Windows Setup tab.
Once you have installed the program, go to Dial-Up Networking and run the Make New Connection Wizard. Enter the name of the NT Server, select your modem, and click Next. Key in the phone number for the modem that is attached to your NT RAS server and click Next. Finally, click Finish.
Right-click on the newly created connection and select Properties. Then, click the Server Types button. In the Server Types window (Figure 5), click on the Type of Dial-Up Server drop-down box and choose Point-to-Point Protocol (PPP): Windows 95, Windows NT 3.5, Internet. In the Advanced Options section, select both Log on to network and Enable software compression. If you specified require encrypted authentication on the NT server’s RAS network configuration, then click on the Require encrypted password check box. In the Allowed network protocols section, select TCP/IP. You may also need to select NetBEUI (recommended) to access certain browsing functions. Then, click the TCP/IP Settings button.
The TCP/IP Settings window is then shown (Figure 6). Turn on the Server assigned IP address and Server assigned name server addresses radio buttons.
You should also place check marks in the options shown at the bottom of the screen: Use IP header compression and Use default gateway on remote network. Then, click OK repeatedly until you return to the Dial-Up Networking window.
If the remote computer has a workgroup name that is different than what is used on your RAS server, you may not be able to browse the RAS server’s Network Neighborhood in its entirety after connecting to RAS. Change the remote computer’s workgroup to match the RAS server’s workgroup by going to the Control Panel and opening the Network applet. Under the Identification tab, change the workgroup name.
Connecting to RAS
At the remote computer, go to My Computer and open up the Dial-Up Networking folder. Double-click the icon for the NT server. The user name and password that you specify must match an account that exists on the NT server. Click the Connect button. A small window will appear that tracks your connection progress.
Once you are connected, start checking things out from your Windows desktop. Check out your server-assigned IP address by selecting Start, Run, typing in WINIPCFG and clicking OK. On the IP Configuration window that appears, click the More Info button. Review your IP address; it should be one from the static pool of addresses defined with the RAS network configuration or from the range of addresses your DHCP server assigns. Look at the Domain Name System (DNS) Server IP addresses. These addresses are used for browsing the Internet by host name and should be the same IP addresses you
would see if running WINIPCFG at a locally attached computer. After your review, click OK.
Test your connection to the NT Server by using PING and the NT server’s IP address. For example, if your NT server’s IP address is 127.0.0.1, type in PING
127.0.0.1 from the Start, Run command line. PING your AS/400 in the same manner. If that works and your NT server is connected to the Internet, PING an external Web server by its IP address. Finally, test your DNS server by pinging the same external site by name. Next, you can map a drive letter to an NT-shared directory by right-clicking Network Neighborhood and choosing Map Network Drive. If you’re able to do all these things so far, pat yourself on the back.
How about signing onto the AS/400? Click the Start button and then Run. Where
xxx.xxx.xxx.xxx is your AS/400’s IP address, key in the following command and then
click OK:
telnet xxx.xxx.xxx.xxx
You should see a sign-on screen when you do this. Go ahead and sign on. Not all standard emulation features will work, but you can see that you can get around some. Sign off by clicking on the Connect drop-down menu from the Telnet menu and then Disconnect. Then, click Connect, Exit to terminate your Telnet application.
For a better terminal session than Telnet, install your favorite TCP/IP emulation software. Choosing one that supports printer emulation over TCP/IP, such as Client Access, is a plus. You’ll find emulation works very well over this connection and provides good response time.
Other Common Tasks
After you’ve done some 5250 emulation, try browsing the Internet and sending and receiving email. These functions should be just as easy to set up and use as if you were at the office. If you can get to other AS/400 systems from the office, you should be able to Telnet and FTP to those too. Try it.
The RAS Administrator
By now, if you’ve been using this article as a learning tool, you’ve experienced the RAS server setup and what it’s like to connect from a remote computer. But how do you manage, control, and monitor dial-in access? You use the RAS Administrator.
At the NT server click on Start, then Programs, and then Administrative Tools. There you’ll see the Remote Access Admin panel (see Figure 7). You use this program for a variety of functions including maintaining authorized RAS users (an alternative to the User Manager Dialin button), checking how many ports are in use, and seeing who’s logged on and for how long.
To work with RAS user permissions, click the Users drop-down menu and then Permissions. The Remote Access Permissions window will be shown. Note that you can easily grant or revoke permissions for all users from this screen. Click OK to return to the Remote Access Admin window.
If you wish to see who is using the RAS ports, double-click on the name of the desired server. A window labeled Communication Ports is displayed. For each port, you can see the user logged in. Note that you can disconnect the user from this screen. To see additional details about the connection, click the Port Status button. On the Port Status window, you can view details such as bytes sent and received and remote workstation IP address.
Managing Your RAS Connections
There are two functional areas on the NT server for dealing with RAS. To configure RAS, such as adding new ports/devices or changing TCP/IP settings, go to Control Panel, Services, and Remote Access Service. Expect to reboot the server any time
you make a change in this area. To monitor RAS or grant and revoke user permissions, run the Remote Access Administrator from the Programs menu.
After becoming familiar with RAS on a small scale, you may wish to set it up for many of users. If so, do some homework on multiport serial devices. These third-party devices are usually sold with an adapter card that installs in the NT server. The multiport device plugs into the adapter card, and several modems plug into the multiport device. Some multiport devices can even be chained together. Review the NT Server Hardware Compatibility List for more information. You still need one phone line per modem with this solution.
If your NT server is connected to the Internet, I recommended that you research the Point-to-Point Tunneling Protocol (PPTP) before investing a lot of money into your own bank of modems.
Figure 1: The Remote Access Setup window is a summary of the ports and devices (modems, in this case) available to RAS. It is also used to configure your RAS setup.
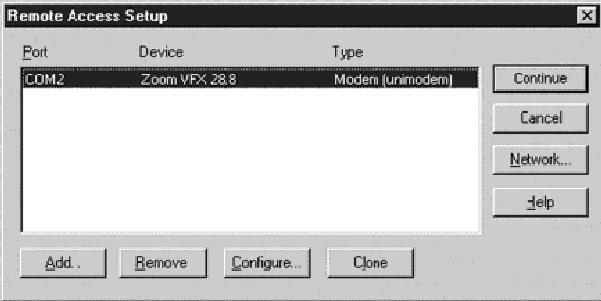
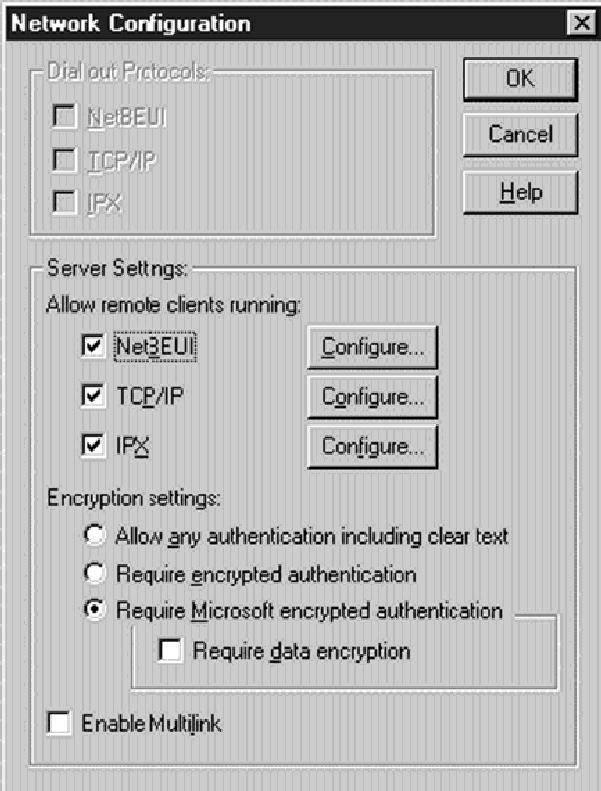
Figure 2: The Network Configuration window allows you to specify the protocols to use and encryption settings.
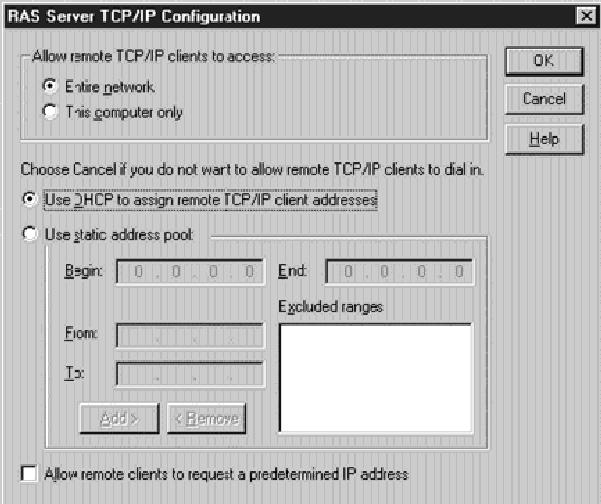
Figure 3: The RAS Server TCP/IP Configuration window is used to specify that the remote user can access the entire network (including AS/400s) and to specify how IP addresses are assigned.
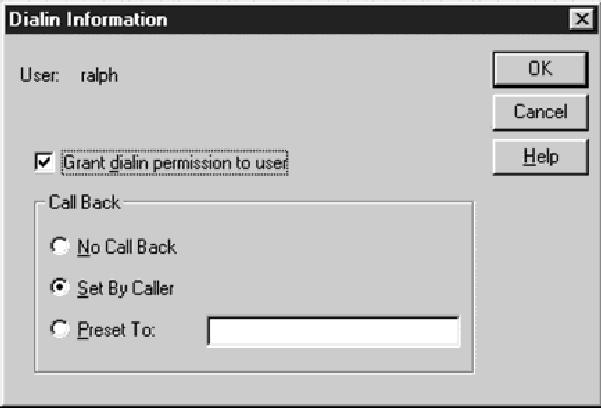
Figure 4: You give your Windows NT users dial-in permission by using the Dialin Information panel in the User Manager for Domains program.
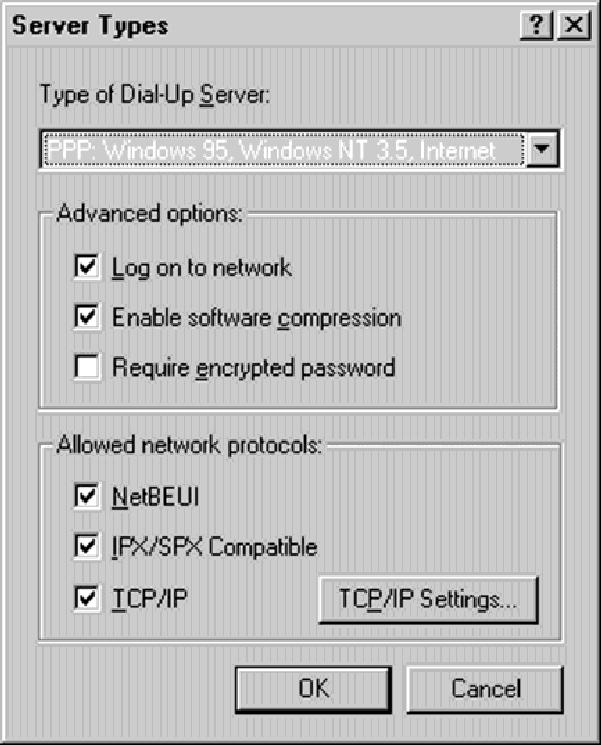
Figure 5: The Server Types window tells the Windows client how to talk to the RAS server.
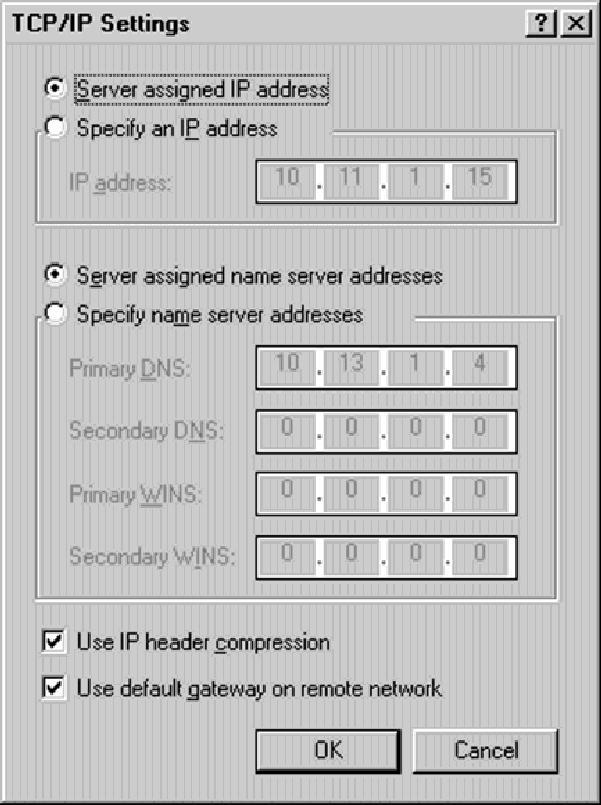
Figure 6: The TCP/IP Settings windows tells the Windows client that the RAS server will assign the client a TCP/IP when dialing in.

Figure 7: The RAS Administrator program lets you manage, control, and monitor dial-in access.

 More than ever, there is a demand for IT to deliver innovation. Your IBM i has been an essential part of your business operations for years. However, your organization may struggle to maintain the current system and implement new projects. The thousands of customers we've worked with and surveyed state that expectations regarding the digital footprint and vision of the company are not aligned with the current IT environment.
 TRY the one package that solves all your document design and printing challenges on all your platforms. Produce bar code labels, electronic forms, ad hoc reports, and RFID tags – without programming! MarkMagic is the only document design and print solution that combines report writing, WYSIWYG label and forms design, and conditional printing in one integrated product. Make sure your data survives when catastrophe hits. Request your trial now! Request Now.
 Forms of ransomware has been around for over 30 years, and with more and more organizations suffering attacks each year, it continues to endure. What has made ransomware such a durable threat and what is the best way to combat it? In order to prevent ransomware, organizations must first understand how it works.
 Disaster protection is vital to every business. Yet, it often consists of patched together procedures that are prone to error. From automatic backups to data encryption to media management, Robot automates the routine (yet often complex) tasks of iSeries backup and recovery, saving you time and money and making the process safer and more reliable. Automate your backups with the Robot Backup and Recovery Solution. Key features include:
 Business users want new applications now. Market and regulatory pressures require faster application updates and delivery into production. Your IBM i developers may be approaching retirement, and you see no sure way to fill their positions with experienced developers. In addition, you may be caught between maintaining your existing applications and the uncertainty of moving to something new.
 IT managers hoping to find new IBM i talent are discovering that the pool of experienced RPG programmers and operators or administrators with intimate knowledge of the operating system and the applications that run on it is small. This begs the question: How will you manage the platform that supports such a big part of your business? This guide offers strategies and software suggestions to help you plan IT staffing and resources and smooth the transition after your AS/400 talent retires. Read on to learn:
LATEST COMMENTS
MC Press Online