


Most shops have trouble getting AS/400 reports to print correctly on a networked printer. There are always gaps, strange characters, and landscape-versus-portrait issues. The simple techniques presented in this article show you how to modify your AS/400 output queues to print flawless ASCII printouts to your TCP/IP Line Printer Daemon- networked printers.
Ever since IBM made it possible to attach printers to the AS/400 via TCP/IP Line Printer Daemon output queues, our lives have been easier. Being able to print AS/400 output to any laser printer that’s attached to your WAN saves time and money: It saves time because the IP printers that were used exclusively for printing Word documents and spreadsheets can now be used to print reports generated on the AS/400. It saves money because, instead of buying printers to use solely for printing AS/400 reports, you can use the same printers that are already attached to your WAN.
But this convenience comes with a price. The printouts look nice, but in most cases there are gaps, or blank sections, on the printout. These gaps are generally on the right and bottom of the report. They waste paper, and they confuse users. Your users want to know why their reports don’t fill the entire page. You may be able to address these problems, or you may not. If you can address them, the answers you provide usually leave users more confused than before. They were simply concerned with unused space on the report. Now, they’re trying to decipher the terms IP Printer and Workstation Customization Object.
Our shop ran across this problem a while ago, and I was determined to find a solution. I had never heard of a Workstation Customization Object before, but by chatting with other users via the Internet, I was provided with enough clues to head into new territory.
What Is a Workstation Customization Object?
A Workstation Customization Object (WCO) is exactly what it sounds like: It is an object that allows you to customize a workstation device (such as a printer). When a WCO
is used with an AS/400 printer output queue, it allows you to customize printing functions ranging from font to line spacing. In this article, I will focus on setting up a WCO for an HP5SI printer connected to our AS/400 and networked through a Line Printer Daemon/Line Printer Requester (LPD/LPR) output queue. Although these techniques can be applied to other types of printers, this article deals solely with the LPD/LPR implementation of this technique. (To see how a WCO can be used with a PC5250 printer session, see the sidebar, “Hey! Workstation Customization Objects Work with PC5250, Too!”)
For this article, I’ll assume that you have already set up an LPD/LPR remote printer on your AS/400 that directs reports to your Internet Protocol (IP)-networked printer. The sample solutions I’ll present will not only fill in the empty spaces, or gaps, in your printouts, but they will also enable you to print on 8.5 x 11 or 11 x 17 inch paper simply by directing the printout to another output queue. I will also provide an Internet link to sample WCO source code that you can download and install for use on your machine.
While this article is only an introduction to using a Workstation Customization Object, it should be enough to get you started customizing your own network printers to print just right. For more information on creating, modifying, and assigning WCOs to AS/400 output queues, consult the OS/400 Workstation Customization Programming V4R3 manual (see the References section at the end of the article).
Getting Started
The first thing you need to do is retrieve the source code for the WCO for the HP5SI printer. To do this, use the Retrieve Workstation Customization Source (RTVWSCST) command as follows:
RTVWSCST DEVTYPE(*TRANSFORM) +
MFRTYPMDL(*HP5SI) +
SRCMBR(HP5SISAMP) +
SRCFILE(QGPL/QTXTSRC)
The Device type (DEVTYPE) parameter must be specified as *TRANSFORM. The Manufacturer type/model (MFRTYPMDL) parameter can be selected from a list by pressing F4 (Prompt). In this list, you’ll find printer models from a number of major PC printer manufacturers, including Hewlett-Packard, Epson, NEC, Okidata, and Panasonic, so you should be able to find a model you can use with your printer. The Source member (SRCMBR) parameter specifies the source member name where you wish to store the Workstation Customization source. Finally, the Source File (SRCFILE) parameter tells you the source file and library in which to store the source member.
The second step is to edit the source you have just retrieved. Using PDM or your favorite source editor, open the source. If you have never seen a WCO source before, it may look like gibberish at first, but don’t fret. Later in this article, I’ll explain the basic changes needed to eliminate the gaps on your reports and how to create a second WCO for the HP5SI that will allow you to print on 11 x 17 inch paper.
The third step, after editing the source and making the required changes, is to create the WCO. To do this, you use the Create Workstation Customization Object (CRTWSCT) command as follows:
CRTWSCST WSCST(QGPL/HP5SISAMP) +
SRCFILE(QGPL/QTXTSRC)
The CRTWSCT command requires only one parameter, and that is where the source file is located. As you can see in this example, you specify the library you wish to place the WCO in and the WCO’s name. The source file parameters default to the QTXTSRC Source file member with the same name as your WCO.
Finally, after creating the WCO, you need to assign it to your printer’s output queue. This requires the following three steps:
1. End the writer associated with the output queue by using the End Writer (ENDWTR) command as follows:
ENDWTR WTR(outqname)
2. Use the Change Output Queue (CHGOUTQ) command to modify your output queue to reference the WCO definition you just created:
CHGOUTQ OUTQ(outqname) MFRTYPMDL(*HP5SI) +
WSCST(QGPL/HP5SISAMP)
3. Restart the remote writer by using the Start Remote Writer (STRRMTWTR) command:
STRRMTWTR OUTQ(outqname)
After you have assigned the WCO to an output queue, try printing a sample report. If you didn’t make any changes to the source, it should look the same as it did before you assigned the WCO. If you did make changes, the printout will reflect the changes you made to the source code. You can now do some fine-tuning simply by editing the source code and re-creating the WCO. You only need to perform the above three steps once. It is not necessary to stop and restart the writer after you have assigned the WCO to its output queue.
Eliminating Gaps with the VARLSPC and CPICOR Tags
Now that you understand how to retrieve, edit, create, and assign a WCO to an output queue, let’s focus on the changes needed to eliminate the gaps left by the default WCO. This may take some tweaking on each system, but you need to change variables in only a few WCO source tags. Start off by looking at the changes I made to my source to make it work for my particular printer. These changes are shown in Figure 1.
The first term you need to recognize is tag. A tag is anything in the source that is preceded by a colon. For example, one of the tags you will be dealing with is :VARLSPC, or the Variable Line Spacing tag. The indented parameters following a tag are specific to that tag’s function.
Look at the changes I made in Figure 1 to the variables under the VARLSPC tag. This tag helps you eliminate the gap on the bottom of the page. It does this by allowing you to control the amount of space from the top of one line to the top of the following line. The only parameters that concern you in the tag area are the Conversion Ratio Denominator (CVNDEN) and the ACSCII Control Sequence (DATA) parameters.
The DATA parameter may look a bit intimidating, but you need to focus on only the two characters following the 2E in the sequence. The 2E is the hexadecimal representation for a decimal. The 39 following it is the hexadecimal representation of the number 9. So, these 4 bytes, for simplicity’s sake, should be read as “.9”. The CNVDEN parameter is much easier to read; it is simply the number 48.
The CNVDEN parameter, combined with the DATA parameter, is what you use to control the variable line spacing. It helps to think of these two parameters as one value so that this example represents the number 48.9, the variable line spacing value that works on our system. These numbers are tweaked by raising or lowering this value until you find a setting that is just right for your system.
If I want to raise the line spacing value, for example, I could change the CNVDEN parameter to 49 and change the DATA portion to 2E31. This combination would represent
49.1. If I want to lower the value, I could change the CNVDEN portion to 48 and change the DATA portion from 2E39 down to 2E38 for 48.8. If I want to lower this value even
further, I could continue dropping it until I reached 2E31, representing 48.1. If I need to go even lower, I would subtract 1 from the CNVDEN parameter to 47, and reset the DATA portion to 2E39, representing 47.9.
Some reports may print blank pages between pages or include one or two overflow lines from the previous page on a new page. In this case, you will lower these values until you find the correct setting for your printer. If you still find gaps on the lower part of the report, raise the value until your printouts look right.
The Character-per-inch (CPI) Computer Output Reduction (CPICOR) tag is much easier to understand. This tag simply tells the printer which font/size combination to use for a particular report. In Figure 1, I specified two CPICOR tags. The first is for reports that print with an original CPI setting of 10. The second is for reports with an original CPI of
12. Notice that the ASCII font (ASCIIFNT) and Font width (FNTWTH) parameters are different for each of these. The Font attribute (FNTATR) parameter stays consistent at 1, which tells the system that you are using a fixed-pitch font. Changing these parameters helps you fill in the gaps on the right-hand side.
The DATA par-ameter on the CPICOR tag could be used in place of the ASCII- FNT and FNTWTH parameters. Not to be confused with the DATA par-ameter of the VARLSPC tag, you use this DATA parameter to specify the Printer Control Language (PCL) code that represents the font, pitch and attributes you want to use. Unless you are familiar with PCL codes, it might be wise to steer clear of this approach until you are more comfortable using the WCO. I have included the URL for Hewlett-Packard’s PCL pages in the References section. There you should find every code you need to start using this parameter.
Printing on 11 x 17 Inch Paper
If your company has an HP5SI, you probably know that you can print on two sizes of paper. Once users realize this, they will definitely want the option to print on either size. You can easily do this with a WCO.
For my printer, I created a second remote output queue, pointed it to the same IP address as the first, created another WCO, and attached it to this new output queue. If users wish to print their report on the larger paper, they simply reroute the report to the second output queue.
Setting up the WCO to print on the larger paper was a little more work, but after the final tweaking was done, the users were very happy with the results. The major changes to point out on this WCO are the Page Size (PAGSIZE) tags. For every page size available, I specified the PCL command in the DATA parameter to use the 11 x 17 inch paper. A sample of this parameter can be seen in Figure 2. Again, go to the HP PCL Web site for listings and explanations for the PCL codes available for the HP printers.
All the tags I have discussed here—along with many other useful tags you can use for WCO programming—are explained in greater detail in the OS/400 Workstation Customization Programming V4R3 manual.
Sample Source Available for Download!
After I had figured out how to solve these problems, I knew that others must also be struggling with their IP printers. I posted a note on the Internet indicating that I would provide the sample source if people wanted it and that they should email me for a request. The response was so overwhelming that I decided to post the source on my Web site, as well as instructions on how to download and install the source. I have received numerous emails saying that the samples were enough to get people going, and, in some cases, were working great without any tweaking at all. This technique allowed those who were previously struggling with printing problems to solve them in minutes.
To get my sample WCO source code, go to prairie.lakes.com/~bvstone/download. html. For instructions on downloading and installing these samples, go to prairie.lakes.com/~bvstone/ wco.html. These samples, along with basic explanations of the
most important tags, should get you well on your way to getting rid of those annoying gaps on your reports.
More About WCO
The AS/400 Support Line Knowledge Base Web site contains information for those of you who wish to learn more about Workstation Customization Objects. Point your browser to as400service.ibm.com/as4sde/slkbase.nsf.
Then, select the Web View-Print link. Under Sub-Function, click on the Advanced Function Print (AFP) drop-down arrow. Find the Host Print Transform (HPT) link, and click on the drop-down arrow. There, you will find the Workstation Customizing Objects (WSCST) dropdown, which will lead you to even more information.
References
HP LaserJet Printers—PCL Commands, Basic Page Formatting, and Font Selection Web page at www.hp.com/cposupport/printers/support_doc/ bpl02705.html
OS/400 Workstation Customization Programming V4R3 (SC41-5605-00, CD-ROM QB3AQ600), available online from the IBM AS/400 Online Library at publib.boulder.ibm.com/html/ as400/online/v4r3eng.htm
Hey! Workstation Customization Objects Work with PC5250, Too!
After reading Brad’s article, “Fill the Gaps with Workstation Customization Objects,” I started experimenting with WCO on AS/400 printer sessions that were created with the PC5250 software that comes with Client Access for Windows 95/NT and the new Express Client. And guess what? WCOs work with these programs, too. Here’s how I applied Brad’s techniques to the AS/400-to-PC PC5250 printer world.
I wanted to create a WCO for the Hewlett-Packard OfficeJet 600 printer in my office that is configured as a PC5250 printer session named JHPRT1. The variable line spacing was too close together so that there were no gaps between AS/400 printer report lines. Since there was no WCO source code for an HP 600 printer, I retrieved the source code for an HP 540 printer, modified the line spacing parameters according to Brad’s article, and created a new WCO called HP600 in the Hertvik library.
To explore how I created this WCO on my AS/400, please read Brad’s article and follow the directions for creating a WCO. Even though that article was written for an AS/400 remote writer using TCP/IP, the information about retrieving and modifying WCO source code and creating WCO objects applies in any situation.
Once my new WCO was created, I assigned it to my printer by performing the following steps:
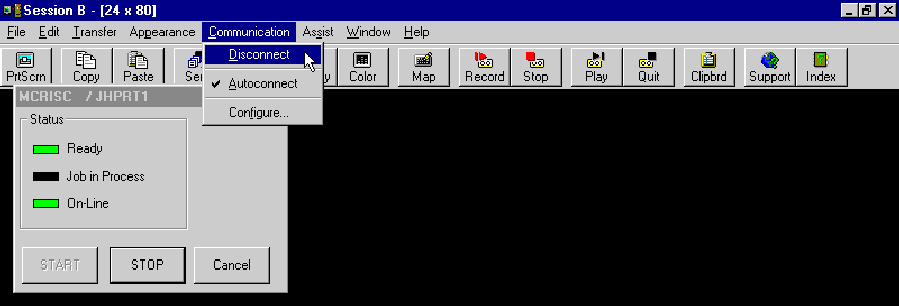
1. I disconnected my PC5250 printer from the AS/400. I did this by going into the PC5250 printer session I wanted to assign a WCO for, clicked on the Communication menu bar item, and selected the Disconnect option from the drop-down menu that appeared (Figure A). This action disconnected the printer from the AS/400 and changed its status to “Vary On Pending.”
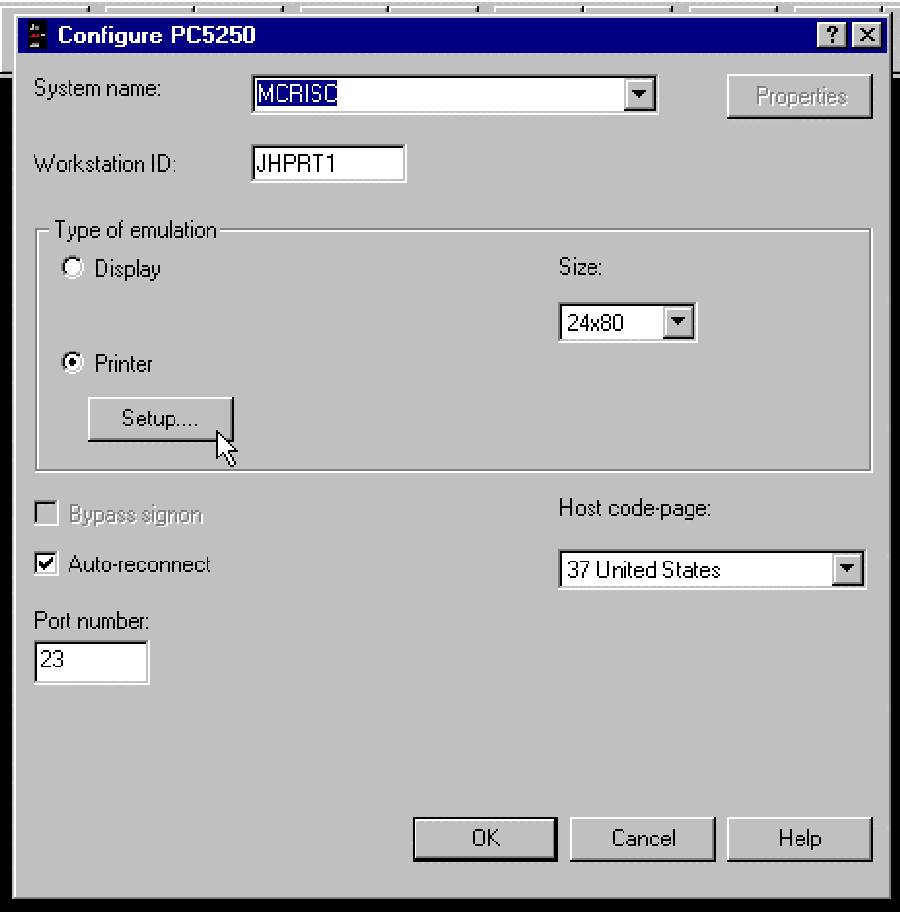
2. In PC5250, I again clicked on the Communication menu bar item and selected the Configure option to change the printer’s configuration. This step brought up the Configure PC5250 screen shown in Figure B.
3. On the Configure PC5250 screen, I clicked on the Setup button for my printer to get to the PC5250 Printer Emulation Setup screen shown in Figure C. On this screen, I made the changes described in steps four through six. These changes tell PC5250 that I am going to use the AS/400 HP600 WCO to configure my AS/400-to-PC printer output.
4. I clicked the “Transform print data to ASCII on AS/400” check box to On. By placing a checkmark there, I informed PC5250 that OS/400 will handle the EBCDIC-to-ASCII printer translation for my HP 600 PC printer.
5. I clicked on the Printer model dropdown box and selected the “Other Printer” option. This box can also be used to specify other predefined EBCDIC-to-ASCII translations that are available on your AS/400. However, since the HP 600 is not contained on that list, I ignored this setting by telling PC5250 that another translation table will be used (my WCO).
6. I then entered the name and library of the WCO in the “Customizing Object” and “Library” fields at the bottom of the screen. This action tells PC5250 that the HP 600 object in Hertvik library will be used to translate AS/400 printouts to ASCII for this printer. At that point, my screen looked like the one shown in Figure C.
7. WCO support was activated the next time my PC5250 printer session attached to the AS/400. OS/400 looked at the changed parameters I passed to it with my session initialization, and it modified the printer device for my session.
After this point, the AS/400 began using my HP600 WCO to format AS/400 printouts to print on my PC5250 printer. Similar to Brad’s article, I can now change my WCO source and re-create the object. However, I found that for PC5250 to use the updated WCO, I needed to disconnect (vary off) my PC5250 printer and vary it back on again before the changes took effect.
So, that’s it: a simple, easy way to use Workstation Customization Objects for your AS/400-to-PC PC5250 printers as well as your LPD-attached remote writers. With Client Access for Windows 95/NT V3R2 and the new Express Client product, you too can take advantage of this valuable AS/400 feature.
— Joe Hertvik
Figure A: Before you can assign a WCO to your PC5250 print session, you must disconnect your printer from the AS/400
 |
 |
 |
:PAGSIZE
PAGWTH= 8390
PAGLEN=11338
DATA ='1B266C3641'X.
Figure 2: Sample PAGSIZE parameter for using 11 x 17 inch paper

 More than ever, there is a demand for IT to deliver innovation. Your IBM i has been an essential part of your business operations for years. However, your organization may struggle to maintain the current system and implement new projects. The thousands of customers we've worked with and surveyed state that expectations regarding the digital footprint and vision of the company are not aligned with the current IT environment.
 TRY the one package that solves all your document design and printing challenges on all your platforms. Produce bar code labels, electronic forms, ad hoc reports, and RFID tags – without programming! MarkMagic is the only document design and print solution that combines report writing, WYSIWYG label and forms design, and conditional printing in one integrated product. Make sure your data survives when catastrophe hits. Request your trial now! Request Now.
 Forms of ransomware has been around for over 30 years, and with more and more organizations suffering attacks each year, it continues to endure. What has made ransomware such a durable threat and what is the best way to combat it? In order to prevent ransomware, organizations must first understand how it works.
 Disaster protection is vital to every business. Yet, it often consists of patched together procedures that are prone to error. From automatic backups to data encryption to media management, Robot automates the routine (yet often complex) tasks of iSeries backup and recovery, saving you time and money and making the process safer and more reliable. Automate your backups with the Robot Backup and Recovery Solution. Key features include:
 Business users want new applications now. Market and regulatory pressures require faster application updates and delivery into production. Your IBM i developers may be approaching retirement, and you see no sure way to fill their positions with experienced developers. In addition, you may be caught between maintaining your existing applications and the uncertainty of moving to something new.
 IT managers hoping to find new IBM i talent are discovering that the pool of experienced RPG programmers and operators or administrators with intimate knowledge of the operating system and the applications that run on it is small. This begs the question: How will you manage the platform that supports such a big part of your business? This guide offers strategies and software suggestions to help you plan IT staffing and resources and smooth the transition after your AS/400 talent retires. Read on to learn:
LATEST COMMENTS
MC Press Online