


Virtualizing has never been easier!
What is i-hosting-i? As the name implies, the i-hosting-i technology is simply an environment where an IBM i partition virtualizes resources for another IBM i partition. The hosting partition is often referred to as the host or server partition, and the hosted partition is typically known as the client partition. The client partition utilizes virtual resources from the host partition and typically has no physical hardware directly assigned to it. The host partition can virtualize the following hardware for the client: disk, tape, optical media, and networking. The client can have a mixture of virtual and physical hardware assigned to it (i.e., the client does not have to be a pure virtual image).
Why Should I Use i-hosting-i?
Implementing i-hosting-i offers several advantages and benefits:
- Maximize the utilization of physical I/O by virtualizing existing resources, making for a better return on investment
- Take advantage of virtualization using your existing IBM i skills
- Make use of broad hardware support (more details on this below)
- Achieve simple, efficient network virtualization; one network adapter can virtualize Ethernet for many hosted clients
- Host a 6.1 partition on a 7.1 partition, and vice versa
- Create new logical partitions without dedicated or additional I/O
- Automatically save client backup data when the hosting partition is saved
- Rapidly deploy partitions by cloning client partitions
What Are the Supported Configs?
As previously mentioned, there is a wide range of support for i-hosting-i. Any IBM POWER6 or IBM POWER7 server that supports IBM i 6.1 or higher is supported. Likewise, any storage, network adapter, tape device, or optical device that supports IBM i 6.1 or higher is supported.
How Do I Set Up i-hosting-i?
The main requirement for utilizing i-hosting-i is having adequate storage capacity in the host partition to create the virtual disks for the client partitions. If you have disk arms that are being lightly used, both in terms of activity and storage utilization, then you're good to go for i-hosting-i.
Create Client Partition/Create Virtual SCSI
The first step in setting up i-hosting-i is to create a new client partition. And the key step while creating the client partition is configuring the virtual SCSI adapter pairings between the host and client partitions. The following example will walk you through the steps to set up the virtual SCSI mappings between the host and the client partitions. In our example, we assume the usage of a Hardware Management Console (HMC). No HMC? No problem! To learn more about utilizing i-hosting-i without an HMC, check out this IBM Redpaper.
For assistance in creating a new logical partition, please reference this Redbook.
Server/Client Virtual SCSI Overview
The virtual SCSI adapters must map correctly between the host partition and the client partition. The example below illustrates the proper pairing.
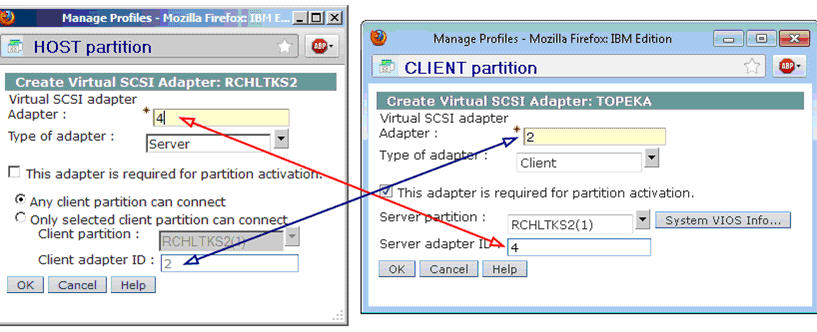
Figure 1: The host and the client partitions must be mapped like this.
Host Partition
From the HMC, select the host partition and edit the profile. Select the Virtual Adapters tab and click on Actions > Create Virtual Adapter > SCSI Adapter. In our example, the server adapter ID is 4, and the client adapter ID is 2. The adapter type must be set to Server on the host partition. Once the client partition has been created, we can specify the mappings to allow only the specific client partition to connect. But for now, we will allow any client partition to connect, and later on we'll update this setting to point to the specific client partition. Save the changes to the profile by clicking OK.
Note: If you are unable to shut down the host partition to activate the profile changes, then the user must also create the virtual SCSI adapter using Dynamic Logical Partitioning (DLPAR).
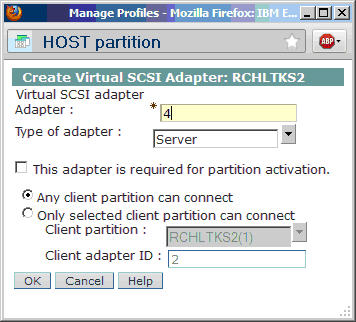
Figure 2: Create the virtual SCSI adapter for the host partition.
Client Partition
Create the client partition as you would any other IBM i partition. In the Create LPAR wizard, at the Virtual Adapters panel, select Actions > Create Virtual Adapter > SCSI Adapter. The SCSI adapter ID will default to the first available adapter ID, which is 2 in our example below. For the adapter type, select Client. Check the box to specify that the adapter is required for partition activation.
Next, from the Server partition drop-down menu, select the Host partition from the list of logical partitions. The server adapter ID maps to the virtual SCSI adapter ID from the host partition, which is 4 in our example. Click OK to save the Virtual SCSI adapter, and finish creating the client partition by completing the Create LPAR wizard.
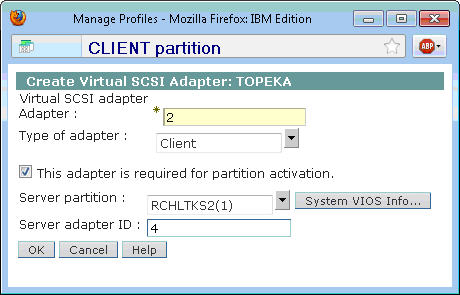
Figure 3: Create the virtual SCSI adapter for the client partition similar to this.
Host Partition
After the client partition has been created, we can update the Virtual SCSI settings on the host partition to allow the new client partition to connect. Edit the host partition profile, and select the Virtual Adapters tab. Edit the existing Server SCSI adapter, and choose "Only selected client partition can connect." Next, select the client partition from the menu pull-down, and click OK to save the changes to the profile.
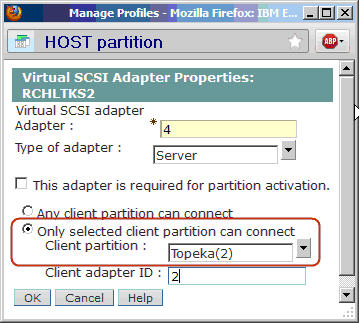
Figure 4: Specify the client partition as the only partition that can connect to the host.
Create Network Server Objects on the Host Partition
Now that we have completed the Virtual SCSI mappings, our next steps on the host partition are to create the Network Server Description (NWSD), the Network Server Storage Spaces (NWSSTG), and the links between the description and the storage spaces.
Create NWSD
On the Host partition, identify the resource of the Virtual SCSI adapter. Run WRKHDWRSC *CMN, and look for a 290B resource (CTL02 in the example below).
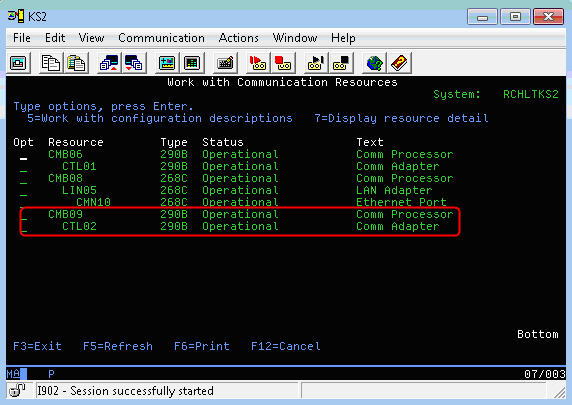
Figure 5: Look for communication resource of type 290B, and make note of the CTLxx number (CTL02 in this example).
To verify that the correct resource has been identified, use Option 7 to Display resource detail. In the following example, V1 corresponds to the hosting partition ID which is 1. The C4 corresponds to the client Virtual SCSI adapter ID, which is 4 in our example.

Figure 6: V1 maps to the host partition id 1, and C4 maps to virtual adapter 4.
Now we are ready to create the NWSD. From the command line, issue the CRTNWSD command. Here's an example of creating a network server description:
CRTNWSD NWSD(
Create NWSSTGs
Use CRTNWSSTG to create the storage spaces/virtual disks for the client partition. Six network server storage spaces will be created in our example.
Note: One NWSD can support up to 16 storage spaces. If more than 16 virtual disks are required, additional NWSDs must be created.
The following example will create storage spaces of size 35000 MB (~34.2 GB).
CRTNWSSTG NWSSTG(TOPEKA1) NWSSIZE(35000) FORMAT(*OPEN) TEXT('Network Server Storage Space for Topeka')
CRTNWSSTG NWSSTG(TOPEKA2) NWSSIZE(35000) FORMAT(*OPEN) TEXT('Network Server Storage Space for Topeka')
CRTNWSSTG NWSSTG(TOPEKA3) NWSSIZE(35000) FORMAT(*OPEN) TEXT('Network Server Storage Space for Topeka')
CRTNWSSTG NWSSTG(TOPEKA4) NWSSIZE(35000) FORMAT(*OPEN) TEXT('Network Server Storage Space for Topeka')
CRTNWSSTG NWSSTG(TOPEKA5) NWSSIZE(35000) FORMAT(*OPEN) TEXT('Network Server Storage Space for Topeka')
CRTNWSSTG NWSSTG(TOPEKA6) NWSSIZE(35000) FORMAT(*OPEN) TEXT('Network Server Storage Space for Topeka')
Add Server Storage Links
Once the NWSSTGs have been created, they must be linked to the NWSD to associate the network storage space with the network server.
The following example links our six virtual disks to the NWSD:
ADDNWSSTGL NWSSTG(TOPEKA1) NWSD(
ADDNWSSTGL NWSSTG(TOPEKA2) NWSD(
ADDNWSSTGL NWSSTG(TOPEKA3) NWSD(
ADDNWSSTGL NWSSTG(TOPEKA4) NWSD(
ADDNWSSTGL NWSSTG(TOPEKA5) NWSD(
ADDNWSSTGL NWSSTG(TOPEKA6) NWSD(
Vary On the NWSD
Issue a WRKCFGSTS *NWS and enter Option 1 next to the NWSD to vary on the NWSD. After the vary on has completed, the status will change to Active. Note that the NWSD must be in Active status before the client partition can be activated.
Virtual Ethernet Bridging
To virtualize Ethernet in an i-hosting-i environment, we will utilize Layer-2 bridging. Layer-2 bridging enables an Ethernet port in the host partition to provide network access for client partitions.
For a detailed overview of Layer-2 bridging, look here.
Host Partition
Create the Virtual Ethernet Adapter on the host partition. From the HMC, select the host partition, and select Manage Profiles > Virtual Adapters. Click on Actions > Create Virtual Adapter > Ethernet Adapter. Click on the View Virtual Network button to see any existing Virtual LANs. Identify a VLAN ID that has not already been defined. Specify the VLAN ID (1 in the example below), and check the checkbox to "Use this adapter for Ethernet bridging." Click OK to save the profile changes.
Note: If you are unable to shut down the host partition to activate the profile change, then create the virtual Ethernet adapter using Dynamic Logical Partitioning (DLPAR).
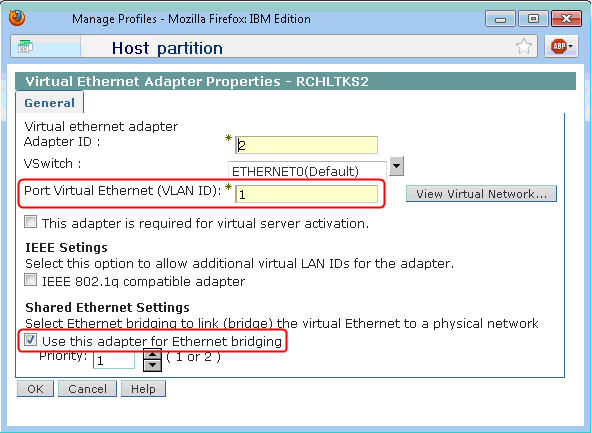
Figure 7: Specify a VLAN ID that is not already in use on your machine, and select the checkbox to use the adapter for Ethernet bridging.
Create Ethernet Line Description
Ethernet Layer-2 bridging is configured on the host partition with the CRTLINETH command. Identify the resources for the line descriptions using the WRKHDWRSC *CMN command.
Identify an Ethernet resource that can be dedicated for the physical line description on the host. Also, identify the virtual resource by looking for a resource of type 268C (see example below). This virtual resource was created in the previous section when we created the virtual Ethernet adapter on the host partition.
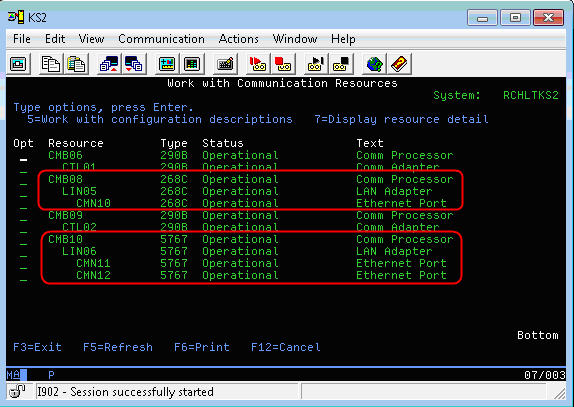
Figure 8: The virtual resource will be of type 268C, and the physical resource will match the hardware type (5767 in this example).
Next, issue the CRTLINETH commands to create the line descriptions. Note that the bridge identifier must be identical on both line descriptions in order to bridge the two adapters together.
CRTLINETH LIND(PHYSICAL) RSRCNAME(CMN11) BRIDGE(BRIDGE)
CRTLINETH LIND(VIRTUAL) RSRCNAME(CMN10) BRIDGE(BRIDGE)
Client Partition
Create the Virtual Ethernet Adapter on the client partition. From the HMC, select the client partition, and under Manage Profiles > Virtual Adapters, click on Actions > Create Virtual Adapter > Ethernet Adapter. Ensure the VLAN ID is the same VLAN ID specified on the host partition. Leave the Ethernet bridging checkbox unselected (see example below), and click OK to save the profile. A 268C Ethernet resource will be created, which can be used for the Ethernet line description on the Client partition.
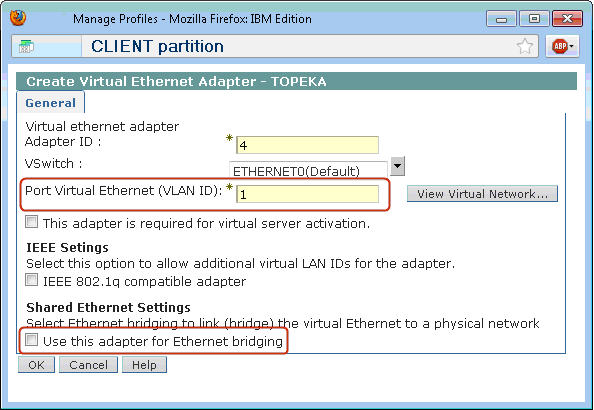
Figure 9: Specify the same VLAN ID as on the host partition, and leave the Ethernet bridging checkbox unselected.
Activate and Install the Client Partition
Ensure the NWSD is varied on, and then activate the client partition from the HMC as you would activate any other IBM i partition. Install the client partition using your favorite installation method (optical, virtual optical, tape, network install, etc.). Refer to the IBM InfoCenter publication SC41-5120-11: "Installing, upgrading, or deleting IBM i and related software" for details on the IBM i installation process.


 More than ever, there is a demand for IT to deliver innovation. Your IBM i has been an essential part of your business operations for years. However, your organization may struggle to maintain the current system and implement new projects. The thousands of customers we've worked with and surveyed state that expectations regarding the digital footprint and vision of the company are not aligned with the current IT environment.
 TRY the one package that solves all your document design and printing challenges on all your platforms. Produce bar code labels, electronic forms, ad hoc reports, and RFID tags – without programming! MarkMagic is the only document design and print solution that combines report writing, WYSIWYG label and forms design, and conditional printing in one integrated product. Make sure your data survives when catastrophe hits. Request your trial now! Request Now.
 Forms of ransomware has been around for over 30 years, and with more and more organizations suffering attacks each year, it continues to endure. What has made ransomware such a durable threat and what is the best way to combat it? In order to prevent ransomware, organizations must first understand how it works.
 Disaster protection is vital to every business. Yet, it often consists of patched together procedures that are prone to error. From automatic backups to data encryption to media management, Robot automates the routine (yet often complex) tasks of iSeries backup and recovery, saving you time and money and making the process safer and more reliable. Automate your backups with the Robot Backup and Recovery Solution. Key features include:
 Business users want new applications now. Market and regulatory pressures require faster application updates and delivery into production. Your IBM i developers may be approaching retirement, and you see no sure way to fill their positions with experienced developers. In addition, you may be caught between maintaining your existing applications and the uncertainty of moving to something new.
 IT managers hoping to find new IBM i talent are discovering that the pool of experienced RPG programmers and operators or administrators with intimate knowledge of the operating system and the applications that run on it is small. This begs the question: How will you manage the platform that supports such a big part of your business? This guide offers strategies and software suggestions to help you plan IT staffing and resources and smooth the transition after your AS/400 talent retires. Read on to learn:
LATEST COMMENTS
MC Press Online