


I'd be surprised to find any of you without old hardware taking up space in your offices. I know my office is a junkyard at times. With the speed at which technology advances, it's hard to find a home for hardware that's still good but isn't bleeding-edge enough to be considered fast for everyday computing tasks. If you're like me, you just hate to dispose of such equipment. Why not recycle some of that old "junk" and turn it into storage capacity?
NAS is a hot buzzword in IT these days. Do a quick Internet search, and the results are almost limitless when it comes to either preconfigured NAS systems or hardware to build your own. I recently had the opportunity to build two of these types of servers, each offering 1 TB of disk space. For my needs, it was still cheaper to build my own than to purchase a NAS device. But if you're just looking to put some storage online with old equipment, then look no further than FreeNAS.
The FreeNAS Project
The FreeNAS project is a beautifully small open-source application based on the FreeBSD distribution. FreeNAS supports Samba, FTP, RSYNC, and NFS protocols across your network. It contains its very own Web-based interface and supports software RAID (0, 1, 5). The best part is how small the package is even after installation: 16 MB total. This makes it perfect to install to USB keys or other removable media.
The first thing to do is to piece together some hardware. Basically, the only requirements are a machine capable of holding 96 MB of RAM, a bootable CD-ROM drive, and of course at least a hard drive. For example, if you have a few 20 G or 30 G IDE drives sitting around, you can convert your paperweights into 40 G or 60 G of network shares. After you have the equipment you are going to work with, download the ISO image from the link provided and burn it to a CD. There's also a VMWare image for use with VMWare Player if you prefer to experiment with the package.
Installation
I'll demonstrate installation on a single IDE drive, but you are free to choose installation onto compact-flash and USB keys as well. Follow the documentation on the site provided in a PDF for further details. Either way, it's rather straightforward. Next, boot the machine with the CD image you just created. Once at the prompt, select "7) Install on HD/CF/USB Key" to start the process.
BSD handles naming devices a bit differently than other Linux distributions, so you might be a bit confused at first if you're used to, say, Red Hat naming conventions. The installer seems to do a good job of automatically discovering your hardware for you, so this shouldn't present any issues.
The next selection screen asks you if you want to create one or two UFS partitions. If you choose to install on only one, this installs the actual system and will not allow you to use the remainder of the drive for storage. This option gives you the choice to install FreeNAS onto compact-flash or USB keys, but have hard drives serve as data partitions. Choose your preferred method to move along.
Next, my instance tells me the CD-ROM drive is device acd0 and the hard drive is da0, so type your parameters in accordingly. Remove the CD media and follow the prompts to reboot the machine.
After you reboot, you'll end up back at the same FreeNAS console setup menu you were at before. At first I was confused, but don't worry, this is normal. You now have to be very careful configuring your network interfaces. It's very specific to its configuration order.
Choose the "1) Interfaces: assign network ports" option and hit Enter. Enter the information displayed for your network card and hit Enter (mine shows up as lnc0). Hit Enter again to skip the optional interface name. Choose to reboot the machine and move to the next section.
Choose the "2) Set up LAN IP address" option to enter the next menu. Enter the appropriate IP address for your machine, and then enter the subnet mask you are using. Now choose the "6) Ping host" option and enter a valid IP on your network to ping. If you can successfully ping another host, that's it for installation.
Configuration of the Web Interface
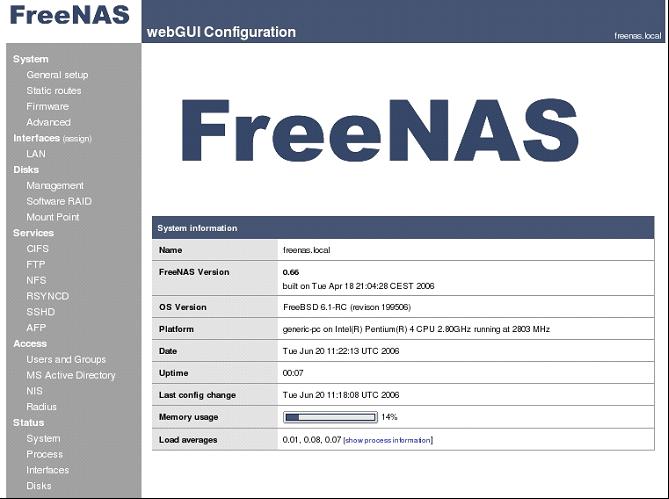
Open up a Web browser and navigate to the IP address or host name of the machine. The default user name is "admin" and the password is "freenas." As soon as you log in, be sure to change these to your desired credentials. You should see something like the image below:
Visit the Disks/Management section to add your disks. Click on the small plus sign symbol (+) to add the physical path to the devices. You'll be given a drop-down menu box to select the partitions you want to add. There are also options for power management features. If you used the single hard drive installation method I referred to above, do not add the boot partition here. When you're finished, make sure you click to apply the changes.
Under the same section, choose the Format tab. This part is a bit confusing as well. If you chose to create both a boot partition and a storage partition on a single drive, you don't have to format the disks you just added. That step was completed at the time of installation. Otherwise, follow the directions in the documentation for formatting drives. The documentation provides very detailed steps for doing so, since the method depends on your hardware configuration.
Next, you have to add a mount point for the drives to be mounted on. Choose the Disks/Mount Point section and click the plus sign symbol (+) to add a mount point. Choose the correct disk, partition number, and file system options. Also, be sure to type in a useful share name. When finished, choose to save, and on the next screen, apply the changes. Again, if you've used the same drive for the FreeNAS installation and the storage data, make sure you select partition 2 as the mount point, since partition 1 contains the boot records.
The last step is to configure the Samba section. Choose the Services/CIFS section. Click the Enable check box, and answer no to both the master browser and time server questions. Then choose Save. This gets the share up and running quickly without any authentication. From a Windows XP client, browse to the netbios name that you called the share. The share name that you typed in will be displayed. For example, Start -> Run -> freenas. Now you have a read/write share running and online.
Other Options
From here, everything else depends on your needs. You can configure FTP and NFS access, control users, and tie the installation into your existing network. I've successfully experimented with installing FreeNAS onto a USB stick and then setting up two 20 G IDE disks in a Raid 1 setup.
Free NAS with FreeNAS
When you need network-attached storage up and running quickly or when you don't have the time and resources available for installing a pre-baked NAS or Samba installation, then FreeNAS might be able to assist you. With its extremely lightweight size and the power of its included configurations, it seems to be the perfect project for resurrecting old hardware. But don't forget it supports more modern setups as well.
Max Hetrick is a PC Support Analyst/Specialist who holds a certification as an MCSA. He also has experience with installation and maintenance of Linux operating systems from the PC to server levels. Max can be reached at


 More than ever, there is a demand for IT to deliver innovation. Your IBM i has been an essential part of your business operations for years. However, your organization may struggle to maintain the current system and implement new projects. The thousands of customers we've worked with and surveyed state that expectations regarding the digital footprint and vision of the company are not aligned with the current IT environment.
 TRY the one package that solves all your document design and printing challenges on all your platforms. Produce bar code labels, electronic forms, ad hoc reports, and RFID tags – without programming! MarkMagic is the only document design and print solution that combines report writing, WYSIWYG label and forms design, and conditional printing in one integrated product. Make sure your data survives when catastrophe hits. Request your trial now! Request Now.
 Forms of ransomware has been around for over 30 years, and with more and more organizations suffering attacks each year, it continues to endure. What has made ransomware such a durable threat and what is the best way to combat it? In order to prevent ransomware, organizations must first understand how it works.
 Disaster protection is vital to every business. Yet, it often consists of patched together procedures that are prone to error. From automatic backups to data encryption to media management, Robot automates the routine (yet often complex) tasks of iSeries backup and recovery, saving you time and money and making the process safer and more reliable. Automate your backups with the Robot Backup and Recovery Solution. Key features include:
 Business users want new applications now. Market and regulatory pressures require faster application updates and delivery into production. Your IBM i developers may be approaching retirement, and you see no sure way to fill their positions with experienced developers. In addition, you may be caught between maintaining your existing applications and the uncertainty of moving to something new.
 IT managers hoping to find new IBM i talent are discovering that the pool of experienced RPG programmers and operators or administrators with intimate knowledge of the operating system and the applications that run on it is small. This begs the question: How will you manage the platform that supports such a big part of your business? This guide offers strategies and software suggestions to help you plan IT staffing and resources and smooth the transition after your AS/400 talent retires. Read on to learn:
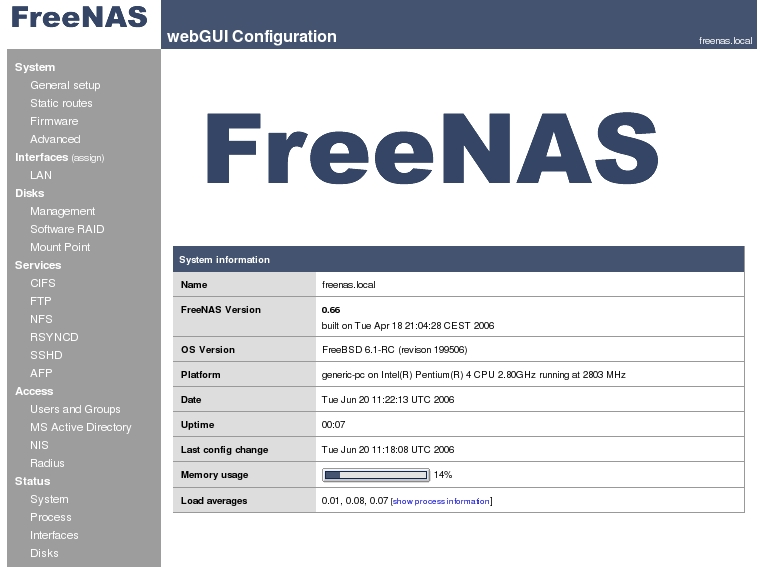
LATEST COMMENTS
MC Press Online