


Do you know about Microsoft SQL Server Integration Services (SSIS)? No? Let me introduce you.
Prior to doing development with Microsoft technologies, I was unaware that SQL Server Integration Services (SSIS) existed. I was familiar with migrations and Extract, Transform, and Load (ETL), and I wrote many applications to perform these operations. So when I discovered SSIS, I realized that this technology needs to be shared with the IBM community.
In this article, I'll introduce SSIS by running a query over a database to generate an Excel spreadsheet.
In previous articles, I covered introductory information on free (Express) versions of Microsoft products:
- Getting Started with Microsoft Visual Studio Express
- Installing Microsoft SQL Server 2012 Express on Your Local Machine
This article will tie those two previous topics together by discussing SSIS, which can be developed within Visual Studio and used to perform operations on Microsoft SQL Server 2012.
What Is SQL Server Integration Services (SSIS)?
SSIS can do so many things, it's difficult to explain. Let's just say it does database operations. With the development tools, you can easily build SSIS packages using a GUI interface to make complex database operations that are commonly needed without having to write custom applications to perform them.
Because SSIS is a component of Microsoft SQL Server, when an SSIS package is created, it's actually just an XML file that SQL Server uses to perform the operations. The XML file generated has the .dtsx extension.
Prior to SSIS, Microsoft called this same technology Data Transformation Services (DTS), which generated an XML file with the extension of .dts.
I always find the best way to describe something is with examples, so we'll be writing a simple SSIS package that runs a query over a database and puts the results into an Excel spreadsheet.
Installing SSIS Development Tools (SSDT)
When I'm creating SSIS packages, I prefer to use Visual Studio. If you installed Microsoft SQL Server and Visual Studio using the links provided at the beginning of this article, you can now click on the following link to add the Microsoft SQL Server Data Tools - Business Intelligence for Visual Studio 2012 (SSDT). After clicking the link, you'll download the SSDTBI_VS2012_x86_ENU.exe file, which you'll need to execute to install the tools needed for SSIS development with Visual Studio 2012. Visual Studio 2013 is currently available, but I have chosen to demonstrate 2012 in this article to support my previous article on installing 2012 for a complete installation process.
To see if you already have the software installed or if you want to verify that your installation was successful, you can open Visual Studio 2012 and attempt to create a new project using the Business Intelligence template. Upon completion of the installation, you should have the Business Intelligence template available as shown in the "After" screenshot in Figure 1.
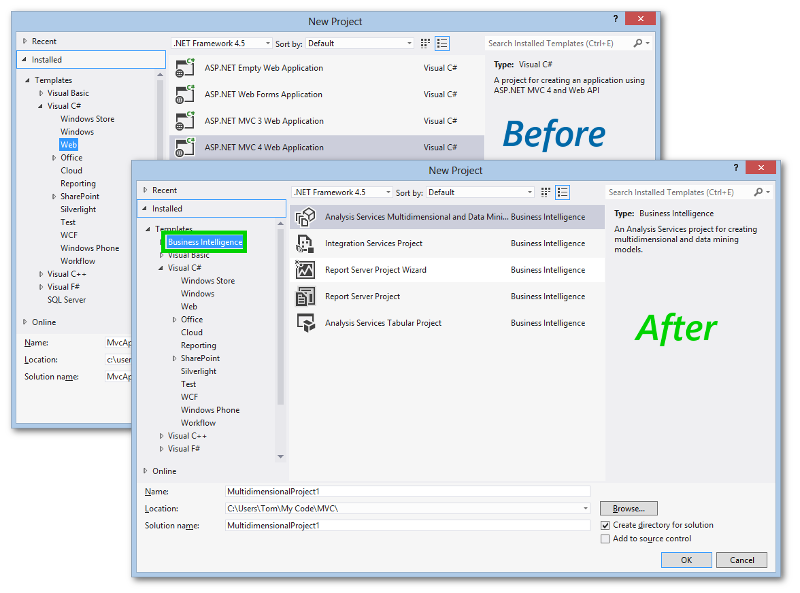
Figure 1: Before and after pictures show the successful installation of the SSDT Business Intelligence for Visual Studio 2012 when creating a new project.
Note: As mentioned, SSIS was formerly called Data Transformation Services (DTS). For SSIS you need SSDT; for DTS you required the Business Intelligence Development Studio (BIDS). Be aware that you'll probably find many references to BIDS as you're googling your way through learning SSIS.
Installation Type
During the Microsoft SQL Server Data Tools - Business Intelligence for Visual Studio 2012 installation, you'll be asked if you want to create a new SQL server instance or use an existing one. Select the first option to "Perform a new installation of SQL Server 2012." See Figure 2.
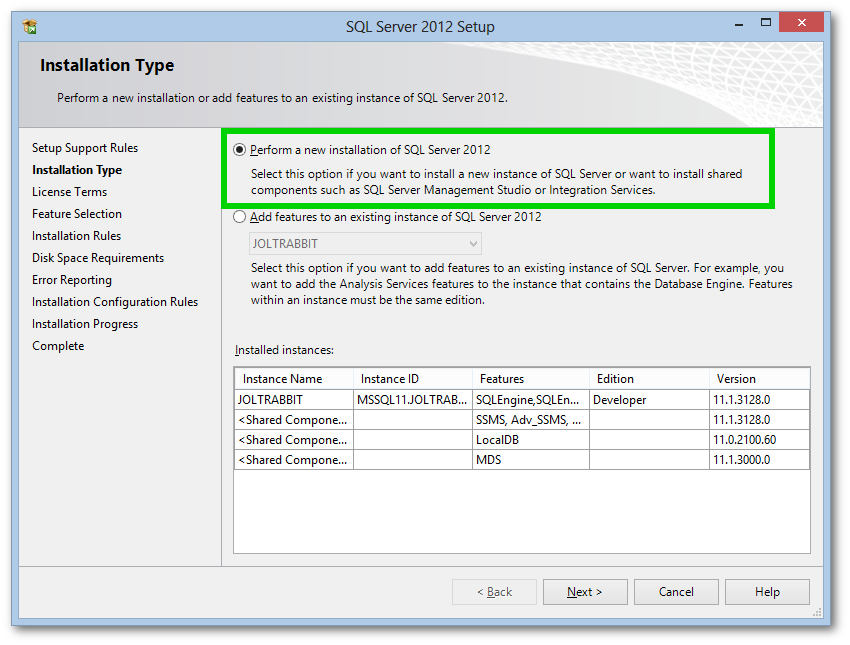
Figure 2: Select the new installation option on the Installation Type screen.
If you attempt to install on an existing instance, you'll get a "Same Architecture installation" failure. Installing on a new instance will get you past this problem.
Feature Selection
On the Feature Selection screen, you're primarily interested in the Microsoft SQL Server Data Tools - Business Intelligence for Visual Studio 2012 option. For this installation, you'll click the "Select All" button followed by the "Next" button to continue the installation.
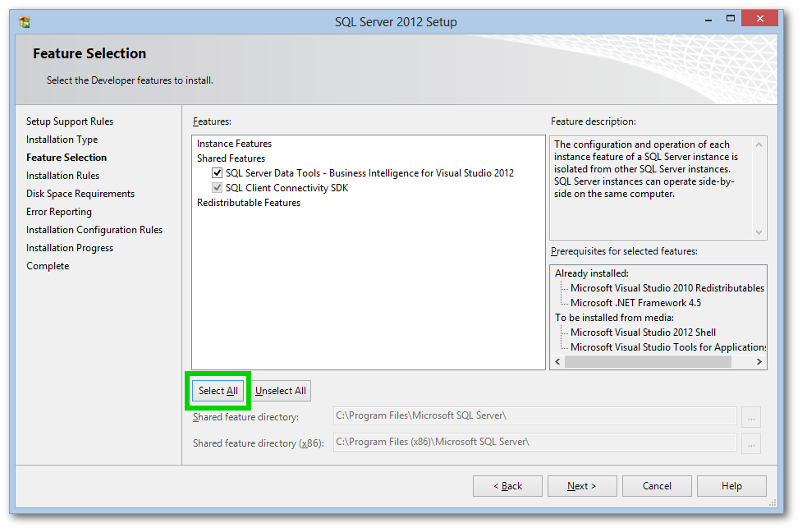
Figure 3: Select all on the Feature Selection screen.
During the installation, you'll see additional screens on which you'll simply click Next until the installation is completed. Upon successful completion, you should be able to open Visual Studio 2012, click on File > New Project, and see the Business Intelligence options available.
Your First SSIS Project
For your first project, you'll run a simple select query over a database table and dump it into an Excel spreadsheet.
You'll reuse the code that creates the database in the SQL 2012 article link above by creating a new table called jr_user. Then you'll insert some records into the jr_user table. The code for the DDL and DML to do this can be downloaded here. When you execute the following query on the local database, you should get the results displayed in Figure 4:
select * from jr_user
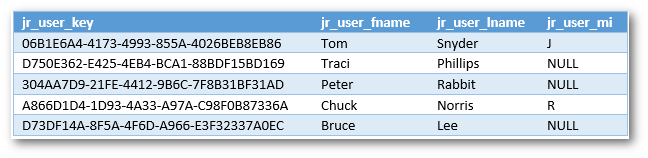
Figure 4: These are the results of the query from select * from jr_user that was created on the local database.
With the givens provided, follow these steps:
- Open Visual Studio 2012.
- Select File > New Project…
- Select Templates > Business Intelligence > Integration Services Project.
- Enter the name for your project and select the directory location to be created.
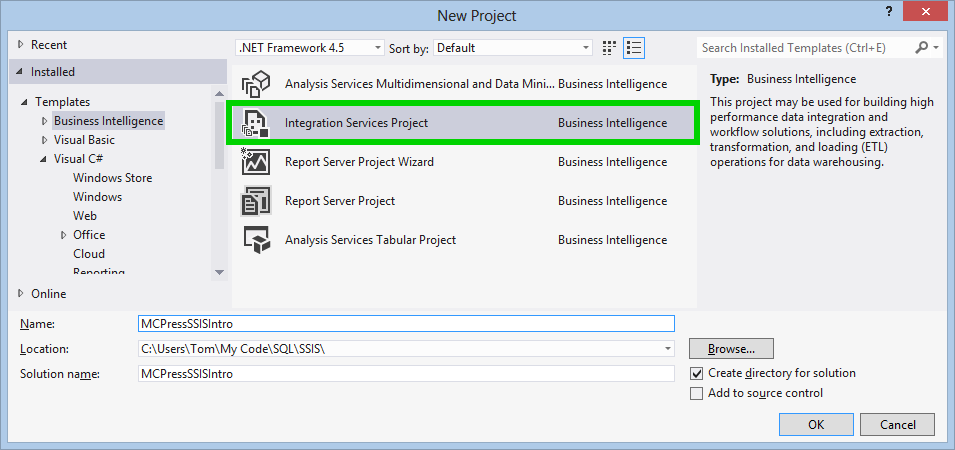
Figure 5: This is the Business Intelligence template.
Connection Managers
With the new project created, you now need to add the source and destination of your project. You'll be pulling data from a database source and writing the data to an Excel destination. The SSIS package refers to these as "connection managers."
Source Connection Manager: Database
To create your database source connection manager, go to the bottom panel labeled Connection Managers, right-click, and select "New OLE DB Connection…" as shown in Figure 6.
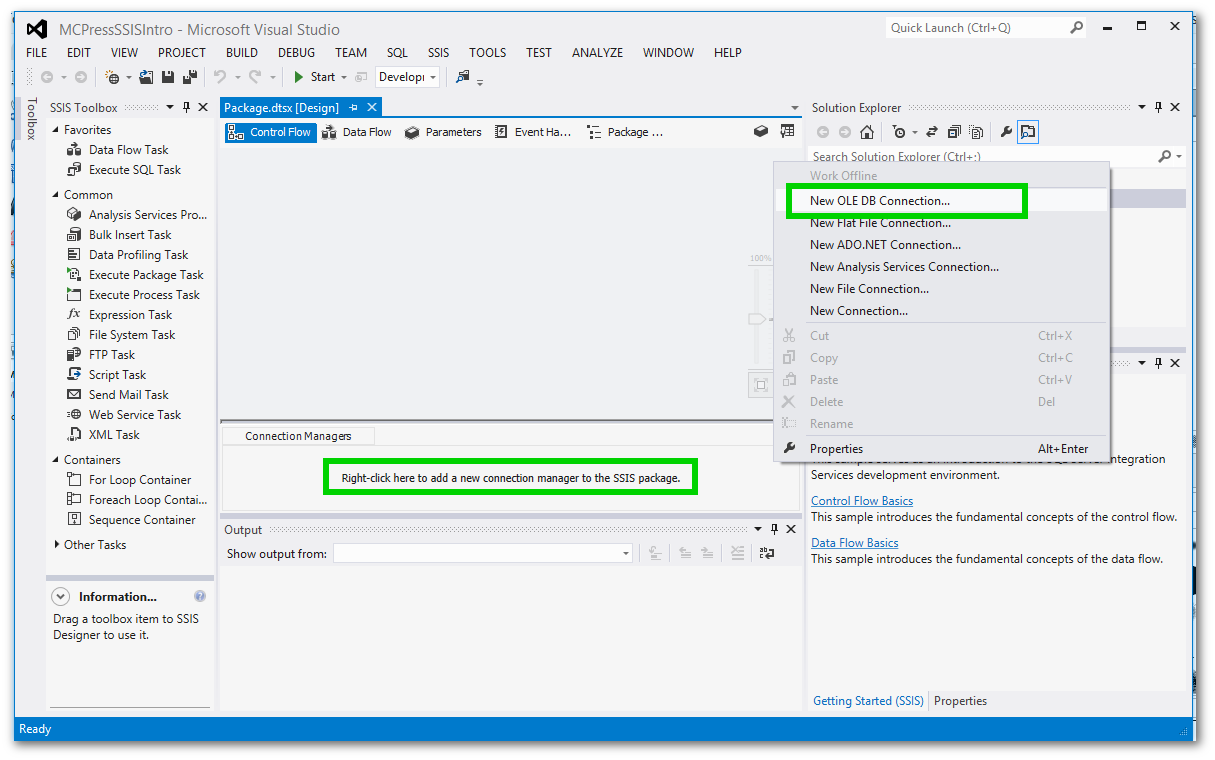
Figure 6: Create your database connection.
When you select the "New OLE DB Connection…" option for the first time, the following screen, "Configure OLE DB Connection Manager," will be blank. You'll need to click on the "New…" button at the bottom of the screen to specify your database information. See Figure 7.
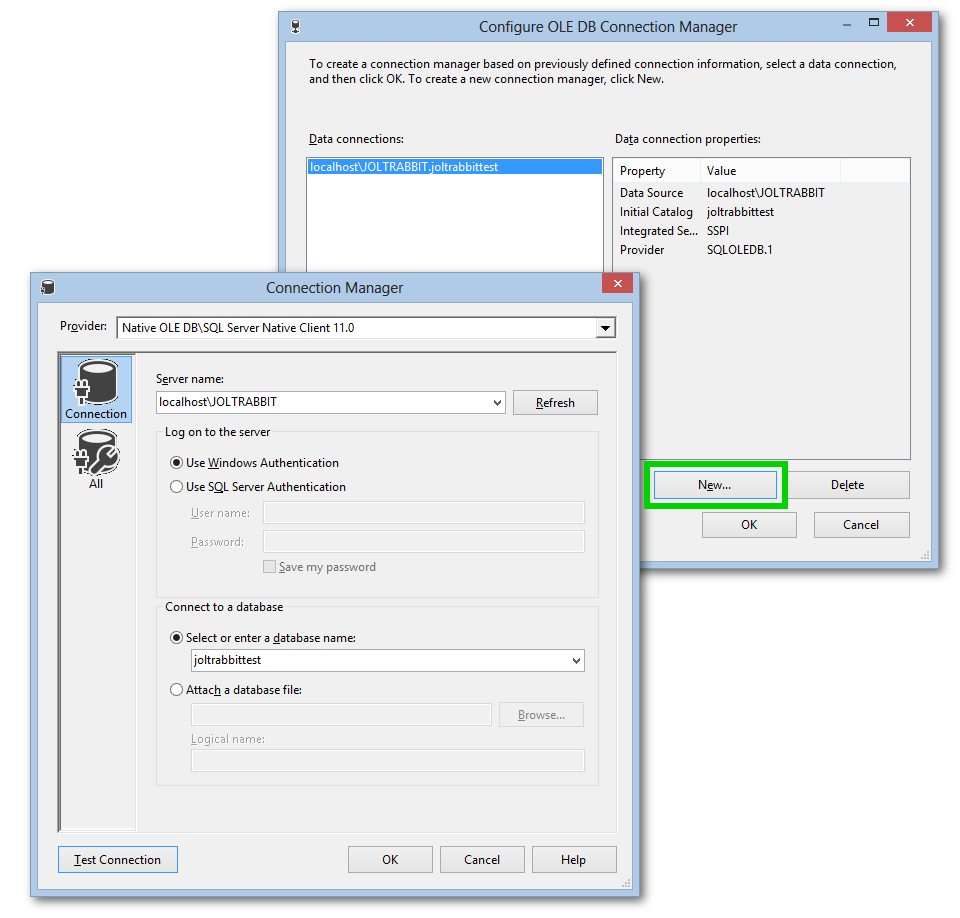
Figure 7: Use the Connection Manager for your database connection.
Set up your connection manager using the following settings, making changes for your machine if needed:
|
Property |
Value |
|
Provider |
Native OLE DB\SQL Server Native Client 11.0 |
|
Server Name |
Localhost\JOLTRABBIT (your server name) |
|
Log on to the Server |
Use Windows Authentication |
|
Enter a Database Name |
joltrabbittest |
When you're specifying your database details, it's not a bad idea to click on the "Test Connection" button to make sure that you have your information entered correctly and that your authentication method is working. You don't want to end up troubleshooting your SSIS package when you have a connection problem.
This connection can be set up numerous ways. I'm merely walking you through one possible setup that will work with the previous articles that I mentioned. You will most likely choose other options when you become familiar with the tool.
Destination Connection Manager: Excel Spreadsheet
To create your database source connection manager, right-click in the Connection Manager panel again, but select "New Connection…" this time. Then select Excel for the file type. Now you can enter the location of the output Excel spreadsheet.
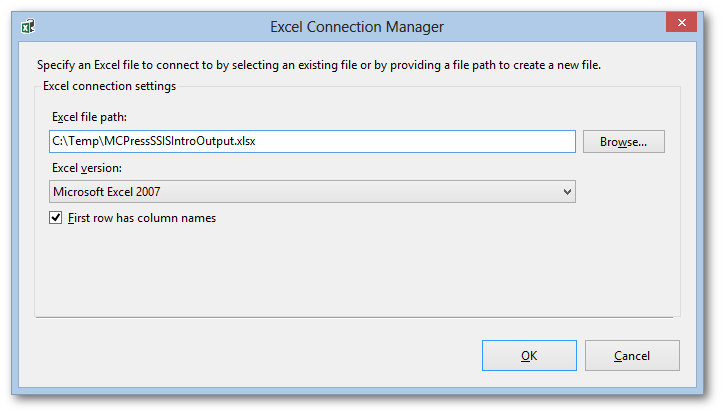
Figure 8: Here's your Excel Connection Manager.
In this example, you'll just create a file in the C:\Temp folder and use Microsoft Excel 2007, leaving the "First row has column names" checkbox checked. Then click on the OK button. Note that you need to name your file with the correct extension; otherwise, Excel will complain later that the format doesn't match the file name. For Excel 2007, use the .xlsx extension. If you had selected an earlier version, you could use .xls (without the last x).
Building the Excel Spreadsheet
In your main window, there are several tabs over the top. For the purposes of this article, you'll be working only with the Control Flow and Data Flow tabs.
First, you need to specify how the spreadsheet will look. To do this, use Execute SQL Task from the SSIS Toolbox on the far left. Click and drag the Execute SQL Task into the work area as shown in Figure 9.
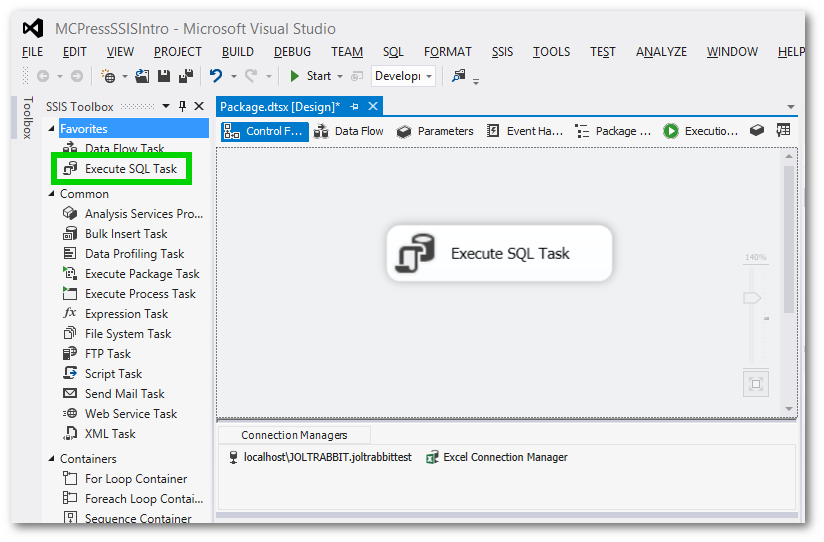
Figure 9: Click and drag the Execute SQL Task into the work area.
It's not intuitive that you would use Execute SQL Task to build the Excel spreadsheet. The way I look at it is that we're building some output; it could be a database table, an Excel spreadsheet, etc. To create the worksheet in the spreadsheet, you'll create a table, and that's exactly what the syntax looks like when you build your task as follows:

Figure 10: This shows the Excel spreadsheet contents using CREATE TABLE.
The key settings that you need to make are outlined in green above:
|
Property |
Value |
|
ConnectionType |
EXCEL |
|
Connection |
Excel Connection Manager |
|
SQLSourceType |
Direct Input |
|
SQLStatement |
CREATE TABLE… |
For the SQLStatement, click on the ellipses (…) button to get the Enter SQL Query window as shown in Figure 10 above. The query you're using will be:
CREATE TABLE MCPress (
MC_KEY LongText,
F_NAME LongText,
L_NAME LongText
)
Even though the middle initial field is available, I deliberately omitted that field of the table to illustrate that you can change the list of fields that are selected for your output. This allows you to pick and choose which data you would like in your Excel spreadsheet from a larger selection of available data.
This example simplifies things by putting the SQL directly into the SSIS package (to keep this article at a reasonable size). You could have also called a stored procedure to separate the SQL from the SSIS package, making it easier to split the project across multiple developers who may have different skill sets. Using stored procedures would also separate the maintenance of the code by enabling you to update the stored procedure to change the results of the SSIS without having to change the SSIS itself.
Data Flow Task
Next, you'll create a Data Flow Task by dragging Data Flow Task from the left onto your main work area as shown:
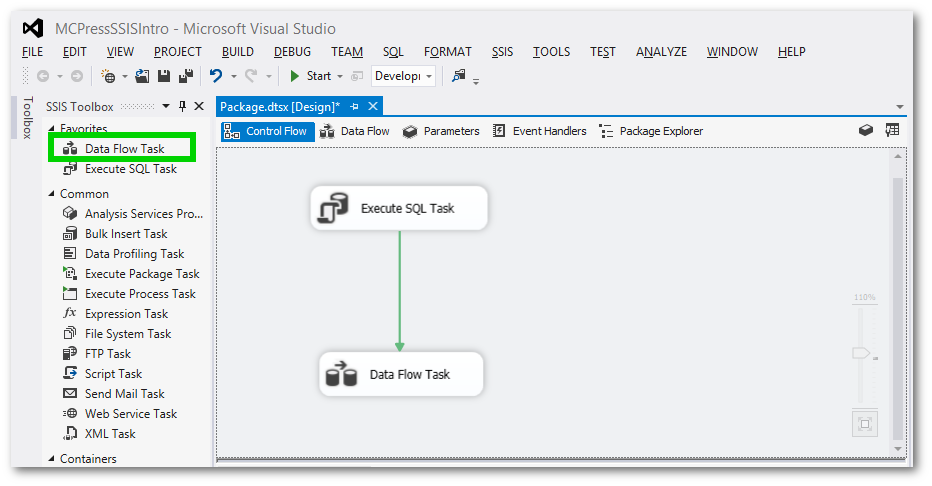
Figure 11: Here's how the Data Flow Task works.
After the Data Flow Task is added, click on the Execute SQL Task and you should see a green arrow on the bottom. Click the arrow and drag to the Data Flow Task to connect them together. This will allow the Data Flow Task to execute on successful completion of the Execute SQL Task.
OLE DB Source
Double-click on the newly added Data Flow Task and you will be taken to the Data Flow tab, which will have a new, blank work area. Click and drag the OLE DB Source from the toolbox onto the Data Flow work area that is now available.
Double-click on OLE DB Source to set the properties.
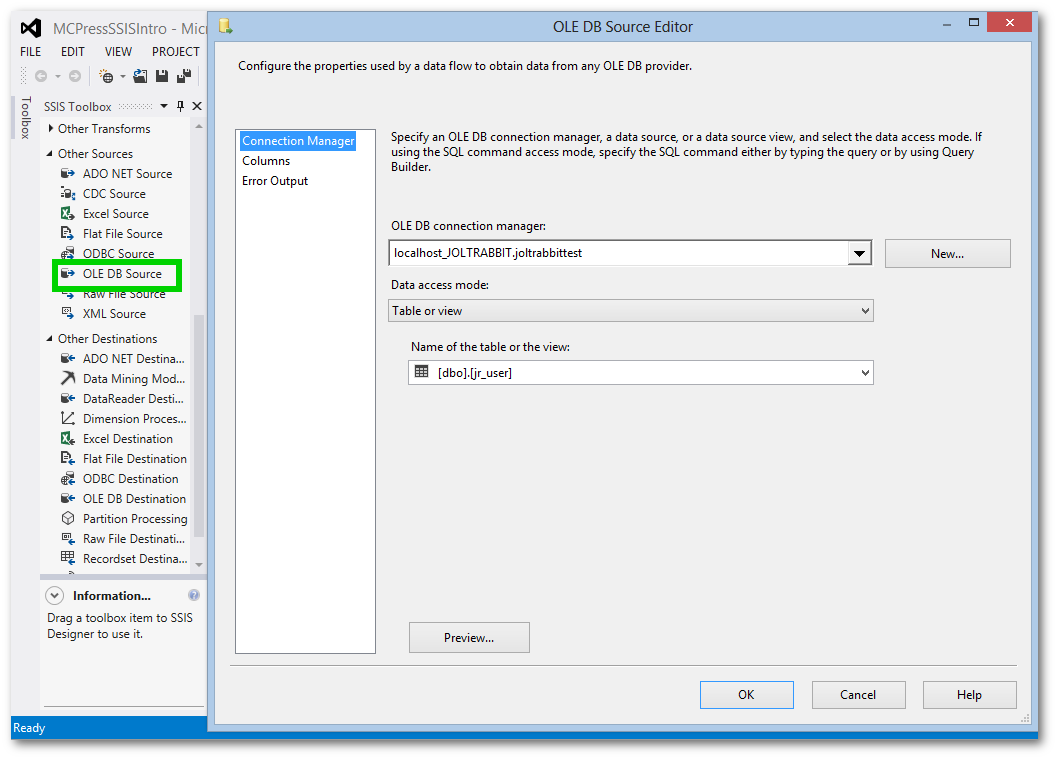
Figure 12: Specify your database and source table.
For this example, you'll just be selecting all the records from the jr_user table. To do this, simply follow these steps:
- Select the OLE DB connection manager that you created earlier that points to your database.
- Select the "Table or view" option for Data Access Mode.
- The drop-down box will list your jr_user table to be selected. Click on it.
- Click on OK.
Data Conversion
Because you're writing to text fields in an Excel spreadsheet, you'll need to convert the text data from the database into Unicode characters; otherwise, you'll get an error when you try to run it.
To pass all of the data through a data conversion, drag Data Conversion from the toolbox onto the work area.
Then click on the OLE DB Source that you created earlier to display the arrows, and drag the blue arrow to the new Data Conversion you just created. You do this so that the Data Conversion is aware of what data needs to be converted.
Double-click on the Data Conversion, and you should see the columns from your jr_user table available for conversion.
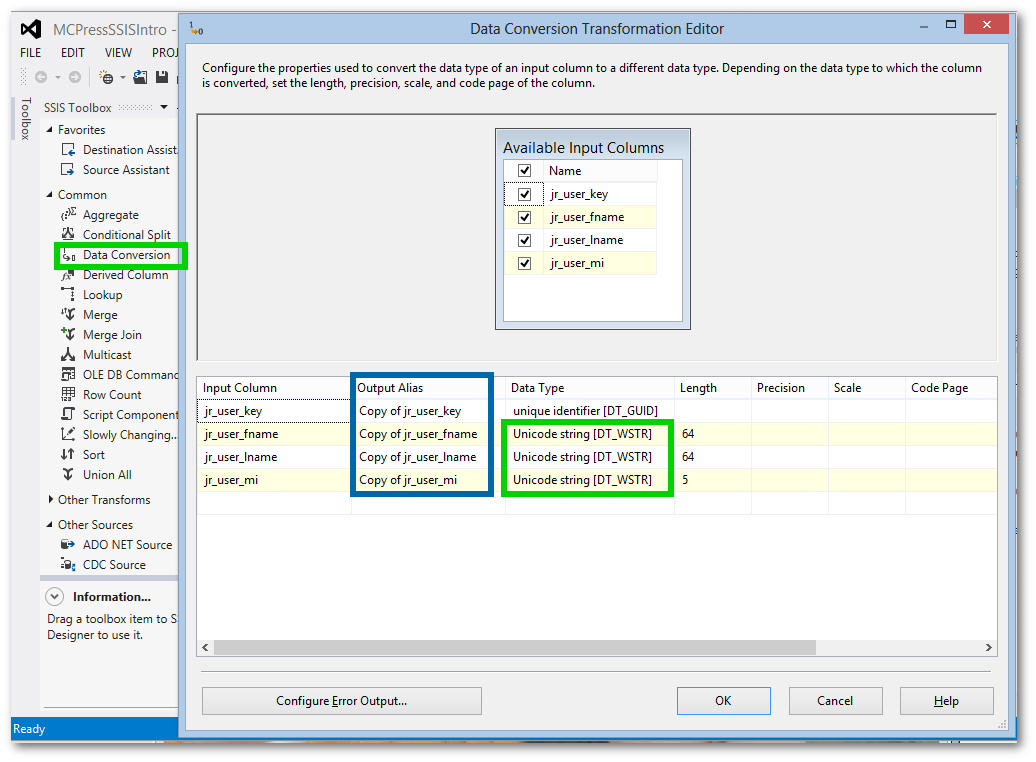
Figure 13: This shows mapping and converting data.
Output Aliases are automatically created with the prefix of "Copy of" as shown above in the blue box. You can rename these or leave as is, which is what will be done here.
The default Data Type for the text fields is String [DT_STR]. You'll be changing all text fields to Unicode string [DT_WSTR]. Once the Data Types are all changed to Unicode string, click on the OK button.
Excel Destination
Finally, you'll plug the Excel Destination into your SSIS package circuitry. Click and drag Excel Destination from the toolbox onto the work area. Click on Data Conversion to display the arrows, and drag the blue arrow down to Excel Destination to connect them. Your Data Flow should now look something like Figure 14. Orientation doesn't matter, but the cleaner the better.
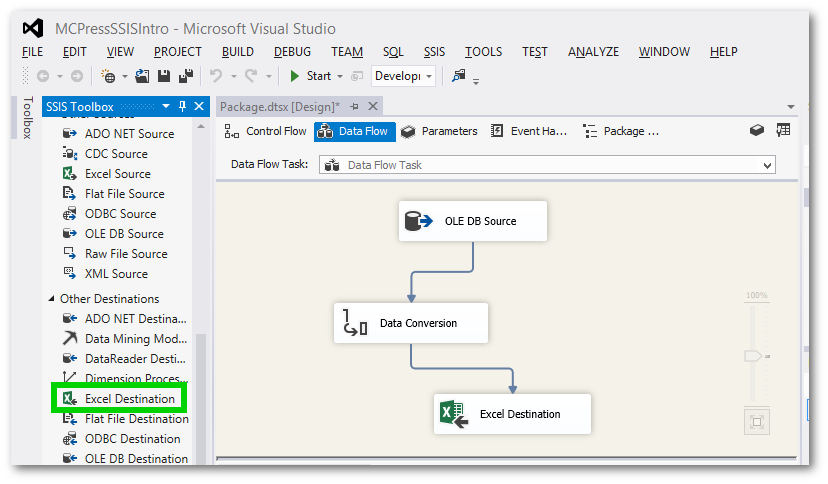
Figure 14: Configure your Excel spreadsheet.
Double-click on Excel Destination to set the properties.
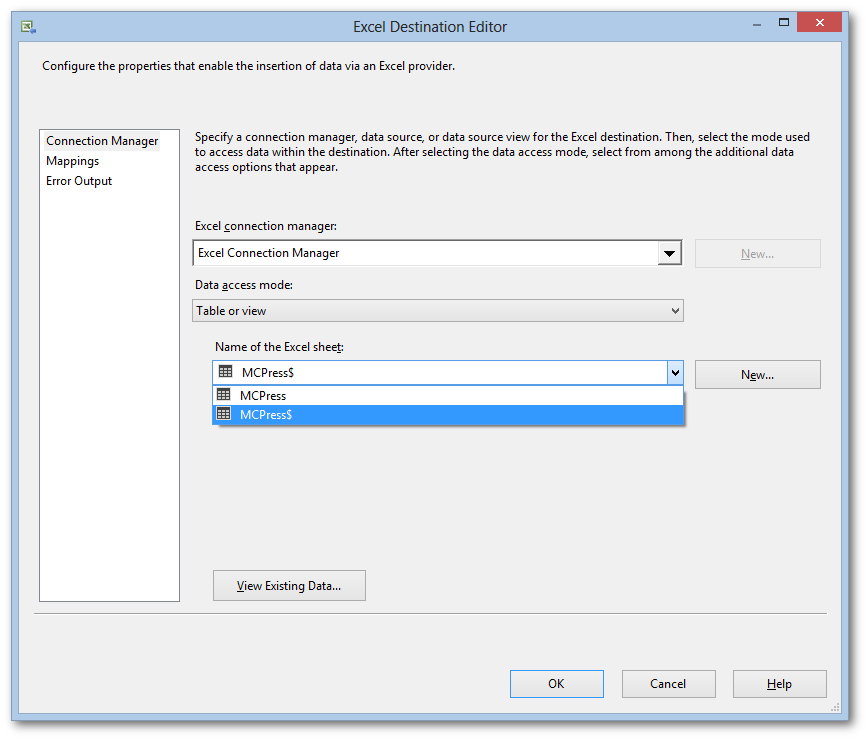
Figure 15: From the data to the spreadsheet!
Select:
- Your Excel Connection Manager
- Data access mode: Table or view
- Name of Excel sheet: MCPress$
For the name of the Excel Sheet, you have two options:
- MCPress is the name of a range.
- MCPress$ is the worksheet name.
The available Excel sheet names are populated from the table that you created earlier with Execute SQL Task. For this example, you'll use the one with the dollar sign ($).
If no tables are listed, you can execute the individual Execute SQL Task by going back to the Control Flow tab. Then, right-click on Execute SQL Task and click on Execute. If that task is set up correctly, you should see a green checkmark on that task.
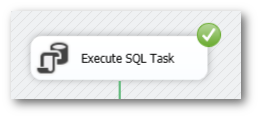
Figure 16: Execute to make the table visible.
After executing the task, go back to Excel Destination on the Data Flow tab and you should now see your table in the drop down list.
Mappings
Upon completing the selection of the table, while still within the Excel Destination, click on Mappings on the far left.
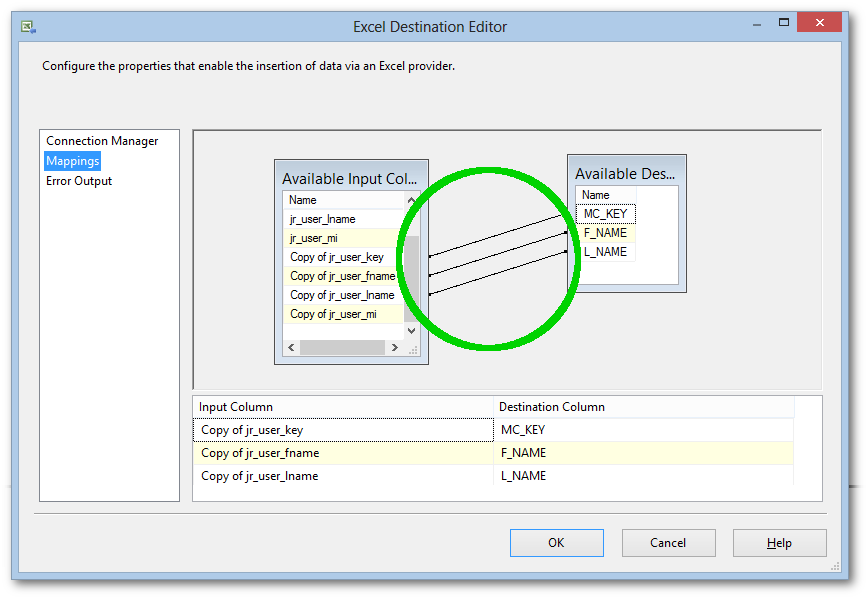
Figure 17: Map to usable data.
In the Mappings window, map the "Copy of" fields that are the converted values in Unicode over to the fields that you defined in your Excel spreadsheet by clicking on one side and dragging to the other side. Just like those matching tests back in the day. Then click OK to finish.
Debugging the SSIS Package
Now that all of your "development" is complete, save your work. (You should actually save regularly during your development.) To run your SSIS package, go to the menu bar Debug and Start Debugging.
You'll likely encounter your first error. Stop debugging and review your output at the bottom. You may see this: "Table 'MCPress' already exists."
To fix this error, go to the location you specified for your Excel destination and delete the file.
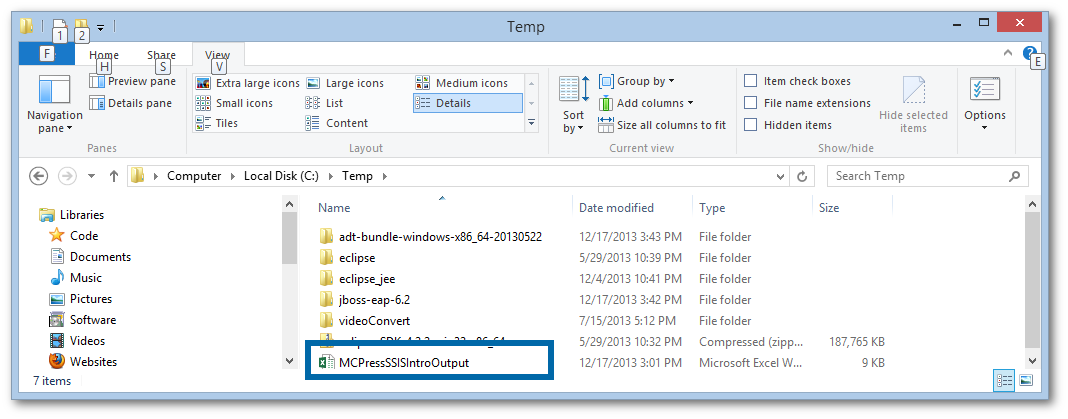
Figure 18: Delete your file for multiple runs.
To permanently fix this problem of recreating the file multiple times, you could drop the table or name the output to contain the datetime (which could be a follow-up article if the interest is there).
After deleting the file, you can run again and you should see green checkmarks on all of your tasks. If you open your output file, you should now see your data with headers.
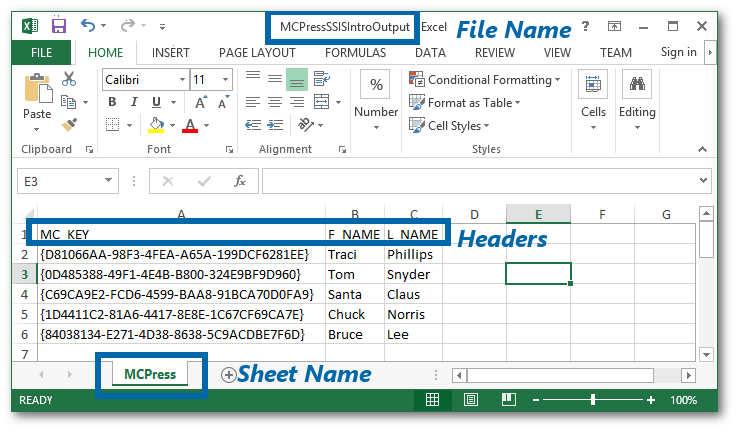
Figure 19: Here's your spreadsheet output.
Things to notice:
- The spreadsheet name is what you specified for the Excel Destination.
- The headers match what you specified in your CREATE TABLE statement.
- The sheet name is the name of the table that you created.
Deployment
You'll simplify deployment by making the build available as a file that can be executed. To do this, go to the Project option on the menu bar and select Convert to Package Deployment Model.
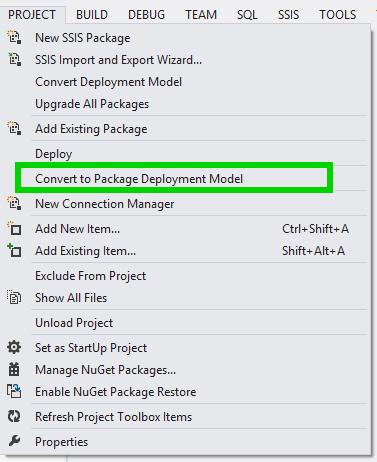
Figure 20: Prepare for deployment.
Then go to the menu bar option Build and select Build Solution.
You now have a Package.dtsx file in a bin folder of the location that you created your SSIS project. For my computer, I found my file here:
C:\Users\Tom\My Code\SQL\SSIS\MCPressSSISIntro\MCPressSSISIntro\bin\Development\
Your location will likely be different. As long as you know the location of where you built your project, you can just drill down into bin\Development. You can also configure the location through Visual Studio.
Using your File Explorer, navigate to that folder and double-click on the .dtsx file. You should see the following window:
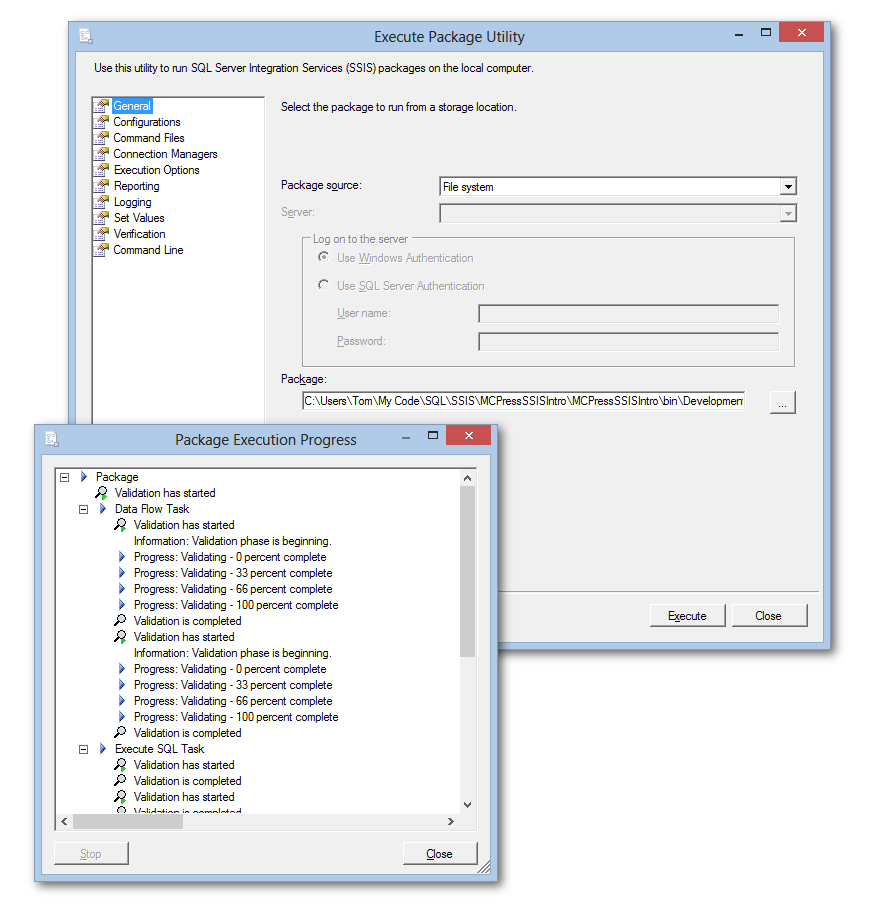
Figure 21: Execution windows show progress.
When you click on the Execute button, you'll see the progress of your SSIS package as it executes. You now have an SSIS package that you can execute repeatedly to generate your output.
Summary
This was one of my more image-heavy articles, but that's the point of SSIS because you can do a lot by using the user interface to create repeatable database operations. There's a fair learning curve to know where everything is at first, but once you get the hang of it, you can knock out repeatable database operations quickly while writing minimal code.
The series of Microsoft articles I have been writing are all prerequisites to my next article, in which I intend to show you how to use these technologies with DB2.
- Getting Started with Microsoft Visual Studio Express
- Installing Microsoft SQL Server 2012 Express on Your Local Machine

Thomas Snyder has a diverse spectrum of programming experience encompassing IBM technologies, open source, Apple, and Microsoft and using these technologies with applications on the server, on the web, or on mobile devices.
Tom has more than 20 years' experience as a software developer in various environments, primarily in RPG, Java, C#, and PHP. He holds certifications in Java from Sun and PHP from Zend. Prior to software development, Tom worked as a hardware engineer at Intel. He is a proud United States Naval Veteran Submariner who served aboard the USS Whale SSN638 submarine.
Tom is the bestselling author of Advanced, Integrated RPG, which covers the latest programming techniques for RPG ILE and Java to use open-source technologies. His latest book, co-written with Vedish Shah, is Extract, Transform, and Load with SQL Server Integration Services.
Originally from and currently residing in Scranton, Pennsylvania, Tom is currently involved in a mobile application startup company, JoltRabbit LLC.
MC Press books written by Thomas Snyder available now on the MC Press Bookstore.
 |
Advanced, Integrated RPG See how to take advantage of the latest technologies from within existing RPG applications. List Price $79.95 Now On Sale
|
|
 |
Extract, Transform, and Load with SQL Server Integration Services Learn how to implement Microsoft’s SQL Server Integration Services for business applications. Now On Sale
|


 More than ever, there is a demand for IT to deliver innovation. Your IBM i has been an essential part of your business operations for years. However, your organization may struggle to maintain the current system and implement new projects. The thousands of customers we've worked with and surveyed state that expectations regarding the digital footprint and vision of the company are not aligned with the current IT environment.
 TRY the one package that solves all your document design and printing challenges on all your platforms. Produce bar code labels, electronic forms, ad hoc reports, and RFID tags – without programming! MarkMagic is the only document design and print solution that combines report writing, WYSIWYG label and forms design, and conditional printing in one integrated product. Make sure your data survives when catastrophe hits. Request your trial now! Request Now.
 Forms of ransomware has been around for over 30 years, and with more and more organizations suffering attacks each year, it continues to endure. What has made ransomware such a durable threat and what is the best way to combat it? In order to prevent ransomware, organizations must first understand how it works.
 Disaster protection is vital to every business. Yet, it often consists of patched together procedures that are prone to error. From automatic backups to data encryption to media management, Robot automates the routine (yet often complex) tasks of iSeries backup and recovery, saving you time and money and making the process safer and more reliable. Automate your backups with the Robot Backup and Recovery Solution. Key features include:
 Business users want new applications now. Market and regulatory pressures require faster application updates and delivery into production. Your IBM i developers may be approaching retirement, and you see no sure way to fill their positions with experienced developers. In addition, you may be caught between maintaining your existing applications and the uncertainty of moving to something new.
 IT managers hoping to find new IBM i talent are discovering that the pool of experienced RPG programmers and operators or administrators with intimate knowledge of the operating system and the applications that run on it is small. This begs the question: How will you manage the platform that supports such a big part of your business? This guide offers strategies and software suggestions to help you plan IT staffing and resources and smooth the transition after your AS/400 talent retires. Read on to learn:
LATEST COMMENTS
MC Press Online