


In the first part of this two-part series, I defined what Open Database Connectivity (ODBC) is and demonstrated how to configure an ODBC data source. I started with the task of adding a new data source and walked you through the configuration of ODBC packages. In this article, I’ll show you how to finish the configuration of an ODBC data source. I’ll also take a look at what you need to configure on your AS/400 in order to use ODBC. As you learned last issue, ODBC is a Microsoft-developed API that uses a set of drivers and a driver manager to allow applications to access data using SQL as a standard language. It is commonly used by most of the visual languages, e.g., Visual Basic and Delphi, as well as Microsoft Access and MS Query, to retrieve data from sources on local or remote systems. Because ODBC uses SQL as its search engine, it is heterogeneous and can retrieve data from such varied sources as PCs, the AS/400 and other midrange systems, and mainframes. That’s enough review: Let’s jump right into how to configure the performance of your ODBC data source.
Performance
The options on the Performance tab (shown in Figure 1) help you to enhance the performance of ODBC requests on the AS/400. You can get to this tab by double-clicking on the 32bit ODBC icon in Control Panel, then highlighting the AS/400 data source you created in Part 1 of this series, and finally clicking on the Configure button.
There are four options on this panel: Enable lazy close support; Enable pre-fetch during EXECUTE; Record blocking; and OS/400 library view.
These are some rather esoteric sounding terms, but once they’re defined for you, you’ll realize that this is just Microsoft’s way of making the mundane sound extraordinary. However, if you are not familiar with SQL, some of these terms may not be familiar to you. If that’s the case, I strongly recommend that you get a basic SQL manual.
Lazy close support refers to how an AS/400 file that was opened by ODBC closes when the SQLFreeStmt command is used with the SQLClose option. If this box is checked
and SQLFreeStmt is used with SQLClose, the open AS/400 file will not be closed until the next ODBC SQL request is sent. If the box is not checked and both SQL statements are used, the AS/400 file will be closed immediately.
Why would you want to use this option? You may have an application that needs to retrieve the last data set from the last position of the file pointer and you want to process that data on the remote application before the file is closed. Leaving the file open can improve performance because you don’t have to reopen the file and reposition the pointer to retrieve the previous data set.
The Enable pre-fetch during EXECUTE option lets your SQL Select statement open a file and perform a Fetch operation when the Select statement is executed, allowing your application to fetch the first block of data before the application requests it. This can reduce the amount of communication between your application and the server, thereby enhancing the performance of the application. If your SQL statements use the SQL ExtendedFetch statement, you should leave this box unchecked because performance will be degraded when these features are used together.
Record blocking is a familiar term to most programmers. You can specify record blocking as the number and size of records to retrieve for each data request. From this panel, you specify when and if record blocking is allowed, as well as the record block size. You can indicate that you want records blocked unless the For Update Of clause is specified on an SQL Select statement. You can also tell the system to block records if the Select statement specifies For Fetch Only. The last option is to indicate that records are not blocked at any time. You can also specify the number of rows (records) to return during a given request in a predefined number between eight and 512. The defaults for this command are Block always unless For Update Of with a record block size of 32. What this means is that records will always be retrieved in blocks of 32 KB, unless the For Update Of clause is used in the SQL File statement. In general, when you experience performance problems with your ODBC requests, you should try changing the block size here before attempting any other changes. You can sometimes improve performance dramatically just by changing this parameter.
The OS/400 library view option specifies the set of libraries that will be searched to create a list of table owners (file owners). This option is only valid when your SQL request contains the Tables function. This is a fairly complex SQL function that probably won’t be used by most ODBC applications. This parameter is only valid when certain parameters, such as szTableQualifier or cbTableQualifer, are specified with the Tables function. If these particular parameters aren’t used, the Default library list is used, which has the same effect as if this option was not specified at all. If you would like more information on what parameters are valid with the Tables function, do the following: From the Data Source Setup panel, with the Performance tab checked, click on Help and then on OS/400 library view to see a list of valid parameters. In general, you should leave this value set to Default library list.
Clicking on the Language tab reveals the panel shown in Figure 2. From this panel, you can specify values for the following options: Sort type, Sort weight, and Language ID. Sort type lets you sort by Language ID (which works in conjunction with the Language ID option), by Hex (all data is converted to hex prior to sorting), by job profile, or by a sort sequence table. If you tell the system to go by a sort sequence table, you will enter the table and library name in the Sort Library/Table Name box.
Sort weight refers to how uppercase and lowercase letters are treated. This option is only available to you if you use a sort type of Language ID. If you select the Shared- Weight radio button, all lowercase letters will be converted to uppercase prior to sorting. If you select the Unique-Weight button, the lowercase-to-uppercase conversion will not take place. Incidentally, the collating sequence for these sorts will be based on the collating sequence of the individual language selected with the Language ID parameter.
Language
Language ID is available to you when the Sort Type of Language ID is selected. You can select the language that is appropriate for your application.
The Other tab (shown in Figure 3) lets you set values for the Connection type, Object description type, and Scrollable cursor options. Each of these options refers to specific SQL operational functions. Connection type controls whether or not you can use such SQL options as Read/Write, where all SQL options are allowed; Read/Call, where only Select and Call statements are allowed; and Read-Only, where only the Select statement is allowed. The default value for this parameter is Read/Write. Object Description Type specifies the types of values that are returned by the ODBC catalog APIs in the REMARKS column of the returned SQL data set.
If you have used SQL, you are familiar with the term scrollable cursor. Scrollable cursors are used to allow multiple, indexed reads of a table (file). The Scrollable cursor option in the Other tab lets you specify whether a cursor should always be scrollable or always scrollable unless the row size is 1. (A row size value of 1 means that only one record is returned from a SQL Fetch operation.) This type of operation is normally specified in the Select Using operation within SQL, but it can also be overridden here.
Translation
The tab shown in Figure 4 lets you specify whether or not to perform data translation on data that is stored in a file with a CCSID of 65535. (Data will be translated after it is retrieved from the AS/400 but before it is returned to your application.) This feature lets you translate EBCDIC data to ASCII format. If you do tell the program to perform the EBCDIC-to-ASCII conversion, you can also specify which translation Dynamic Link Library (DLL) should be used. Finally, this option allows you to pass a parameter to the translation DLL, if it requires one. You should refer to the DLL vendor’s documentation to determine if a parameter is required.
The Format tab (Figure 5) allows you to set up AS/400 database server data format options. From this tab, you can control the following options: Naming convention, Decimal separator, Time, and Date. The Naming convention parameter specifies whether your SQL statements must use SQL naming standards or SYS naming standards. SQL naming standards dictate that table names must have a period (.) between the collection (library) and the table name. The SYS naming convention means that a slash (/) is used to separate the collection and table name. The Decimal separator parameter specifies what is used as a decimal point. The default value is a period (.).
The Date and Time options control which separators are used on returned date and times. The default for the Time parameter is *HMS (hours, minutes, and seconds) using a colon (:) as the separator. The default for the Date parameter is *ISO (International Standards Organization), which is yyyy-mm-dd with a hyphen (-) used as the separator.
The ODBC Data Source Administrator Window
So far, everything I’ve done to set up a data source has been at the user level. That is, only the user currently logged into Windows 95/NT will be able to access the data source configuration I’ve previously defined. If you want this data source to be available to all users of this PC, regardless of who is logged on, you should select the System DSN tab from the ODBC Data Source Administrator window (Figure 6). Data sources configured using this tab will be available to all users of a PC.
Use the File DSN tab (Figure 7) to connect a data source to a data provider, such as the AS/400. Unlike the user or system types of Data Set Names (DSN), file data sources may be shared by all users, as long as they have access to the appropriate drivers such as the Client Access/400 32-Bit ODBC driver. Click on the Add button to add a new file data source and you’ll be presented with the Create New Data Source window shown in Figure
Other
Format
File DSN
8. This is the same window you see when you click on the Add button in both the User DSN and System DSN panels. Clicking on the Advanced button gives you access to the dialog box shown in Figure 9. From there, you can modify the ODBC driver settings, changing such things as parameters passed or driver name. You should only make these kinds of changes if you have the documentation handy for the particular ODBC driver you are changing and you are sure of what you are doing. Your modifications could easily make your data source unusable. Checking the Verify this connection (Recommended) box will allow you to test the connection before proceeding. This is a very good idea if you change any of the driver settings. You can continue on with the rest of the file data source configuration just as you did with the user data source configuration.
The Set Directory button on the File DSN tab (see Figure 7) allows you to make the current directory shown on this panel the default directory for listing data sources. That is, the directory shown on this panel (in the Look in drop-down box) will become the default directory from which all data sources will be listed. If you have data sources in another directory, they will not be shown in the list. In general, you’ll never need to change this setting unless you have software that places ODBC drivers in something other than the default directory, which is C:Program FilesCommon FilesODBCData Sources.
ODBC Drivers and About Tabs
The ODBC Drivers and the About tabs on the Data Source Administrator window are informational tabs; you cannot change anything from them. The ODBC Drivers tab lists the defined ODBC drivers available to this PC, including any you may have created, while the About tab lists information about the core ODBC components. Both panels are handy for reference in time of trouble, but not much use otherwise.
The Tracing tab shown in Figure 10 allows you to start or configure an ODBC Trace session. Click on the appropriate When to trace radio button to define when you want the session to run. All the time means just what it says; all ODBC calls will be logged. Onetime only means that only the current ODBC session will be logged. When the user logs off, tracing will stop. Click on the Start Tracing Now button to begin the session. Clicking on the Stop Tracing Now button will end the current Trace session. You can enter the name of the Trace Log file in the Log file Path box or leave the name as the default. The Custom Trace DLL box allows you to specify the name of the trace DLL. Unless your ODBC driver software requires a specific trace DLL, you can leave this entry at its default value.
A discussion of ODBC tracing wouldn’t be complete without mentioning a couple of caveats. First, the ODBC trace log files can become incredibly huge unless you periodically clear them by deleting them. Second, when you trace ODBC calls, you log all data passed between the PC and the remote database server. This means that user IDs and passwords are logged in clear, unencrypted text. Needless to say, this is a security violation that compromises security on both the PC and the remote AS/400. Anyone who has access to this PC can start an ODBC trace and retrieve this sensitive information. It is a good idea to remove the trace DLL from the PC in order to close this security hole. If you later need to start an ODBC trace on that PC, you can always restore it from a server or diskette.
On the AS/400
That’s the basics of each option available to you when you create or modify an ODBC data source. You can make a huge impact on the performance of the ODBC-enabled application based on the options you select from these panels. However, you’re not done yet. There are a few more things to take care of on your AS/400. From an AS/400 command line, type the command Add Remote Database Directory Entry (ADDRDBDIRE) and press Enter. You’ll see the Add RDB Directory command panel (Figure 11). You’ll need to type in the name of your AS/400 in the Relational database field and *LOCAL in the Remote location field. You’ll also need to define whether this is an *SNA or *IP connection by making the appropriate entry in the Type field. You create this remote
Tracing
database directory entry so that the ODBC driver connecting to this AS/400 will know what syntax to use for the table qualification. Some ODBC SQL calls require a syntax of SYSTEM.COLLECTION.TABLE, where a period (.) is used as a separator. The syntax of SYSTEM.COLLECTION. TABLE is equivalent to AS/400 System Name, Library, and File name. The AS/400 requires a slash (/) as a separator. Defining the Remote Database Directory Entry lets the ODBC driver know what syntax to use. (For another view on how to improve ODBC performance from the AS/400, see “Kick Start ODBC with Prestarted Jobs,” Client Access/400 Expert, November/December 1996.)
Client Access/400 and ODBC calls using Client Access communicate with a program named QZDAINIT that runs on your AS/400. This program resides in library QIWS. Normally, QZDAINIT is started when you start subsystem QSERVER. Generally, the system startup program will start QSERVER. However, some AS/400s have been set up to use QCMN or QBASE as the default communication subsystem. If this is the case, you may need to ensure that those subsystems are started before your Client Access-based ODBC connections will work.
That’s an in-depth look at configuring ODBC. If you find that a particular setting doesn’t work with your ODBC driver or the SQL syntax required by that driver, experiment with the configuration until you make it work. Although SQL is generally the same across all applications and platforms, there are differences. You may find that certain recommendations made in this series of articles may not function exactly the way you intended with your application. The online help provided with the Client Access driver (32- bit) is fairly extensive and quite helpful. Refer to it if you experience any problems.
QSERVER
All Set
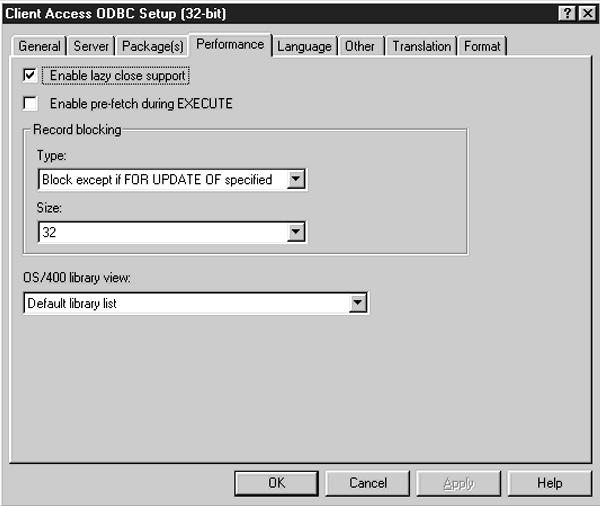
Figure 1: The options on the Performance tab will help you enhance the performance of ODBC on your AS/400.
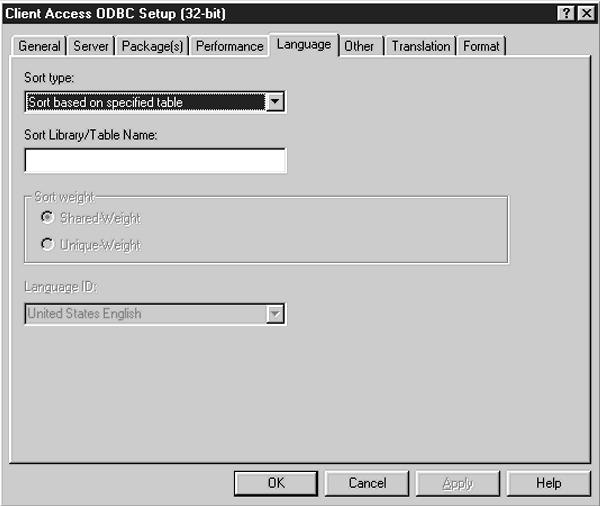
Figure 2: The Language tab lets you specify such options as Sort Type, whether to sort by uppercase or lowercase, and what Language ID to sort by, if applicable.
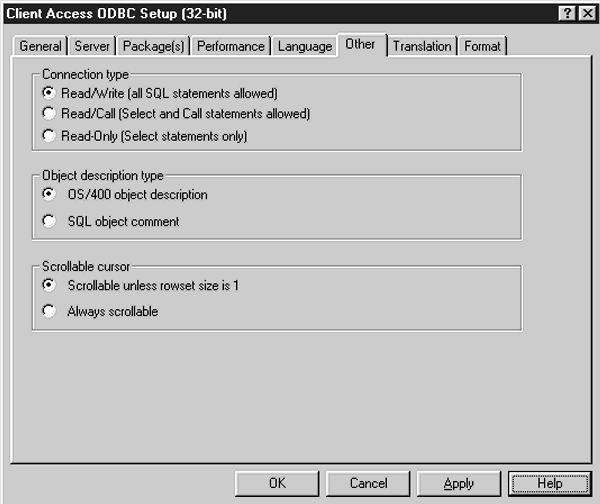
Figure 3: The Other tab lets you specify such options as Connection type, Object description type, and Scrollable cursor.
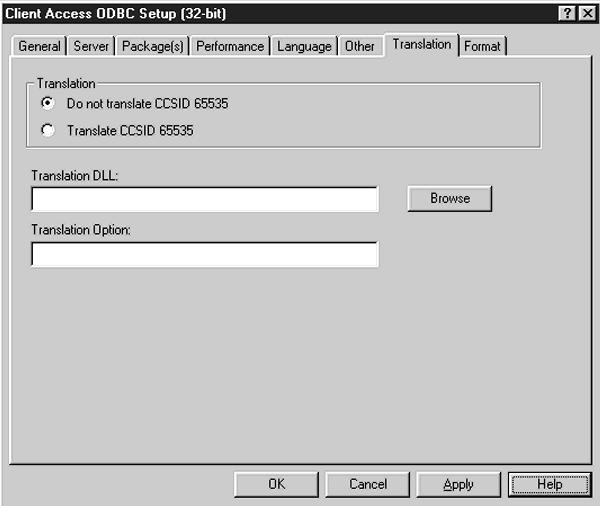
Figure 4: You specify whether or not CCSID 65535 translation should be performed on the Translation tab.
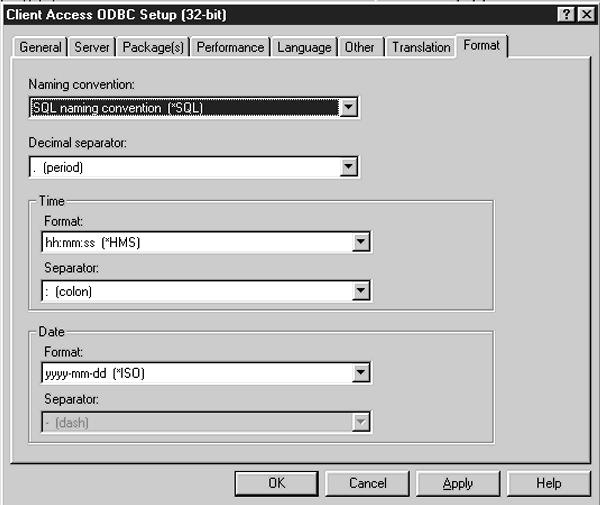
Figure 5: The Format tab lets you specify the format of returned data.
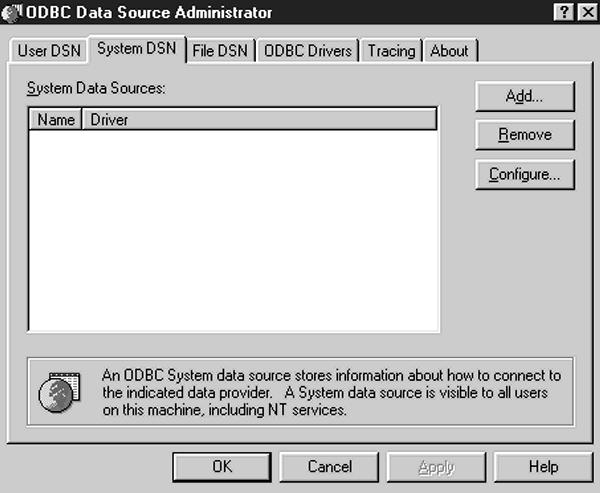
Figure 6: The ODBC Data Source Administrator window is the starting place for defining ODBC data sources.
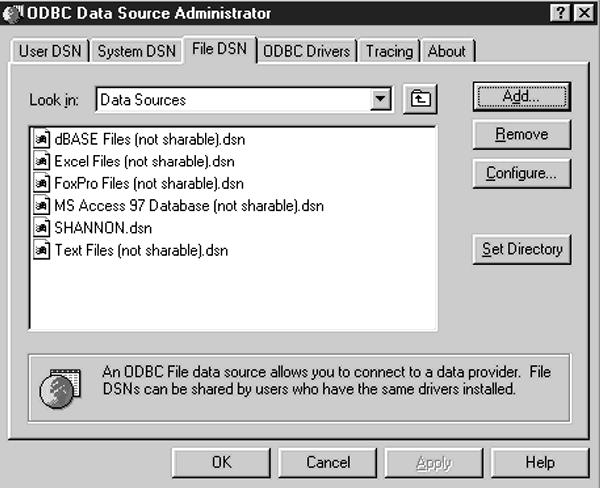
Figure 7: The File DSN tab lets you connect a data source to a data provider, such as the AS/400.
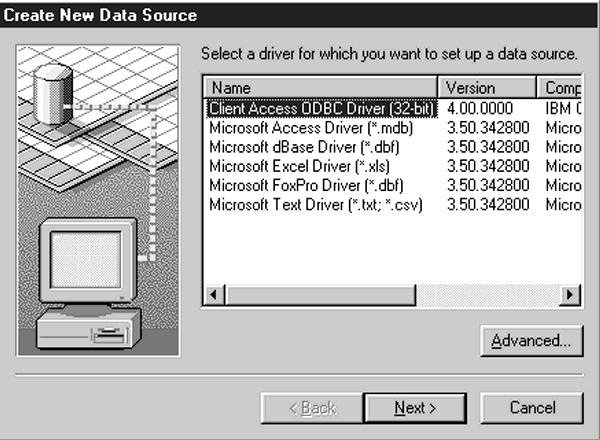
Figure 8: The Create New Data Source window is used to add new data sources using existing ODBC drivers.
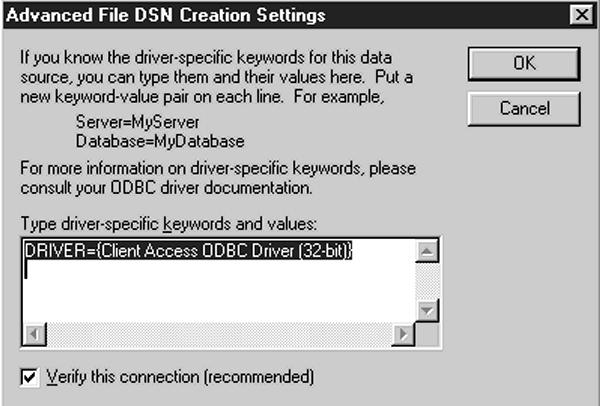
Figure 9: The Advanced File DSN Creation Settings dialog box lets you modify ODBC driver settings.

Figure 10: The Tracing tab lets you configure or start an ODBC Trace session.
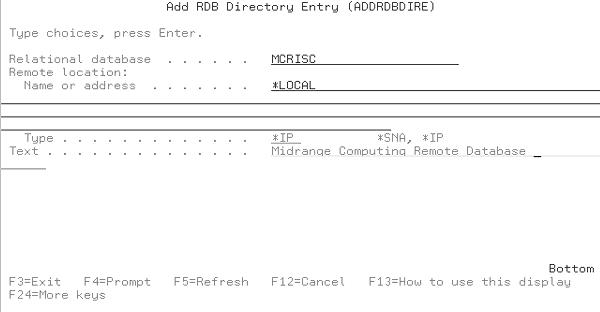
Figure 11: The Add RDB Directory Entry panel on the AS/400 lets the ODBC connection know what SQL syntax to use.


 More than ever, there is a demand for IT to deliver innovation. Your IBM i has been an essential part of your business operations for years. However, your organization may struggle to maintain the current system and implement new projects. The thousands of customers we've worked with and surveyed state that expectations regarding the digital footprint and vision of the company are not aligned with the current IT environment.
 TRY the one package that solves all your document design and printing challenges on all your platforms. Produce bar code labels, electronic forms, ad hoc reports, and RFID tags – without programming! MarkMagic is the only document design and print solution that combines report writing, WYSIWYG label and forms design, and conditional printing in one integrated product. Make sure your data survives when catastrophe hits. Request your trial now! Request Now.
 Forms of ransomware has been around for over 30 years, and with more and more organizations suffering attacks each year, it continues to endure. What has made ransomware such a durable threat and what is the best way to combat it? In order to prevent ransomware, organizations must first understand how it works.
 Disaster protection is vital to every business. Yet, it often consists of patched together procedures that are prone to error. From automatic backups to data encryption to media management, Robot automates the routine (yet often complex) tasks of iSeries backup and recovery, saving you time and money and making the process safer and more reliable. Automate your backups with the Robot Backup and Recovery Solution. Key features include:
 Business users want new applications now. Market and regulatory pressures require faster application updates and delivery into production. Your IBM i developers may be approaching retirement, and you see no sure way to fill their positions with experienced developers. In addition, you may be caught between maintaining your existing applications and the uncertainty of moving to something new.
 IT managers hoping to find new IBM i talent are discovering that the pool of experienced RPG programmers and operators or administrators with intimate knowledge of the operating system and the applications that run on it is small. This begs the question: How will you manage the platform that supports such a big part of your business? This guide offers strategies and software suggestions to help you plan IT staffing and resources and smooth the transition after your AS/400 talent retires. Read on to learn:
LATEST COMMENTS
MC Press Online