


Remember the good old days, when your AS/400 had a system printer and a few other printers scattered throughout the building? Because you had only a few printers to worry about, directing printer output was not a problem. Since that time, reduced prices for printers and the advent of printing over TCP/IP have allowed people to attach many more printers to their systems, often causing problems whenever you try to direct spooled output to these printers. Now, not only must you manage output to printers located in one building, but you may also have TCP/IP printers that are a thousand miles away attached to your AS/400. In addition, users are demanding more flexibility: They want to be able to print some reports on the printer closest to their workstations and other reports either on faster printers or on the system printer. Some users do not even use the same workstations throughout the day, so when they change workstations, they need their reports to move with them. If you attach PCs to your AS/400 with an emulator, you may encounter problems caused by virtual devices. When users attach to a virtual device, the system assigns a device ID. This device ID means that, every morning when users sign on, they may be using different workstation devices from the day before.
Because of these issues, you cannot simply assign a user or workstation to an output queue. You can, however, generate reports and place them on hold. After the reports are generated, users can then change output queues and release their printouts. One problem with this approach is the numerous phone calls you will receive when users can’t find their output. If you allow every user to work with output queues and change reports, someone will accidentally delete a report sooner or later. If you’re lucky, the report can be easily re-created. This article describes in detail the method I use to manage printer output. Although there are many ways to accomplish the task, the method I describe here provides you with a method to solve the problem.
Alright, Who’s Killing Trees?
I’m sure you’ve witnessed users accidentally run a menu option that generated huge reports they either didn’t want or didn’t realize they ran. To avoid this problem, I give every program that generates a spooled file on my system a display screen to prompt users for report generation parameters. If the program does not require any parameters, I simply display a generic screen to inform users that they are about to run a report. The screen
displays a description of the report to be run and gives users the option to press F3 to cancel the report. On each display screen, the currently selected output queue is displayed in the upper right portion of the screen.
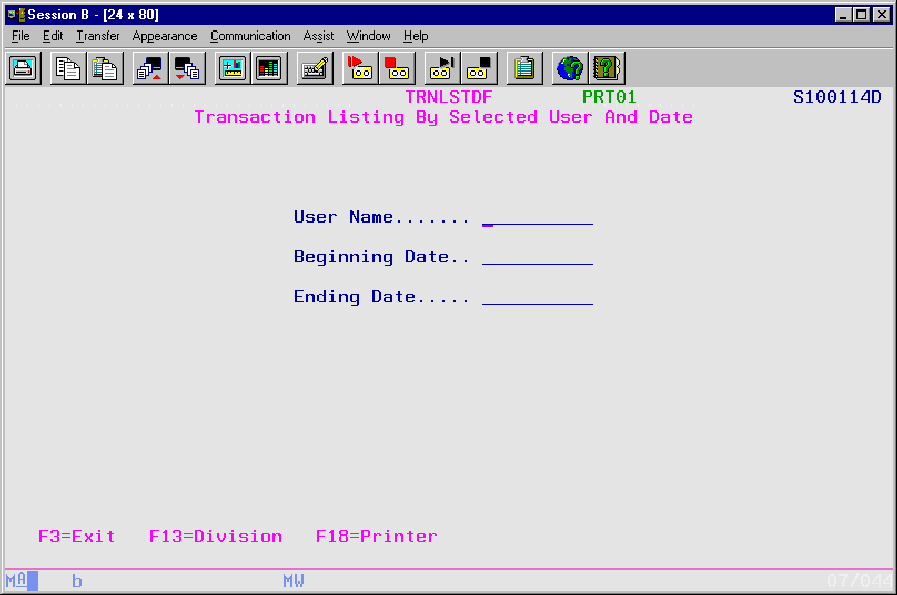
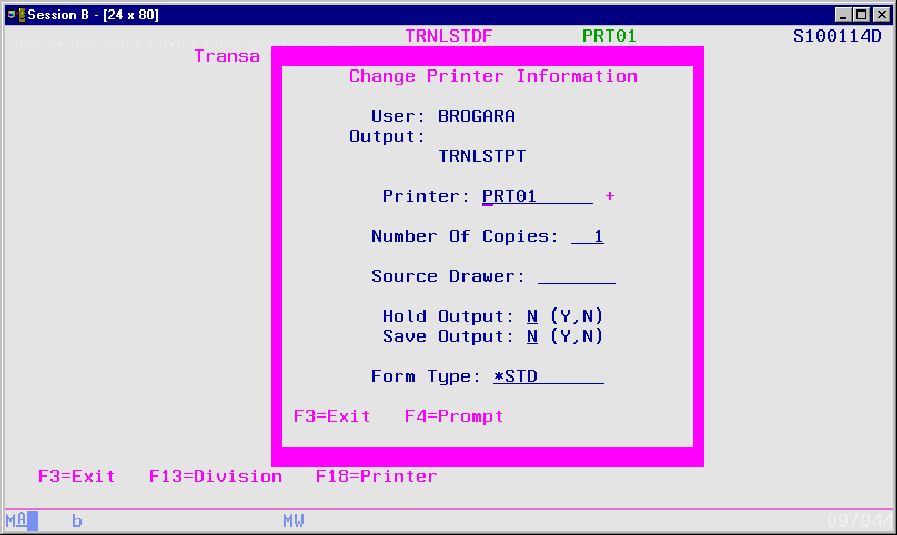
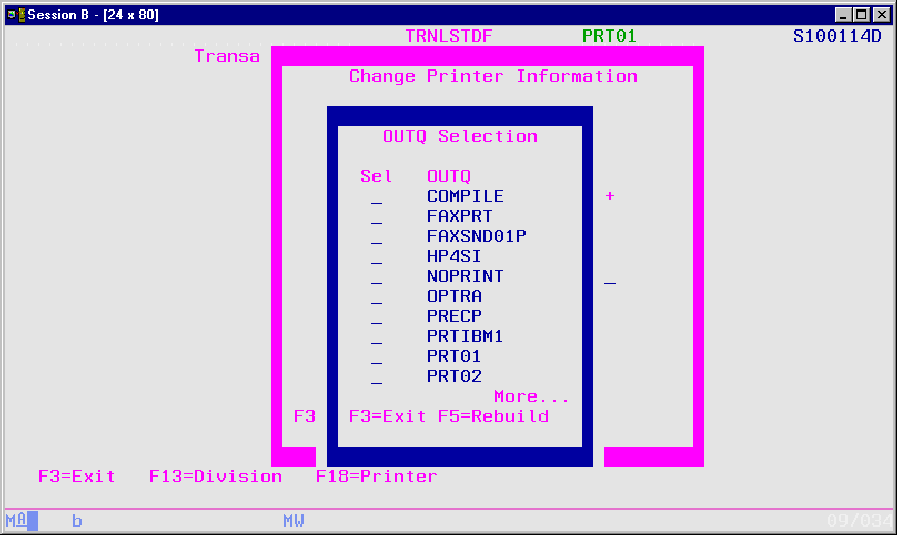
Here is how I have the display screens set up and how I enable users to select the appropriate output queue to which they should send any given report. Figure 1 shows an example of a report parameter selection screen for a simple transaction report sorted by user and date. The upper right portion of the screen displays the output queue (PRT01) to which this report is being sent. F18 presents a screen like the one shown in Figure 2. From that screen, the user can change the output queue, number of copies, form type, source drawer, and whether the report should be placed on hold or saved after printing. If unsure of the output queue name, the user can prompt on the printer line by pressing F4 to display a list of valid output queues from which an output queue can be selected (see Figure 3). F5 rebuilds the list of output queues. (Normally, the rebuild should be done once after adding new printers or output queues.) After a selection has been made, the user is returned to the report selection display, the output queue selected is displayed on the screen, and a report can be generated. The output queue selected is stored in a physical file and used whenever this report is run again. Even if the user uses the same output queue for this report, the output queue needs to be selected only once.
To manage this function, I use two physical files, one logical file, two display files, and four RPG programs (see Figure 4). The source for these objects is available at www.midrangecomputing.com/mc/99/07. Physical file CPY001PF stores the printer override information. Another file, CPY004PF, contains the valid output queue names. To create a file with valid output queue names, I use the following command:
DSPOBJD OBJ(*LIBL/*ALL) +
OBJTYPE(*OUTQ) +
OUTPUT(*OUTFILE) +
OUTFILE(CPY004PF).
After file CPY004PF is created, I create a logical file over it that is keyed by output queue (object name). This logical file determines whether a valid output queue name has been selected. You can also use the Check Object (CHKOBJ) command to validate the output queue name, but I find it easier to create the logical file and chain it to the physical file whenever the user selects a different output queue.
The two display files and four RPG programs display the current output queue, maintaining and retrieving the information stored in CPY001PF. These are the program names and functions:
• CPY001RG retrieves the parameters from CPY001PF before issuing the Override with Printer File (OVRPRTF) command. This program can be called either from a CL program or, if the printer file is a user-opened file, from another RPG program.
• CPY002RG retrieves the name of the output queue to which the report is scheduled to be sent. I use this program to display the output queue name on the report parameter selection screens.
• CPY003RG allows users to change the output queue name and other override parameters for the reports they are about to generate.
• CPY004RG displays the list of output queue names that can be selected. The program is called from CPY003RG when users prompt on the printer name. CPY004RG also allows CPY004PF to be rebuilt by pressing F5.
Naming Names
The first step in this process is to attach labels with correct AS/400 output queue names to your printers. For those of you operating in the S/36 environment, this means using native object names, such as PRT01, rather than S/36 equivalents, such as P1. Obviously, you must provide the correct output queue name because the AS/400 doesn’t know where “the
printer next to Suzie’s desk” or “the printer next to the fax machine” is located. (In case you are unsure of the output queue name, it should be available from the printer label.)
The next step is to create a physical file to store the user name and report name along with other important information such as the output queue name, form type, and whether the output is being held or saved. The layout of this file (which I have named CPY001PF) is shown in Figure 5. This is the information I save for each report, but if you need different parameters to accommodate your users, fields can be added to this file. You can place all available printer override fields into this file, although you may never use many of the options in the OVRPRTF command.
Now, examine the fields in CPY001PF in detail. The first field, CPPRTF, is the name of the printer file for which these overrides apply. CPUSER contains the user name. When you first set up the CPY001PF file, you should enter the printer file name of any report that is directed using this method. You can leave the user name blank and enter the rest of the parameters for each report because the blank user name record becomes the default for the printer file. If a record for the printer file is not found in CPY001PF, the output queue name is set to *JOB and the form type is set to *STD. When program CPY001RG is called to retrieve the printing parameters, it first checks under the current user name. If a record is not found for the user, it checks the blank user name and returns the parameters for the blank user. CPY003RG handles any change that needs to be made to accommodate a particular user.
CPPRNT is the output queue name where the report should be spooled. CPFORM contains the form name (*STD or INVOICE, for example). You can set the form type in the external printer file, but users have requested that they be able to change the form type from the type set up in the printer file. CPCOPY determines the number of copies you wish to generate. CPHOLD and CPSAVE are used respectively either to place the spooled files on hold or to save the output after it has been printed. CPDESC is simply a description of the report.
Sometimes, a program generates output that may not be required in all instances, or some users may not need the printout and simply discard it. To control these functions, I use CPPRPT and CPSWCH. CPPRPT is a “yes or no” flag that specifies whether the user wants the report generated. CPSWCH holds an external indicator or switch setting such as U1 through U8. In the program that generates output, I code the external indicator on the printer file in F-specs. This way, I can always have the program execute a WRITE to the printer file. If indicator U1 is coded on an F-spec but the indicator is not turned on, the WRITE to the printer file occurs as usual, but a spooled file is not generated. This consideration eliminates the need to add logic to the program to control whether printer output should be generated. To avoid potential problems, I do not allow users to change the CPPRT or CPSWCH fields. CPBIN and CPSRCD are used to select the bin and drawer on laser printers.
You must add the output queue name field to the display screens that control the reports. You should try to use the same area on your display files for consistency. That way, users can always determine where the output is scheduled to print by checking the same spot on every screen. I use F18 on all of my display files to allow users to change output queues. You may use whatever function key you like as long as you can keep it consistent. In addition, you need to add a few lines of code to your applications to call the programs to retrieve the output queue names and maintain the CPY001PF file.
Bringing It All Together
Along with the code for this utility, I have included on the Web a short RPG IV program that illustrates how this all works. This program has a display file and a printer file, but there is no CL program to perform OVRPRTF, so I have coded the printer file as user- open. Before you display the screen, execute subroutine $RTVOUTQ, which calls program CPY002RG and passes along the name of the printer file. The selected output queue is
returned and placed into field WSOUTQ, which is displayed on the screen. F18 executes the $CHGOUTQ subroutine, which calls program CPY003RG. This program allows users to change output queues or any other option, such as the number of copies. If you change any of the parameters, CPY001PF is updated inside CPY003RG. In addition, if you have multiple reports generated from the same RPG program, you can change the value of the WPPRTF field and execute $CHGOUTQ multiple times. Before the screen is redisplayed, $RTVOUTQ is called to retrieve the output queue name from the CPY001PF file. If a user changes the output queue, the new output queue is displayed on the screen. Before any output is sent to the printer, subroutine $SETOUTQ, which calls program CPY001RG, is executed. Parameters from CPY001PF are passed back, and OVRPRTF is then executed. The printer file opens, and data is written to the printer file.
This method for managing printer output isn’t something you can accomplish overnight. If you are experiencing problems keeping track of the spooled output on your AS/400, you may wish to implement something similar to this example. I started using this method with some of my problem reports, and, now, every program I write that generates a spool file uses this method. Your users will need a little training on how to use this new option, but once they understand how it works, the IS staff should receive fewer phone calls and, hopefully, fewer lost or misdirected reports. If your users send reports to the wrong output queues by mistake, you can view the CPY001PF file to determine the output queues to which the reports were sent.
Figure 1: My report programs prompt the user for runtime parameters.
 |
 |
 |
Object Source Member Type Description
CPY001PF PF Stores printer override information by printer file name and user ID
CPY001RG RPGLE Retrieves report override values from
CPY001PF CPY002RG RPGLE Retrieves the name of the output queue to which a report is to be sent
CPY003DF DSPF Display file used by program CPY003RG CPY003RG RPGLE Allows user to change report override information
CPY004DF DSPF Display file used by program CPY004RG CPY004LF LF CPY004PF keyed by output queue name CPY004PF PF Contains a record for each output queue; created with DSPOBJD
CPY004RG RPGLE Lists valid output queue names
Figure 4: Our system to allow users to select output queues uses these nine objects.
A UNIQUE
A R RCOPY
A CPPRTF 10 COLHDG('Printer File')
A CPUSER 10 COLHDG('User Name')
A CPPRNT 10 COLHDG('Printer/Outq')
A CPFORM 10 COLHDG('Forms Number')
A CPCOPY 3S 0 COLHDG('Number Of Copies')
A CPHOLD 4 COLHDG('Hold *YES/*NO')
A CPSAVE 4 COLHDG('Save *YES/*NO')
A CPDESC 20 COLHDG('Description')
A CPPRPT 1 COLHDG('Print Report (Y,N')
A CPSWCH 2 COLHDG('Switch Number')
A CPBIN 5 COLHDG('Output Bin')
A CPSRCD 7 COLHDG('Source Drawer')
A K CPPRTF
A K CPUSER
Figure 5: Physical file CPY001PF stores printer file override information.


 More than ever, there is a demand for IT to deliver innovation. Your IBM i has been an essential part of your business operations for years. However, your organization may struggle to maintain the current system and implement new projects. The thousands of customers we've worked with and surveyed state that expectations regarding the digital footprint and vision of the company are not aligned with the current IT environment.
 TRY the one package that solves all your document design and printing challenges on all your platforms. Produce bar code labels, electronic forms, ad hoc reports, and RFID tags – without programming! MarkMagic is the only document design and print solution that combines report writing, WYSIWYG label and forms design, and conditional printing in one integrated product. Make sure your data survives when catastrophe hits. Request your trial now! Request Now.
 Forms of ransomware has been around for over 30 years, and with more and more organizations suffering attacks each year, it continues to endure. What has made ransomware such a durable threat and what is the best way to combat it? In order to prevent ransomware, organizations must first understand how it works.
 Disaster protection is vital to every business. Yet, it often consists of patched together procedures that are prone to error. From automatic backups to data encryption to media management, Robot automates the routine (yet often complex) tasks of iSeries backup and recovery, saving you time and money and making the process safer and more reliable. Automate your backups with the Robot Backup and Recovery Solution. Key features include:
 Business users want new applications now. Market and regulatory pressures require faster application updates and delivery into production. Your IBM i developers may be approaching retirement, and you see no sure way to fill their positions with experienced developers. In addition, you may be caught between maintaining your existing applications and the uncertainty of moving to something new.
 IT managers hoping to find new IBM i talent are discovering that the pool of experienced RPG programmers and operators or administrators with intimate knowledge of the operating system and the applications that run on it is small. This begs the question: How will you manage the platform that supports such a big part of your business? This guide offers strategies and software suggestions to help you plan IT staffing and resources and smooth the transition after your AS/400 talent retires. Read on to learn:
LATEST COMMENTS
MC Press Online