


Editor’s note: We at Midrange Computing recently installed a new AS/400 in our California office. Daniel Green, one of MC’s best technical editors and a TCP/IP expert, oversaw the installation and reconfigured our AS/400 TCP/IP setup from scratch. The following are Daniel’s notes and words of advice for getting TCP/IP up and running on your AS/400.
The installation and configuration processes I’ll be describing in this article were performed on a RISC AS/400 running V4R3, but most commands function similarly on lower releases. Before you start configuring TCP/IP on your AS/400, you should design a plan that includes information about the network hardware you have installed, especially the type of LAN or WAN equipment. You can use the Work with Hardware Resources (WRKHDWRSC *CMN) command to find out what kind of LAN hardware is installed on your system and the port that supports your LAN type. I’ll be using an Ethernet LAN in this example, but you can use Token-Ring, X.25, wireless LANs, frame relay, and other communications adapters. (See Appendix A in OS/400 TCP/IP Configuration and Reference V4R3 [SC41-5420-02] for hardware options.) Prior to configuration, also ensure that TCP/IP Connectivity Utilities for AS/400 (program product 5769TC1) is installed on your AS/400. Determining if 5769TC1 is installed is easily accomplished using the following steps:
1. Enter the command GO LICPGM on any command line to access the Work with Licensed Programs menu.
2. Select option 10 (Display installed licensed programs).
3. Page though the licensed programs display until you find 5769TC1-TCP/IP Connectivity Utilities for AS/400.
4. Make sure the Installed Status is *COMPATIBLE. If you can’t find the 5769TC1 program product, you’ll need to install it from an authorized IBM CD-ROM or tape. (See AS/400 Software Installation V4R3 [SC41-5120-
02] for installation details.) After you have confirmed that the 5769TC1 program has been successfully installed on your AS/400, you’re ready to start enabling TCP/IP communications. I suggest you
allocate the QSYSOPR message queue to your interactive job in *Break mode while performing the following tasks in case there are any problems.
First, you should become familiar with two menus: the green-screen Configure TCP/IP menu (type GO CFGTCP) and the TCP/IP Administration menu (GO TCPADM). These menus contain all the commands I will be describing to get TCP/IP up and running. (In many cases, there are two or three ways to complete a TCP/IP configuration task.) In my example, I will be using an Ethernet LAN connected to a new computer, but your line type could be entirely different. (TCP/IP operates over a variety of physical line types. See Appendix A in OS/400 TCP/IP Configuration and Reference V4R3 for line types and corresponding creation commands.) If you already have a LAN set up on your system, you may be able to skip some of these steps.
The first chore in setting up TCP/IP is to configure a physical line description for the type of AS/400 LAN adapter card you have identified for TCP/IP use in the previous steps. In my case, I found that CMN04 was my Ethernet port; yours could be entirely different, but the port name will start with CMN if it was automatically configured. I can use the Create Line Desc (Ethernet) (CRTLINETH) command shown in Figure 1 to create the Line that TCP/IP will use. (Notice the resource name is the port I found when I used the Work with Hardware Resources command, WRKHDWRSC.) You can define a controller and device description for this line by hand, but TCP/IP will automatically create these objects when activated, so there’s really no reason to worry about them unless you have some special needs. Just fill in the line description and the resource name and press Enter to create the line. Use the OS/400 defaults for all the other parameters.
The Heart of TCP/IP
Now that you have configured a TCP/IP line, you’ll need to identify at least one unique Internet address that is associated with the line by creating a TCP/IP interface. You can use almost any address you want if you’re not going to be using the interface to connect with computers outside your local network (e.g., the Internet). If you want to access other networks, you’ll have to obtain a unique address from Network Solutions. (For more information on TCP/IP addresses, see “Breaking Down TCP/IP Addressing” on page 4.)
Use the Add TCP/IP Interface (ADDTCPIFC) command shown in Figure 2 to add a TCP/IP interface to your system. (Remember that these are logical, not physical interfaces, so more than one interface can be added to a line.) Most parameters can be left at the defaults, but you must enter the Internet address, the line description to attach this interface to, and the subnet mask. The subnet mask is important because it indicates the size and structure of your network. I am using 255.255.255.0 because it is a default value showing that I have between 1 and 254 computers on my network. TCP/IP supports multihoming, which means you can describe multiple interfaces per line description defining different network connections. You can also use option 1 (Work with TCP/IP interfaces) on the Configure TCP/IP menu (reached by the command GO CFGTCP, shown in Figure 3) to add, change, remove, start, and end AS/400 TCP/IP interfaces. If you want to reach remote networks (or subnetworks) using your TCP/IP interface, you must create at least one route (a routing entry) using option 2 (Work with TCP/IP routes) on this menu. If your AS/400 is attached to a single network with no IP routers, you don’t need any routes. (Consult the OS/400 TCP/IP Configuration and Reference V4R3 for details on routes.)
Defining Your Local Domain Name and Host Name
The next step in this odyssey is to define the primary name associated with your system. This name is the one by which your AS/400 is identified within the TCP/IP domain (the Internet). This primary name is a combination of the local domain name and the host name. The local domain name identifies where your system resides within a hierarchy of systems. It contains labels separated by periods (xyz.rtc.com). The host name is unique within the domain and can be used to translate an Internet address for remote servers. Together they form the fully qualified host name in the form of a host.domain,
which identifies a specific system to users outside the local domain. The local domain name can be used by sockets to facilitate host name resolution by the Domain Name System (DNS), an optional method of resolving a host name to an Internet address. In large networks, it’s easier to use DNS servers than to have a complete copy of the host table on every server. In order to use Post Office Protocol (POP) and Simple Mail Transfer Protocol (SMTP) mail servers, you must configure the local domain and host name.
To configure a local domain name and host name, choose option 12 (Change TCP/IP Domain) on the Configure TCP/IP menu (Figure 3). As shown in Figure 4, you enter the host name (MCRISC in this example) and the local domain name. In this example, the local domain name is midrangecomputing.com but in a large network, the domain could look like system1.rochester. ibm.com. The local domain name is descriptive of your organization and indicates its purpose with the labels you use. Midrangecomputing.com indicates that this organization is midrangecomputing and it is a commercial venture (.com). On this panel, you can also indicate up to three remote DNS servers used by this system and the default protocol used to communicate with these servers. The fully qualified name defined for this system is MCRISC.midrangecomputing.com.
The last step you need to complete before actually starting TCP/IP is to configure your TCP/IP host table, which allows you to associate remote host names with TCP/IP addresses. This requirement is analogous to the HOST table that must be set up on a PC that uses TCP/IP. The table contains a list of the hosts on your network that your AS/400 will communicate with and their related TCP/IP addresses. To add an entry to your host table, use the Add TCP/IP Host Table Entry (ADDTCPHTE) command as shown in Figure 5 to associate a host name with an IP address you have assigned to it.
You can also use option 10 (Work with TCP/IP host table entries) on the Configure TCP/IP menu (Figure 3), to add, change, or remove entries. In this case, I am using MCRISC as the identity of my system (the short form), but I could have used the fully qualified name MCRISC.midrangecomputing.com (which I configured in the last step) if I wanted to identify the system to people outside the local LAN. It’s extremely important to have one administrator keep track of host and domain configurations so that conflicts don’t arise and security is not compromised.
Start Communicating with TCP/IP
Now the details of configuring TCP/IP are behind you. Even if you decide to add new hosts, interfaces, or domains, you have a working knowledge of the process and it should be a breeze. You can either use line commands to start and control TCP/IP or you can use the TCP/IP Administration (TCPADM) menu (Figure 6) to perform administration tasks. Before you start TCP/IP, you must execute the Start Host Server (STRHOSTSVR) command (using the *ALL parameter) to start the servers that will allow communication with your server clients. After issuing this command, start TCP/IP either with the Start TCP/IP (STRTCP) command, or select option 3 on the TCPADM menu. There are only two parameters to this command: Start application servers and Start TCP/IP interfaces. Leave the default of *YES on each parameter unless TCP/IP is already started and you want to start only a specific interface or server. Once you press Enter, you can check QSYSOPR Message Queue to see that the following TCP/IP application severs are started: SNMP, TELNET, FTP, SMTP, and LPD.
TCP/IP application server jobs run in the QSYSWRK subsystem. You can also configure additional TCP/IP servers, such as BOOTP and DHCP, and specify that they automatically start when you start TCP/IP. In addition to looking at QSYSOPR, you can verify that TCP/IP is up and properly running on your AS/400 by using the Work with Active Jobs (WRKACTJOB) command and checking to see that the QTCPIP job is running in the QSYSWRK subsystem.
When first starting TCP/IP, the most reliable method of determining its status is using the Verify TCP/IP Connection (PING) command on your AS/400.
You can either PING LOOPBACK (a default host name created automatically for your TCP/IP card in the Host File when configuring TCP/IP) or PING the qualified system name (MCRISC. midrangecomputing.com, in this case). If TCP/IP is not functioning properly, PING will return messages stating there was no response from the host. If you have a problem starting TCP/IP, check the QHST history log, check all QSYSOPR messages, and retrace all your installation steps. Pay special attention to the line description, your host table, and all IP addresses. It’s easy to mistype one digit in a 12- digit address.
I found the basic rules for configuring TCP/IP on a new computer are fairly simple:
• Start with well-defined objectives and design a comprehensive plan to accomplish these objectives.
• Pay close attention to all details of the process and record each configuration step and the values you assign to all network attributes.
• Once you have TCP/IP running, save the configuration files either with the Save Configuration (SAVCFG) command or the Save Object (SAVOBJ) command. Save objects QTOC* and QATM* from QUSRSYS.
• When you decide to connect your AS/400 to the world’s largest network, the Internet, make a thorough study of the security measures you’ll need to implement to keep hackers at bay.
TCP/IP Goes Graphical
Starting with V4R3, IBM has included some new tools with which to configure TCP/IP on a new AS/400. OS/400 V4R3 and above comes with a CD-ROM called EZ- Setup for AS/400e Series. This CD-ROM can be used to automatically install Client Access/400 and basic TCP/IP communications. In the future, IBM may go totally graphical, eliminating much of the frustration of setting up TCP/IP communications manually. Unless you use EZ-Setup, however, most of the steps in the initial setup of TCP/IP currently need to be performed using 5250 emulation on the AS/400. However, a PC that is properly configured with Client Access/400’s or Express client’s Operations Navigator can perform many of the advanced configuration and administration tasks used to maintain TCP/IP network communications. It’s obvious that IBM is slowly molding the AS/400 into a full-fledged GUI environment, and I much prefer to use Operations Navigator instead of a green-screen to administer TCP/IP.
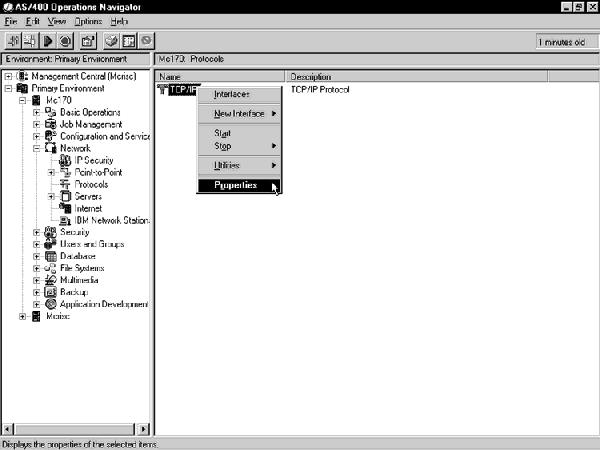
In order to access your TCP/IP controls, open the Operations Navigator window for your AS/400 and double- click the Network icon under the AS/400 you’re manipulating; in this case, MCRISC. Double-click the Protocols icon to bring up a panel similar to Figure 7. Left-click the TCP/IP protocol icon to bring up the pop-up menu shown and select Properties. Using the TCP/IP Properties menu, you can change or add interfaces, start and stop TCP/IP, and configure security rules. Although the OS/400 TCP/IP Administration (TCPADM) menu (Figure 6) is designed to be the primary TCP/IP administration tool, Operations Navigator offers most of the TCP/IP functions you’ll be performing on a day-to-day basis and provides a point-and-click method of TCP/IP administration that you can use after your basic TCP/IP configuration is created.
Whether you choose green-screen or graphical TCP/IP configuration, you’ll find that IBM has done an excellent job integrating TCP/IP into the AS/400, providing plenty of intuitive tools for working with the most pervasive IT communications protocol today
References
OS/400 TCP/IP Configuration and Reference V4R3 (SC41-5420-02, CD-ROM QB3ANL02)
OS/400 AS/400 Software Installation V4R3 (SC41-5120-02, CD-ROM QB3AWG02)
Related URL
AS/400 Online Library: publib.boulder. ibm.com/pubs/html/as400/online/ homeeng1.htm
Related Reading TCP/IP Fastpath Setup V4R1 (SC41-5430-00, CD-ROM QB3A0K00) “Getting the AS/400 Firewall Up and Running,” Midrange Computing, December “Technology Spotlight: Dynamics on the Internet: DNS,” Midrange Computing, October 1998
“Technology Spotlight: IP Security Protocol,” Midrange Computing, September “Technology Spotlight: An Anatomy of SSL,” Midrange Computing, August 1998 “Automate TCP/IP Addressing with BOOTP,” Midrange Computing, August 1998 (www.midrangecomputing. com/MC/ 98/08)
“Technology Spotlight: Inside TCP/IP Addressing,” Midrange Computing, June 1998 (www.midrangecomputing. com/MC/98/06)
“Technology Spotlight: DHCP,” Midrange Computing, March 1998
Breaking Down TCP/IP Addressing
Although TCP/IP is relatively new to the AS/400 world (it was added in V3R1) and is just starting to be used in many midrange shops, its basic concepts have been around for almost 25 years. It’s not an overstatement to say that TCP/IP has driven the rise of an international network: the Internet. Although no one predicted its popularity when TCP/IP was developed by Vinton Cerf in 1973, TCP/IP has imparted a kind of lingua franca to computing, allowing communications between heterogeneous platforms on different networks. TCP/IP is a combination of two protocols:
• the IP protocol (RFC 1166), which uses a hardware-independent addressing scheme based on 32-bit numbers to send packets of data (datagrams) between networks
• the TCP protocol (RFC 793), which is responsible for verifying the correct delivery of the IP packets between network nodes
In order to understand the basics of using TCP/IP, a good place to start is by studying the underlying structure of this protocol: IP addressing. You’ll need at least a rudimentary knowledge of IP addressing to set up TCP/IP on your AS/400.
What’s in an Address?
On top of every local or vendor-specific network address, TCP/IP assigns a unique number to every workstation on Earth that can access the Internet. In the PC world, this task is normally accomplished dynamically by your ISP and you receive a different address every time you dial up the Internet. TCP/IP uses a unique 32-bit (4-byte) number divided into four octets (bytes) that, by convention, is expressed as four decimal numbers in the 0 to 255 range. (Although the range covers 0 to 255 decimal or 00000000 to 11111111 binary, IP addresses starting with 0 or 255 are reserved for special purposes.) Each octet in an address is separated by periods, e.g., 175.212.80.5. Because of the huge number of addresses needed, TCP/IP developers decided to use the first octet in the TCP/IP address to designate five different classes (sizes) of networks. Currently only three classes are in general use: A, B, and C. Class D is reserved for multicast use, and class E is reserved for future use. Each different network class was assigned as many bytes of the address as it needed to represent the number of hosts in its network class. This numbering scheme is shown in Figure 1. Notice that as the number of possible networks addresses increases, the number of possible host addresses decreases and vice versa. This addressing method provides the flexibility and sheer numerical strength needed to manage a worldwide addressing system. Obviously, only the largest worldwide organizations either need, or can obtain, a Class A network. Most large organizations fall into the Class B arena. For instance, Yale University has a Class B license and uses an IP address of
130.132.*.*, allowing it to attach up to 65,000 hosts to its network.
1998
1998
For managability reasons, many large network owners (A, B) find it’s more convenient to divide their networks into subnetworks—or subnets—than it is to request additional IP network addresses for each new local network. Basically, subnets provide a technique to subdivide a network into mini-networks to allow more nodes to use a single IP Class license. Subnets also hide the internal network structure from outsiders and facilitate traffic and congestion control. The subnet is identified by combining a network ID, such as
10.103.132, and the subnet ID, which, in this case, allows for 254 subnets ranging from 10.103.132.1 to
10.103.132.254. The last octet in this case refers to the host ID with the subnet. Subnet notation can be a bit confusing since it is based on binary algorithms and some vendors use proprietary notation for their subnets. Certain IP numbers have been assigned special values to facilitate subnetting and local IP communications. These numbers have the same meaning whether used in a subnet or regular IP address. Because there are instances when a computer does not know the IP number of the network it is on, or even its host address, one value—0—has been reserved to represent an unknown byte of the IP address. For example, an IP address of 0.0.0.26 is used to represent a machine that knows only that it is host number 26. (It is not on a subnet.) A message can still be sent to this machine within its local network by using another special IP byte value: 255. This value is used for broadcasts, which are used to send a message that you want every system on a network to see. This value transmits messages to a number of different systems without sending them to each specific IP address. You could reach every host on network 120.8.2 by using a broadcast address of 120.8.2.255, saving time and money. Another use of this technique is to quickly send messages to all hosts on the local system without looking up any specific IP numbers. In this case, you can just use 255.255.255.255 for the IP address rather than specifying any discreet values. Note that some older implementations also use 0 instead of 255 for broadcast messages.
Certain other IP address bytes are also used for special purposes. Generally, 0, 127, and any number above 223 should never be contained in regular IP addresses. The division of IP address into subnets can be enhanced by using subnet masks to specify the number of bits used for the subnet ID and the host ID. A subnet mask is a 32-bit number that looks very much like an IP address. However, zero bits in the subnet mask indicate positions pointing to the host number, and one bits indicate bit positions ascribed to the subnet number. For example, a subnet mask of 11111111.11111111.11111111.00000000 indicates that the first three bytes refer to the subnet and the fourth byte refers to the host.
Within your own networks, you can assign your own unique TCP/IP addresses, but if you want to connect to the Internet, your network addresses and domain names visible on the Internet must be obtained from a central authority. In the United States, InterNIC handles this chore. Although ISPs usually provide their customers with IP addresses, it’s possible for almost anyone to get a Class C license, even if it’s only for home use. The registration process is not difficult: you can register online at www.networksolutions.com. Once you have your IP address, you’re ready to configure your internal hosts using the bytes available to the class you’ve been assigned.
Class A Class B Class C
First Byte in 0 to 127 128 to 191 192 to 233 the IP Address
Additional Bytes None Byte 2 Byte 2, 3 Used to Indicate
Network
Bytes Used to Byte 2, 3, 4 Byte 3, 4 Byte 4 Indicate Hosts
Potential Number 126 16,000 2,000,000 of Networks
Potential Number 16,777,214 65,532 254 of Hosts
Figure 1: Here is the numbering scheme used for creating the three different classes of TCP/IP networks.
Figure 1: Here is the numbering scheme used for creating the three different classes of TCP/IP networks.
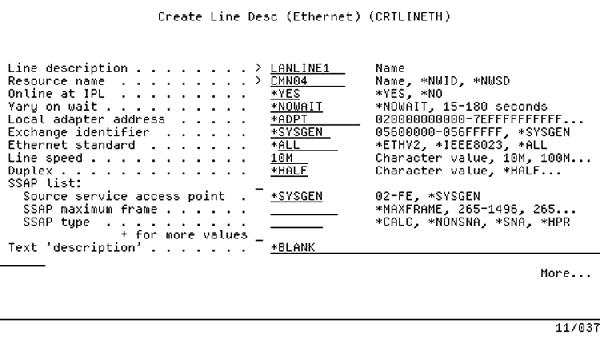
Figure 1: The Create Line Description (Ethernet) (CRTLINETH) command sets up your communications port as an AS/400 Ethernet line.
Figure 2: Use the Add TCP/IP Interface (ADDTCPIFC) command to add a TCP/IP interface to your communications line.
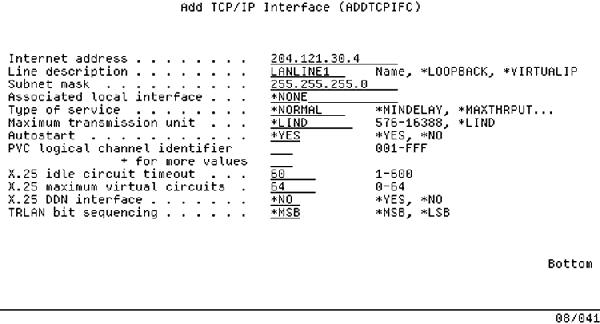
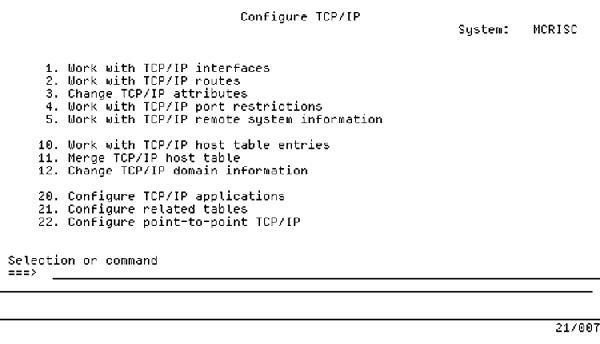
Figure 3: For green-screen TCP/IP, the Configure TCP/IP menu is the place to go.
Figure 4: Define your domain and host names to create a fully qualified host name.
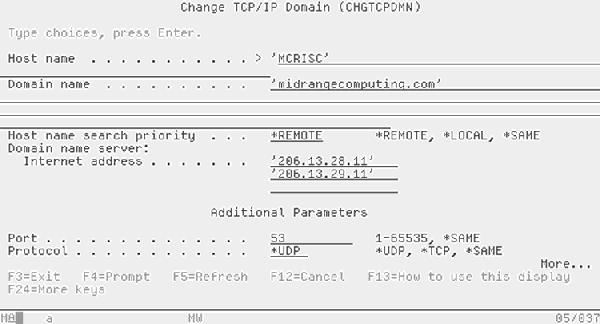
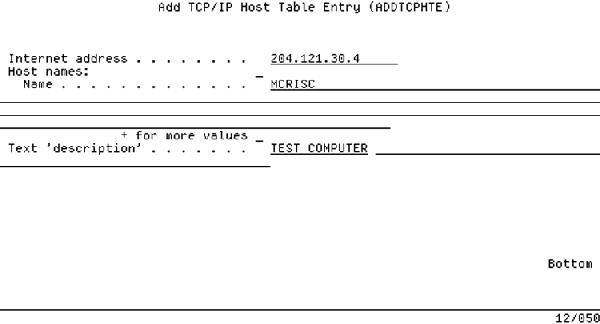
Figure 5: Adding an entry to the Host Table is easy with the Add TCP/IP Host Table Entry (ADDTCPHTE) command.
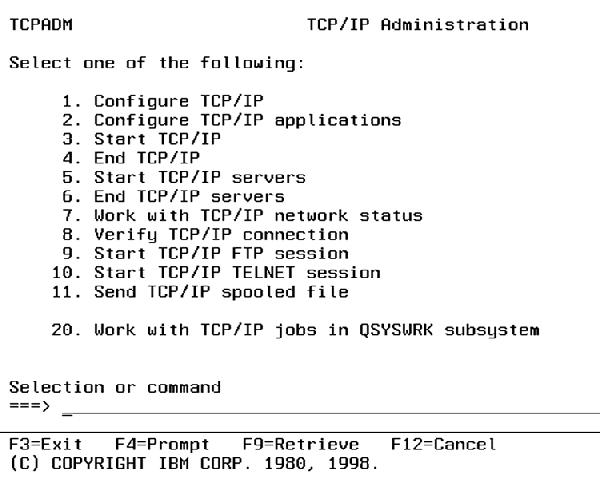
Figure 6: Use the TCP/IP Administration menu to configure other TCP/IP applications.
Figure 7: You can perform graphical administation of your TCP/IP connections through the TCP/IP properties in Operations Navigator.

 More than ever, there is a demand for IT to deliver innovation. Your IBM i has been an essential part of your business operations for years. However, your organization may struggle to maintain the current system and implement new projects. The thousands of customers we've worked with and surveyed state that expectations regarding the digital footprint and vision of the company are not aligned with the current IT environment.
 TRY the one package that solves all your document design and printing challenges on all your platforms. Produce bar code labels, electronic forms, ad hoc reports, and RFID tags – without programming! MarkMagic is the only document design and print solution that combines report writing, WYSIWYG label and forms design, and conditional printing in one integrated product. Make sure your data survives when catastrophe hits. Request your trial now! Request Now.
 Forms of ransomware has been around for over 30 years, and with more and more organizations suffering attacks each year, it continues to endure. What has made ransomware such a durable threat and what is the best way to combat it? In order to prevent ransomware, organizations must first understand how it works.
 Disaster protection is vital to every business. Yet, it often consists of patched together procedures that are prone to error. From automatic backups to data encryption to media management, Robot automates the routine (yet often complex) tasks of iSeries backup and recovery, saving you time and money and making the process safer and more reliable. Automate your backups with the Robot Backup and Recovery Solution. Key features include:
 Business users want new applications now. Market and regulatory pressures require faster application updates and delivery into production. Your IBM i developers may be approaching retirement, and you see no sure way to fill their positions with experienced developers. In addition, you may be caught between maintaining your existing applications and the uncertainty of moving to something new.
 IT managers hoping to find new IBM i talent are discovering that the pool of experienced RPG programmers and operators or administrators with intimate knowledge of the operating system and the applications that run on it is small. This begs the question: How will you manage the platform that supports such a big part of your business? This guide offers strategies and software suggestions to help you plan IT staffing and resources and smooth the transition after your AS/400 talent retires. Read on to learn:
LATEST COMMENTS
MC Press Online