


Three-tier client/server sounds complicated. But, as you will see, it doesn't have to be. And the benefits it provides can far outweigh the forethought and planning time required for a successful implementation. In this article, we will take a look at some of the concepts involved with three-tier client/server and show you how to implement a sample system in an AS/400 environment.
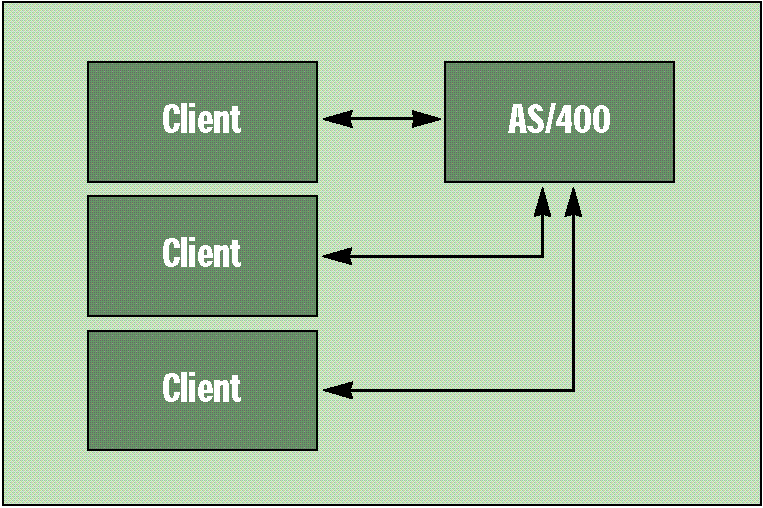
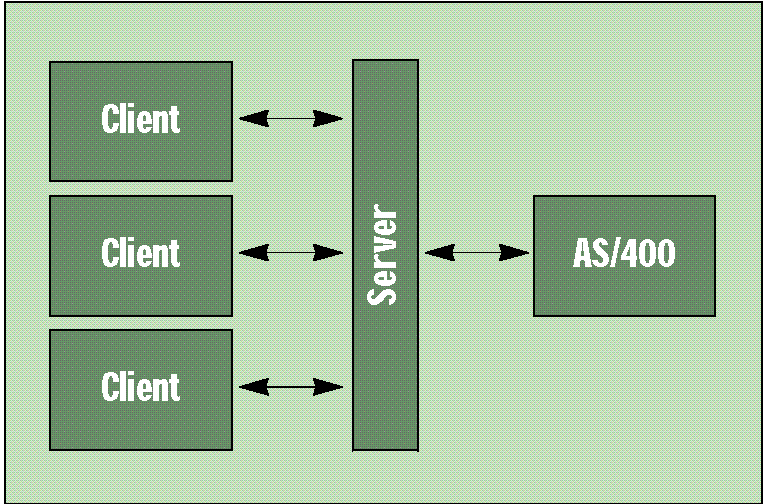
Three-tier client/server could potentially change the way you design systems. It can be tremendously helpful in deploying small and large-scale client/server systems. But just what is it, you ask? In traditional client/server systems, the client system requests information from the AS/400 (1). The AS/400 processes the request and sends the results back to the client program. In three-tier client/server architecture, another program sits between the client that originates the request and the AS/400 (2). It basically acts as a server for the information requests.
Three-tier client/server could potentially change the way you design systems. It can be tremendously helpful in deploying small and large-scale client/server systems. But just what is it, you ask? In traditional client/server systems, the client system requests information from the AS/400 (Figure 1). The AS/400 processes the request and sends the results back to the client program. In three-tier client/server architecture, another program sits between the client that originates the request and the AS/400 (Figure 2). It basically acts as a server for the information requests.
A third (middle) server layer can provide much extra functionality. When clients request information, they actually request it from the server program. This program can monitor these requests. It can check for such things as appropriate security, and it can make sure that the requests conform to business rules. The benefit of performing the checks at this level is that it is a single point where the business rules are located. This single point can be more easily managed than client programs on individual clients. It can also ease the burden on your AS/400, because it can greatly reduce the number of client connections required. You may even be able to get away with purchasing fewer ODBC driver licenses.
Another benefit of three-tier client/server architecture is that, in some implementations, it is "object-oriented." Object-oriented purists may object, but you can think of the server program as a black box that performs operations and returns data based upon client program requests. If these black box "objects" are implemented properly, they can greatly reduce the programming required for developing the client programs.
In three-tier architecture, the client programs don't have to know where the data is ultimately coming from. This means that you can make changes to the back-end, and the server program and the clients won't know the difference. This can greatly simplify the client side of complex distributed architectures. For instance, if you have data residing on several AS/400s, you could create a middle layer program that gathers information from each of them and provides it to clients.
If you make changes to the middle layer, they are utilized by the client programs as soon as they are put into place. This means you can easily change the method you use to access the data on your AS/400. If, for instance, you decide that you would rather use data queues or sockets to pass data between the AS/400 and the server program, you could change the access method without having to change the client programs. Any improvements to the middle layer are beneficial to the client programs immediately.
The three-tier architecture that we'll focus on in this article revolves around Object Linking and Embedding (OLE) and OLE automation. For more information on OLE and OLE automation, see "Using OLE with AS/400 Data," MC, July 1995. Specifically, we'll focus on remote OLE automation. OLE automation allows you to programmatically use OLE objects that reside on your local PC. Remote OLE automation allows you to use OLE objects that reside on a remote machine. Microsoft is still working on versions of Windows that completely support remote OLE automation at the operating system level, but it gave us a sneak preview when it released Visual Basic 4.0. The Enterprise Edition of Visual Basic 4.0 has a lot of nice tools for client/server development, including the capability to do remote OLE automation.
OLE uses the client/server model. An OLE object called an OLE server, which is how the server in our example is implemented, provides services to OLE objects called OLE clients. With remote OLE automation, an OLE server can be created that does all of the database access. Then this object can be placed on another machine on the network, and your client programs can issue requests to it. These requests will be processed by the object and the results returned to your client programs. The connection to the AS/400 is made by the server, so no AS/400 connection is required by the client. Several clients can access the server at the same time, and you can control whether requests will be processed concurrently or one at a time. This allows you to control the processing load on both the server and the AS/400.
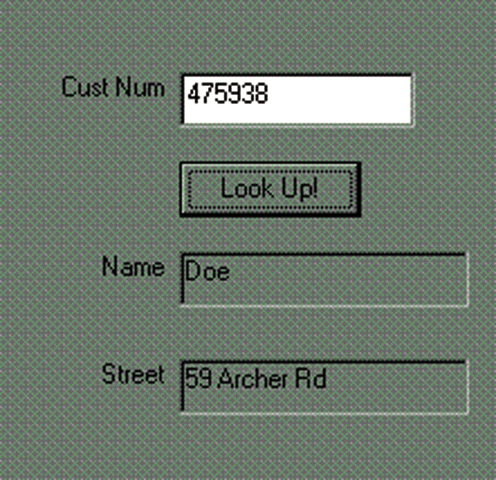
For demonstration purposes, I have created a very simple three-tier system that retrieves and displays data from the venerable QCUSTCDT file in the QIWS library. The end results are shown in 3. The example is built from several components.
For demonstration purposes, I have created a very simple three-tier system that retrieves and displays data from the venerable QCUSTCDT file in the QIWS library. The end results are shown in Figure 3. The example is built from several components.
The components required to run the example are Visual Basic (VB) 4.0, Windows 95 or NT, and a 32-bit ODBC driver. I won't go into a lot of detail concerning the VB programs, because this article is focused on the client/server structure rather than the specific implementation. You can use either the Professional or the Enterprise edition of VB 4.0. If you use the Professional edition, you won't be able to use the OLE object remotely, but you can still develop, test, and use the objects on your local PC. Either Windows 95 or Windows NT must be running on the machine that will act as the server. And since the VB 4.0 32-bit edition is required for remote OLE automation and you have to use a 32-bit ODBC driver with 32-bit programs, a 32-bit ODBC driver is required for this example. I used IBM's new 32-bit ODBC driver provided with the Client Access for Windows 95 beta. Note that any AS/400 interface, such as remote SQL or data queues, can be used to access the AS/400, as long as it is 32-bit. I chose ODBC because of its ease of use and popularity.
Since at least two components-in addition to the AS/400-are required for three-tier client/server, there are two programs to this example. One component is the server program. It is a VB 4.0 program that creates an OLE automation object that can be used locally or remotely. Another component is the client application that uses this object. As you will see, data access from the client application is very simple.
The server program accepts requests for information from the client programs and retrieves the information requested from the QCUSTCDT file in the QIWS library on the AS/400. Its basic function is to accept a customer number and retrieve the record belonging to that customer from the AS/400. It then returns the values of the fields in that record to the client program.
The server program code is shown in Figures 4 and 5. It is similar to other VB programs, with a few subtle differences. VB 4.0 has a new type of module that you can use in your programs. If you've programmed in VB before, you're familiar with forms and code modules. The new module is the "class" module. It allows you to create OLE classes. With these classes, you can create objects that have properties and methods, just like any standard OLE object.
There are two modules to the program. The code module, shown in 4, is merely a place holder. Since we are creating an executable OLE server, it needs to have a place to begin execution. The Sub Main in this module takes care of that.
There are two modules to the program. The code module, shown in Figure 4, is merely a place holder. Since we are creating an executable OLE server, it needs to have a place to begin execution. The Sub Main in this module takes care of that.
The second module is the class module (5) that defines the OLE server. There are two events that occur when an object of this class is created. They are the Class_Initialize and Class_Terminate events. They are run when the class is created and destroyed, respectively. They are similar to Form_Load and Form_Unload events. In the Class_Initialize event, a database connection to the AS/400 is made. The database is defined as private to the class module, so it can be referenced from anywhere within the module but not from outside it. It is closed by setting its object to Nothing in the Class_Terminate event.
The second module is the class module (Figure 5) that defines the OLE server. There are two events that occur when an object of this class is created. They are the Class_Initialize and Class_Terminate events. They are run when the class is created and destroyed, respectively. They are similar to Form_Load and Form_Unload events. In the Class_Initialize event, a database connection to the AS/400 is made. The database is defined as private to the class module, so it can be referenced from anywhere within the module but not from outside it. It is closed by setting its object to Nothing in the Class_Terminate event.
There are two user-defined properties and one method for this object. The method, GetCustomer, requires one parameter, the customer number. It uses this number to construct an AS/400 SQL statement that retrieves the record for that customer from the QCUSTCDT file. The two properties, LstNam and Street, return the values for the last name and street fields of the current record of that file.
Other properties and methods could be defined for this file. For instance, you could add properties for the rest of the fields in the file. The properties in the example are read-only, but you could change them to be read-write. Then you could create methods for adding and updating records. Deleting records could also be done with a method. These examples are all along the lines of the traditional programming model. You could (and should) be more creative and make the functions of objects more like real-life tasks instead of programming tasks.
There are a couple of deficiencies in this example that should be corrected to make it a more robust framework. For simplicity's sake, I left all error-handling out. Proper error-handling is critical for an OLE automation server, because an unanswered error message could require operator intervention in the form of answering the message at the server. Also, in the Class_Initialize event, the ODBC database is opened without specifying a particular driver, user ID, and password. This will also require user intervention. When the server is used, it will prompt for an ODBC data source at the server and will wait until one is selected before processing any requests.
The client program is shown in 6 (page 107). Notice that the part of the code that does the work, in the cmdLookup button's click event (6, label A), is very short. It simply makes sure the value entered in the text box is numeric and uses it to retrieve the customer information from the remote server by invoking the GetCustomer method. Then the name and address property values from the remote server are assigned to the labels on the form. Pretty simple stuff.
The client program is shown in Figure 6 (page 107). Notice that the part of the code that does the work, in the cmdLookup button's click event (Figure 6, label A), is very short. It simply makes sure the value entered in the text box is numeric and uses it to retrieve the customer information from the remote server by invoking the GetCustomer method. Then the name and address property values from the remote server are assigned to the labels on the form. Pretty simple stuff.
To keep the example focused, error-checking was also left out of the client program. Of course, you would want to add proper error-checking to any of your client programs. The best kind of error-checking you could add would provide good interaction between the client and the remote server. You have to design this yourself if you want it done right, but the flexibility is nearly limitless. The sidebar, "Testing and Installing the Example," walks through the implementation steps for those of you who would like to see three-tier client/server in action.
As you can imagine, we've barely scratched the surface of what is possible with remote OLE automation and three-tier client/server. With the AS/400 as a data server, there are many benefits that can be realized using this architecture, and improvements in the implementation process are continuously being introduced. Understanding the technology and what it can do for you can help you determine whether or not it can benefit your organization.
Brian Singleton is an associate technical editor for Midrange Computing. He can be reached by E-mail at
Running the Example Locally
Setting up a remote OLE server is not too complicated if you use the built-in tools Microsoft provides with the VB 4.0 Enterprise edition. But before you go straight to remote, you should test the OLE server locally. This is the easiest way to be sure that you won't have any obvious problems with the server program before you deploy it. Before you can run the example locally, you have to have a 32-bit AS/400 ODBC data source set up on your machine.
Here's how you test the server program locally:
1. Create a new VB project. Remove all files from the project and add the QCUSTCDTClass.CLS and modQCUSTMain.BAS files as shown in article Figures 4 and 5.
2. Specify the controls the project requires by selecting Custom Controls from the VB Tools menu. This server doesn't require any custom controls, so remove them all.
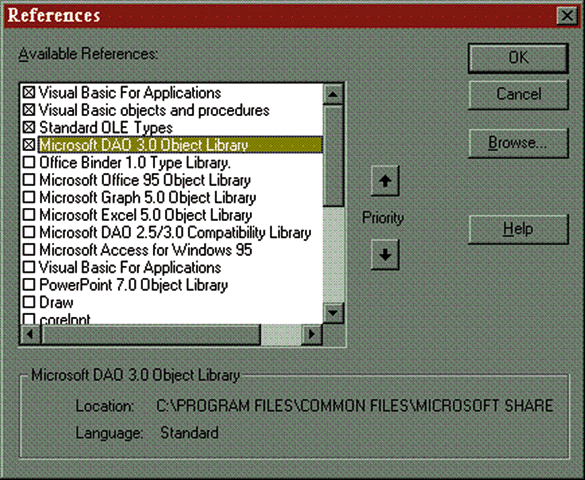
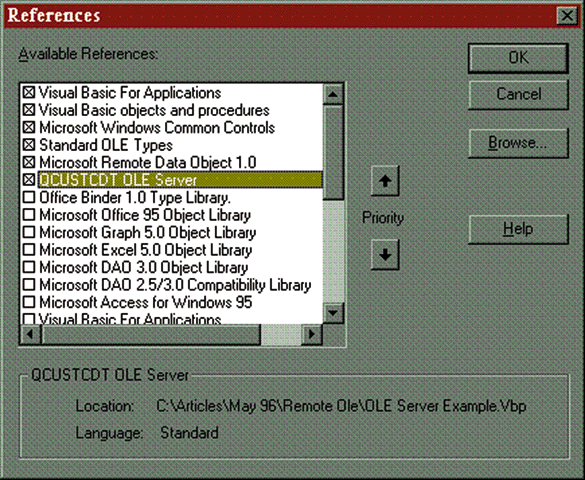
3. Make sure the correct object references are specified by choosing References from the VB Tools menu. The references used are shown in A1.
3. Make sure the correct object references are specified by choosing References from the VB Tools menu. The references used are shown in Figure A1.
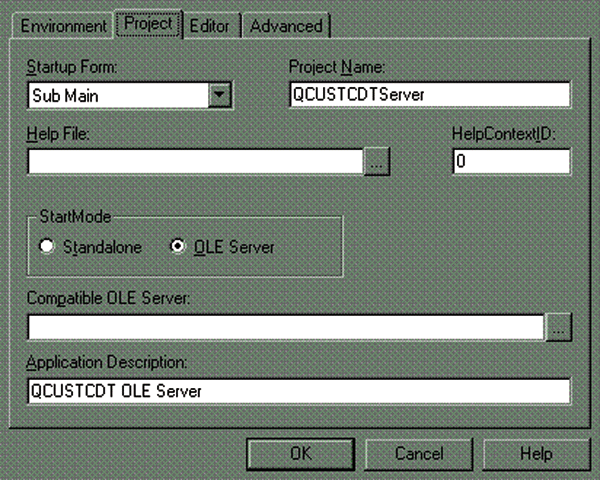
4. Set up the project options. From the Tools menu, select Options. Then, click on the Project tab to display the screen shown in A2. Set the Startup Form to Sub Main. Give the project a name and an Application Description. Also, set the StartMode to OLE Server.
4. Set up the project options. From the Tools menu, select Options. Then, click on the Project tab to display the screen shown in Figure A2. Set the Startup Form to Sub Main. Give the project a name and an Application Description. Also, set the StartMode to OLE Server.
5. Close the window and save the project.
6. Compile and run the program by pressing Ctrl+F5. Then, minimize the VB window. The server program is now ready to receive requests.
Here's how you test the client program locally:
1. With VB 4.0, you can have multiple instances of the development environment running at the same time, so start another copy of VB.
2. Create another new project and remove any forms automatically added.
3. Create a form called TESTFORM.FRM that looks like article 3; then add the code shown in article 6.
3. Create a form called TESTFORM.FRM that looks like article Figure 3; then add the code shown in article Figure 6.
4. Remove all custom controls except Microsoft Windows Common Controls.
5. Change the references for the project to match those shown in A3. Be sure to add the reference to the OLE server. It will be in the list with the description you entered for the server program.
5. Change the references for the project to match those shown in Figure A3. Be sure to add the reference to the OLE server. It will be in the list with the description you entered for the server program.
6. Change the project options to have a startup form of frmOLETest.
7. Save the project with any name you want.
When you run the project, the form will load (article 3). Test the client and server by entering a valid customer number, such as 475938, and pressing the lookup button. You'll be prompted for an ODBC data source. Once you have completed the ODBC login, the data is retrieved and displayed on the form. Because the client program and the OLE automation object are on the same machine, everything happens locally. As you will see, this will change when you deploy the server remotely.
When you run the project, the form will load (article Figure 3). Test the client and server by entering a valid customer number, such as 475938, and pressing the lookup button. You'll be prompted for an ODBC data source. Once you have completed the ODBC login, the data is retrieved and displayed on the form. Because the client program and the OLE automation object are on the same machine, everything happens locally. As you will see, this will change when you deploy the server remotely.
Compiling the Example Programs
If you are satisfied with the results of the local test, compile both programs.
To compile the server program, follow these steps:
1. Select Make EXE from the File menu from the VB environment where the server project is running.
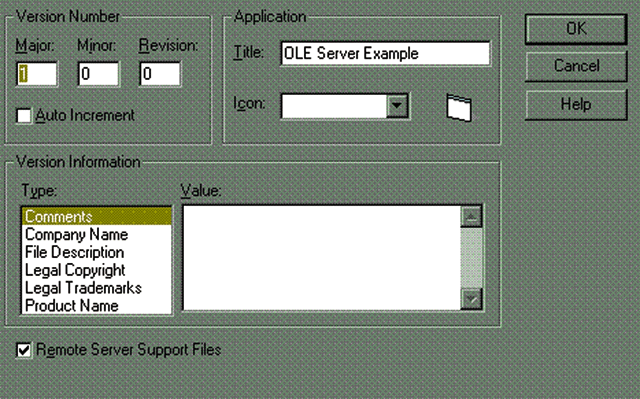
2. Click the Options button on the next dialog box and make sure the Remote Server Support Files option is checked (A4).
2. Click the Options button on the next dialog box and make sure the Remote Server Support Files option is checked (Figure A4).
The process for compiling the client is nearly the same:
1. You may have to re-add the reference for the OLE server. If VB complains that it can't find a reference, go back into the references dialogue and add a reference to the server executable you created in the above steps.
2. Remove the reference to the missing server.
3. Compile the client by selecting Make EXEfrom the File menu.
Make sure everything is compiled correctly by running the client executable:
1. Double-click on the server program from the Windows Explorer or File Manager to "register" the server program on your machine. It will start and end quickly.
2. Run the client in the same manner. The client should function as before, calling the server, which prompts for an ODBC login.
3. Log on and look up a customer as you did before.
If everything runs correctly, you're ready to go remote!
Creating Installation Programs
Visual Basic includes a program that helps automate the creation of a setup program to ease the installation of your programs. This program is called the Application Setup Wizard. It can be used to create setup programs for remote OLE servers as well as standard programs. Setup programs created with the wizard handle many of the tedious details of setting up an OLE server, including creating the proper facilities to allow you to uninstall the server under Windows 95. You can use the Application Setup Wizard for both the server and the client.
Here's how to create the instal-lation program for the server:
1. Start the Application Setup Wizard and choose the project file for the server program.
2. Proceed to the next screen, where you'll be asked if you want to include any Data Access drivers. None of the drivers in the list are needed, so choose Next.
3. On the next screen, you can select where the setup program and its associated files will be saved. I suggest a network drive so you don't have to use diskettes.
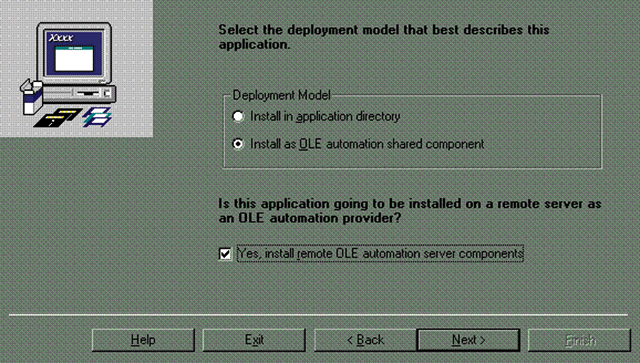
4. Choose Next three more times to skip to step 6 (A5). Of the available options, choose these two: Install as OLE automation shared component and Install remote OLE automation server components. Select Next.
4. Choose Next three more times to skip to step 6 (Figure A5). Of the available options, choose these two: Install as OLE automation shared component and Install remote OLE automation server components. Select Next.
5. Select Finish. The required files will be compressed and put in the location you specified.
Here's how to create an instal-lation program for the client:
1. Use the Setup Wizard again. When the program starts, choose the project for the client program and press Next.
2. This brings up the Setup Wizard step 3 dialog. Here, you should enter a location where you want the setup program built. Select Next to proceed to the Setup Wizard step 4 dialog.
3. On this screen, specify which OLE automation servers the client uses. For this project, the local server you've been using comes up selected, because that's what the project references. Deselect it and click the Add OLE Servers button. This brings up a file dialog box in which you choose the OLE servers to add. Choose Remote OLE Servers from the File Type list and choose the file for your remote server. The file will be in the same directory as the rest of the server project and will have the same name as the server project, but its extension will be .VBR. Once you do that, you'll be asked for some information about the remote server. Enter the network address where the server object resides, the network protocol you are using, and None as the authentication level.
4. Select Next until you reach step 7 of the Setup Wizard. Then press Finish.
Installing and Running the Example Remotely
From the machine that you've chosen to be the server, run the setup program you just created. The OLE components will be installed on the server machine. Then you have to perform some steps to register the OLE object as a remote server.
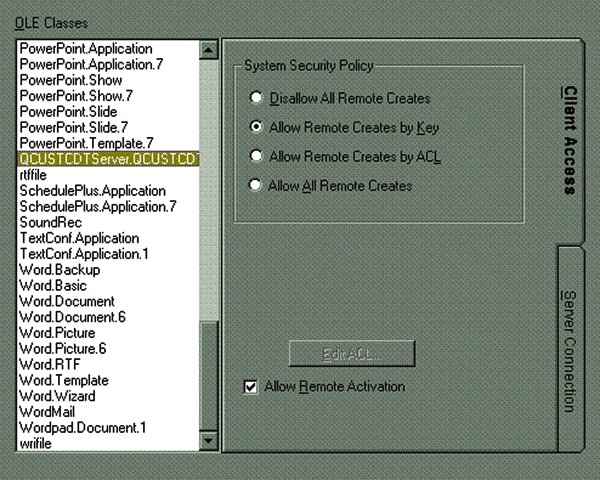
Windows 95 and Windows NT have an area called the registry where environment settings are kept. Each OLE object, including an OLE automation server, has to be registered in order for Windows to recognize it. The Setup Wizard automatically creates the proper entries in the registry so that you can use your OLE server locally. To be able to use the OLE server remotely, you have to change these entries on the server. Fortunately, the Setup Wizard includes the program required to make those changes: the RemAuto Connection Manager (A6).
Windows 95 and Windows NT have an area called the registry where environment settings are kept. Each OLE object, including an OLE automation server, has to be registered in order for Windows to recognize it. The Setup Wizard automatically creates the proper entries in the registry so that you can use your OLE server locally. To be able to use the OLE server remotely, you have to change these entries on the server. Fortunately, the Setup Wizard includes the program required to make those changes: the RemAuto Connection Manager (Figure A6).
The connection manager helps you manage security for remote objects. There are many options available, but we'll choose one that's not too intrusive for testing purposes.
First, you have to start the connection manager (it will be in the Remote Automation Management folder or program group) on the server:
1. Select the QCUSTCDTSer-ver.QCUSTCDTClass entry.
2. Choose the Client Access tab. Then choose Allow Remote Creates by Key. Make sure the Allow Remote Activation check box is selected. This ensures that the OLE server can be started remotely.
3. Close the connection manager.
The setup program also installs the Automation Manager program on the server. This program services any requests for remote OLE objects. It must be running on the server before remote OLE will work, so start it now. This program minimizes itself once it has started.
You also need to be sure you have configured a 32-bit ODBC data source on the server. Any 32-bit ODBC driver should work, but, for the example, I used the Client Access for Windows 95 beta driver.
Back on the client machine, you have to run the setup program to install the client. The setup program should create the proper registry entries to find the remote OLE server.
1. Select the client program you created from the Start menu to run it.
2. Enter a valid customer number (e.g., 475938).
3. Choose the Lookup button to initiate the remote OLE request. At this point, the OLE server is started on the server machine.
4. Go back to the server machine and complete the ODBC login. Once you do this, the information requested will be returned to the client.
While the client program is running, you can request data without having to go back and log on at the server. However, if you stop and restart the client program, you'll have to log on at the server again.
- BS
Serving Up Three-tier Client/Server
Figure 1: Traditional Client/Server Architecture
Serving Up Three-tier Client/Server
Figure 2: Three-tier Client/Server Architecture
Serving Up Three-tier Client/Server
Figure 3: The Client Program User Interface
Serving Up Three-tier Client/Server
Figure 4: The Server Program Code Module: modQCUSTMain.BAS
Attribute VB_Name = "modQCUSTMain" Option Explicit Sub main() ' This is a placeholder End Sub
Serving Up Three-tier Client/Server
Figure 5: The Server Program Class Module: QCUSTCDTClass.CLS
VERSION 1.0 CLASS BEGIN MultiUse = -1 'True END Attribute VB_Name = "QCUSTCDTClass" Attribute VB_Creatable = True Attribute VB_Exposed = True Option Explicit ' Private declarations ' Database definitions Private ws As Workspace Private db As Database Private rs As Recordset Public Sub GetCustomer(nTmpCustNum As Long) '------------------------------------------ ' Method to retrieve the customer information ' for the customer ID passed in the ' nTmpCustID parameter '------------------------------------------ Set rs = db.OpenRecordset("select * from QIWS.QCUSTCDT where CUSNUM=" & nTmpCustNum, dbOpenSnapshot, dbSQLPassThrough) End Sub Property Get LstNam() LstNam = rs("LstNam") End Property Property Get Street() Street = rs("Street") End Property Private Sub Class_Initialize() Set ws = Workspaces(0) Set db = ws.OpenDatabase("", False, False, "ODBC;") End Sub Private Sub Class_Terminate() Set rs = Nothing Set db = Nothing Set ws = Nothing End SubServing Up Three-tier Client/Server
Figure A1: The Server Program References
Serving Up Three-tier Client/Server
Figure A2: Connection Manager on the Client
Serving Up Three-tier Client/Server
Figure A3: The Client Project References
Serving Up Three-tier Client/Server
Figure A4: Creating the Server Program
Serving Up Three-tier Client/Server
Figure A5: Visual Basic 4.0 Setup Wizard
Serving Up Three-tier Client/Server
Figure A6: RemAuto Connection Manager on the Server

MC Press books written by Brian Singleton available now on the MC Press Bookstore.
 |
i5/OS and Microsoft Office Integration Handbook Harness the power of Microsoft Office while exploiting the iSeries database. List Price $79.95 Now On Sale
|


 More than ever, there is a demand for IT to deliver innovation. Your IBM i has been an essential part of your business operations for years. However, your organization may struggle to maintain the current system and implement new projects. The thousands of customers we've worked with and surveyed state that expectations regarding the digital footprint and vision of the company are not aligned with the current IT environment.
 TRY the one package that solves all your document design and printing challenges on all your platforms. Produce bar code labels, electronic forms, ad hoc reports, and RFID tags – without programming! MarkMagic is the only document design and print solution that combines report writing, WYSIWYG label and forms design, and conditional printing in one integrated product. Make sure your data survives when catastrophe hits. Request your trial now! Request Now.
 Forms of ransomware has been around for over 30 years, and with more and more organizations suffering attacks each year, it continues to endure. What has made ransomware such a durable threat and what is the best way to combat it? In order to prevent ransomware, organizations must first understand how it works.
 Disaster protection is vital to every business. Yet, it often consists of patched together procedures that are prone to error. From automatic backups to data encryption to media management, Robot automates the routine (yet often complex) tasks of iSeries backup and recovery, saving you time and money and making the process safer and more reliable. Automate your backups with the Robot Backup and Recovery Solution. Key features include:
 Business users want new applications now. Market and regulatory pressures require faster application updates and delivery into production. Your IBM i developers may be approaching retirement, and you see no sure way to fill their positions with experienced developers. In addition, you may be caught between maintaining your existing applications and the uncertainty of moving to something new.
 IT managers hoping to find new IBM i talent are discovering that the pool of experienced RPG programmers and operators or administrators with intimate knowledge of the operating system and the applications that run on it is small. This begs the question: How will you manage the platform that supports such a big part of your business? This guide offers strategies and software suggestions to help you plan IT staffing and resources and smooth the transition after your AS/400 talent retires. Read on to learn:
LATEST COMMENTS
MC Press Online