


Creating mobile apps is one technical challenge. Getting them onto users' devices is another.…
As mobile apps become more prevalent in day-to-day business operations and your IT staff begins mastering the process of creating such apps, eventually you'll be confronted with a distribution challenge: How will these apps get loaded onto your users' smartphones and tablets?
One common approach for getting mobile apps out to your corporate users' devices is to simply create mobile Web apps--Websites designed explicitly for smartphones that can be accessed by a standard internal URL on any smartphone browser. To see a working example of this, point your smartphone's browser to the iAdmin demo.
Bookmarks pointing to sites like this can be placed on the smartphone's homepage, thereby emulating an "app" to some degree. This technique works fine for straightforward applications such as inquiries and basic data entry. However, as your apps become more sophisticated, you'll eventually find cases where the mobile Website approach to app distribution won't cut it. For example, we recently needed to create an iPad app that would use use an attached laser barcode scanner for performing inventory transactions. Interfacing the iPad with a scanner or any other external device would have been impossible to do via a browser-based app.
So when you find a native app is needed, and you've waded through the process of creating a functioning mobile Web app, how do you get the final product pushed out to your users' devices as a native app? Many developers assume they must push their apps through the Apple App Store or Google Play. But if you're merely deploying apps within your own enterprise, you can skip the App Store rigmarole and use your own internal resources to deliver apps to your users. The process entails placing the app with appropriate credentials onto an internal server from which users can download and install it.
What follows are the steps to get a mobile app — in this case developed through the Sencha Touch mobile framework — pushed out to your internal users directly from your own internal server. We'll use PhoneGap Build and Sencha Command as the mechanisms for packaging up a Sencha Touch Web app and making it work as a standalone app on the various platforms. All of these tools can be used for free.
In the interest of space, I won't be talking about the technical details behind creating the app (that would merit a series of articles itself), but even without any Sencha Touch experience you should still be able to follow these instructions to create a generic app, install it on your iPhone or iPad, and launch it. I should also note that while this will be an iOS-specific demonstration of pushing out an app, many of these steps would apply to Android-based devices as well.
Registering Your Company and your App(s) with Apple Inc.
Before we get into the application packaging and PhoneGap build process, you'll need credentials from Apple in order to distribute the app to iOS devices, with or without the App Store. These Apple credentials are applied as part of the build, which you'll see shortly.
The key point to convey is that Apple's Developer Enterprise Program allows you as a developer to deploy apps within your company without going through the rigmarole of the App Store. The process entails going to the Apple Developer site and registering for an Apple ID for a nominal fee (about $300 per year).
It can take a few days to get your company approved (for CNX, it took two days). Once registered, you'll have a user ID that allows you to log in to the Apple Developer Site and navigate to the "Certificates, Identifiers & Profiles" page listing your production certificates for iOS distribution, as shown here:
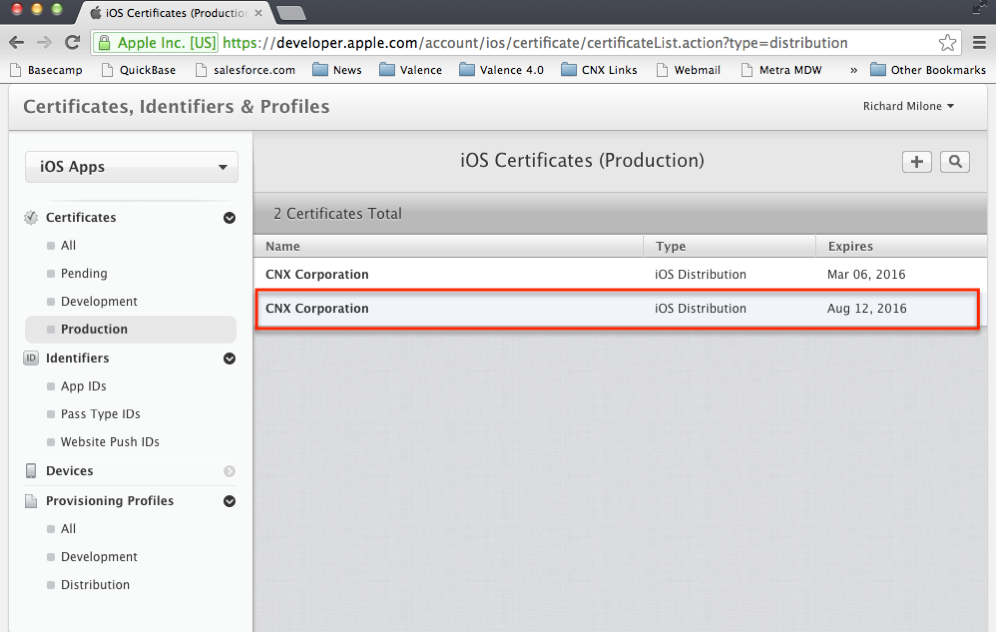
Figure 1: This is the Apple Developer Certificates page.
Once you have an approved and registered company ID, the next step is to create an App ID for the app we're going to create here. For sake of example, we'll refer to it as MyFirstApp going forward. Click on "App IDs" and then hit the plus (+) icon up top. This gives you a form for entering basic information about your app. Enter a basic name (i.e., MyFirstApp for this example) and an explicit App ID suffix, which Apple recommends be done in a "reverse-domain name" style. For us, this works out to com.cnxcorp.myfirstapp. No need to change anything else, just click Continue to generate a formal ID for you app.
Lastly, you'll need to get two special files to process your app through the PhoneGap build process: a ".p12 certificate" file and a "mobile provisioning" file.
The .p12 certificate is associated with your corporate registration, so you'll only need to do this one time. The .p12 must be created from a .cer file that you download from the Apple Developer site. This is achieved by going to the Certificates section, clicking on Production, selecting your certificate, and hitting Download. If you're using a Mac, you can then open up the downloaded .cer in your KeyChain app and export it as a .p12 document. For Windows users, it's slightly more involved and requires downloading an Open SSL utility, but you can find many how-to examples on the Internet.
To get the mobile provisioning file, click on Distribution under the Provisioning Profiles section; then choose In House as your distribution type. When you hit Continue, it will ask you which App ID you're distributing, at which point you'll select the App ID you just created. Hit Continue again and select the certificate (you should have only one). Hit Continue once more, give the app a profile name (i.e., MyFirstApp), and finally generate the mobile provisioning profile.
With the .p12 and .mobileprovision files in hand, you're ready to proceed to the build process.
Making Your PC Work as a Local Web Server
For some of the following steps, you'll need a local Web server running on your PC. You can tell if you have one operating by typing localhost in your Web browser URL and seeing if anything comes up. If not, you likely need to install and/or start the server, the process for which will vary depending on your type of computer and which operating system you're using. On Windows, you may find it easiest to activate Internet Information Server (IIS), but there are many other choices available as well. On my Mac running Mountain Lion (OSX 10.8), I typically go to a command line (via the Terminal app) and type sudo apachectl start to get my built-in Apache Server running.
It'll be important that you know the location in your file directory from which the Web server is serving its files. On my Mac, it's serving from /Library/WebServer/Documents, and this is where I'll be working from as I proceed through the subsequent steps. I will be referring to this as the "root" path.
Installing Sencha Touch and Sencha Command
Another prerequisite for this process is to install Sencha Touch on your PC, if it's not already there. Sencha Touch is available for free for open-source projects and is a great framework for developing cross-platform mobile apps. Even without knowing anything about using this framework, you should still be able to follow these steps and get a crude app working on your phone (you can learn the nitty-gritty of the development process later). So download the zip file from the Sencha Website and unzip it in your Web server's root path.
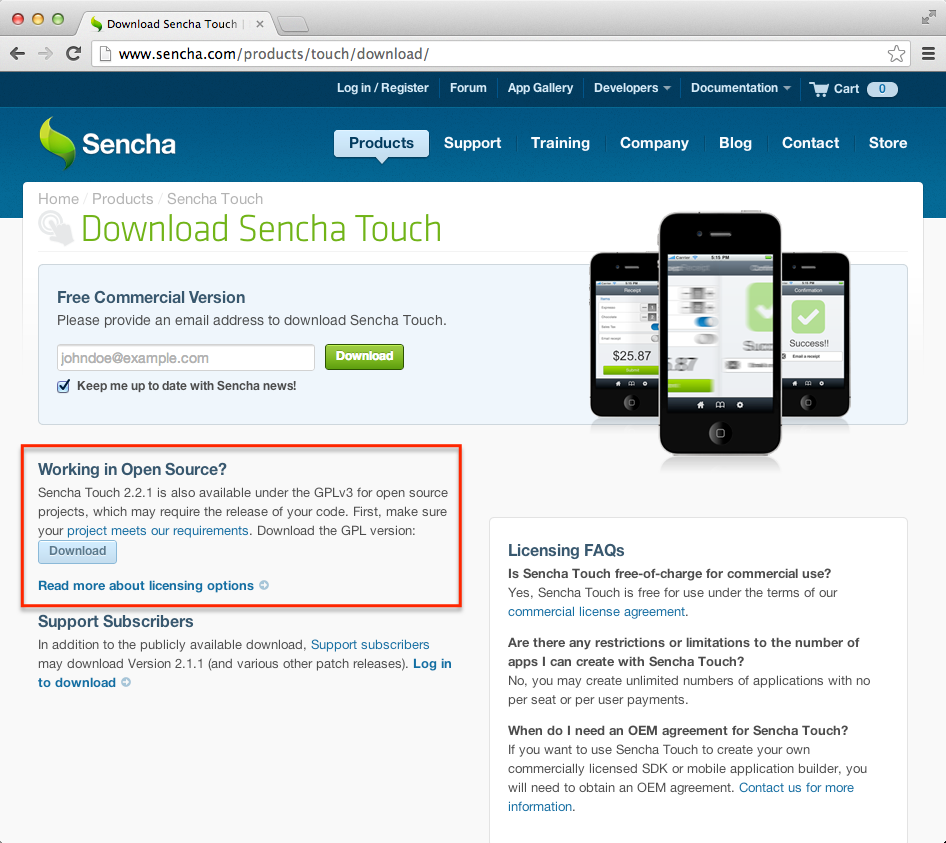
Figure 2: Download Sencha Touch 2.2.1.
In conjunction with Sencha Touch, you'll also need to install Sencha Command, as this tool will be used to generate the app. Read up on the process at http://docs.sencha.com/touch/2.2.1/#!/guide/command. Then, scroll down to the System Setup section and follow the instructions.
With these prerequisite steps behind you, you're ready to build and deploy your first app. The following four steps will give you the rote process for pushing an app out to an iPhone.
Step 1: Create Your App Shell
The first step is to create the shell for your app. This shell will serve as the template for your app, to which you can come back later and add more functionality as you learn the ins and outs of Sencha Touch.
From a command line on your PC, go to the directory of your newly installed "touch" folder (in my case, cd /Library/WebServer/Documents/touch-2.2.1) and then type sencha generate app MyFirstApp [path]/MyFirstApp. The path can be anywhere on your PC, but it should be somewhere that can be served to your browser by your local Web server. So in my case I used Library/WebServer/Documents as my path.
Next, verify everything is working on your PC by launching your shell app in a WebKit-enabled browser (such as Google Chrome). You should see something like this:
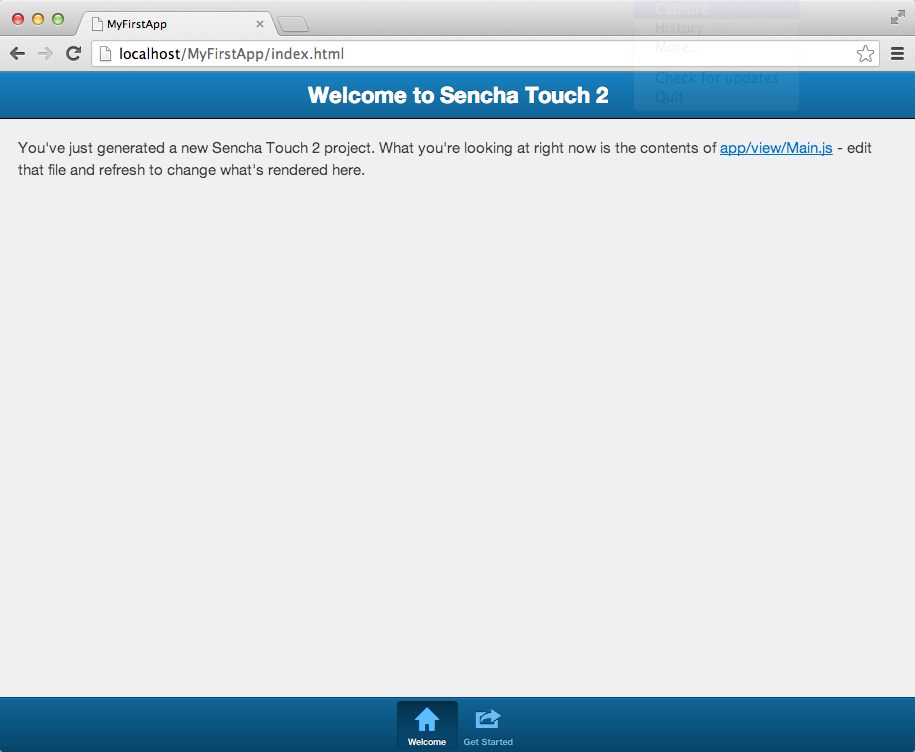
Figure 3: MyFirstApp is now running in your browser.
Not much to this app, of course. But this gives you a great starting point for building on to the app later. For now, we'll leave it like this and move on to the packaging process.
Step 2: Package It
When you "package" your app, you're basically preparing your source files so they're ready for distribution to mobile devices. We'll use Sencha Command to do this step, which will result in a folder containing just the pieces necessary to run this app. That can mean a substantial reduction in file size (in this case, a 25-to-1 reduction).
So go back to the command line on your PC and navigate to the root of your app folder (i.e., cd /Library/WebServer/Documents/MyFirstApp). From within that folder, run the following command:
sencha app build production
Note: You could also do "sencha app build testing" to create a larger distribution file with debugging functions, which goes beyond the scope of this article, but it's good to know for future reference.
If all goes as expected with the build command, you should see a new production folder in build/MyFirstApp like this:
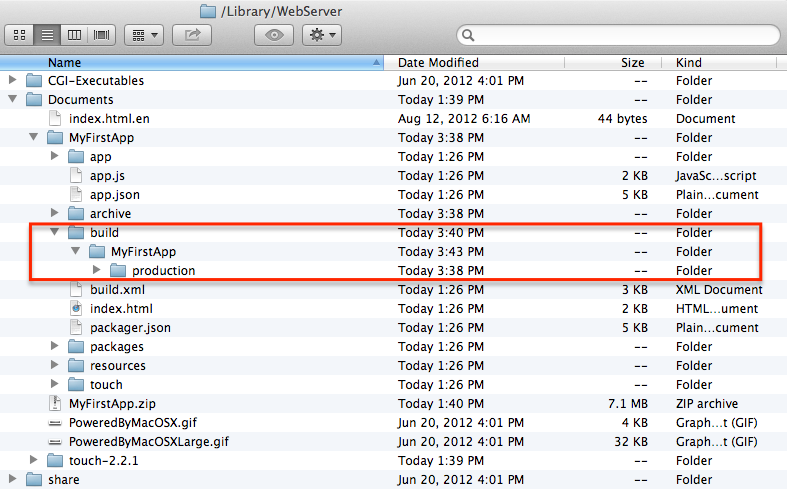
Figure 4: New folders will appear after the build process completes.
This production directory should be zipped down so it can be uploaded as a single file to PhoneGap Build in the next step.
Step 3: Build It
PhoneGap is the key to getting your mobile Web apps deployed as standalone apps that will work on multiple platforms. PhoneGap Build is the online tool we'll be using here to convert your packaged files from step 2 into an app you can upload to your iPhone (or just about any other smartphone or mobile device, for that matter).
Navigate over to the PhoneGap Build site, click on Get Started, and select the free plan. You'll need to create an account, which PhoneGap steps you through quite nicely. We recommend registering through GitHub, as you'll likely be using GitHub in the future for pulling in source for your apps (though you won't need it for the steps we're doing here).
Once registered and logged in with PhoneGap Build, you'll be presented a page from which you can start packaging your app for deployment. Simply click on the New App button, select the Private tab, and then upload the zip file of your app. Once uploaded, you can click on the app to see the six platforms PhoneGap Build will build to. Select the drop-down box beside the iOS to apply your "key" for the app. This is where you upload the .p12 and .mobileprovision files generated from the Apple Developer site. Once this is done, you can proceed to build the app. As PhoneGap Build churns through the build process, you should see a screen like this:
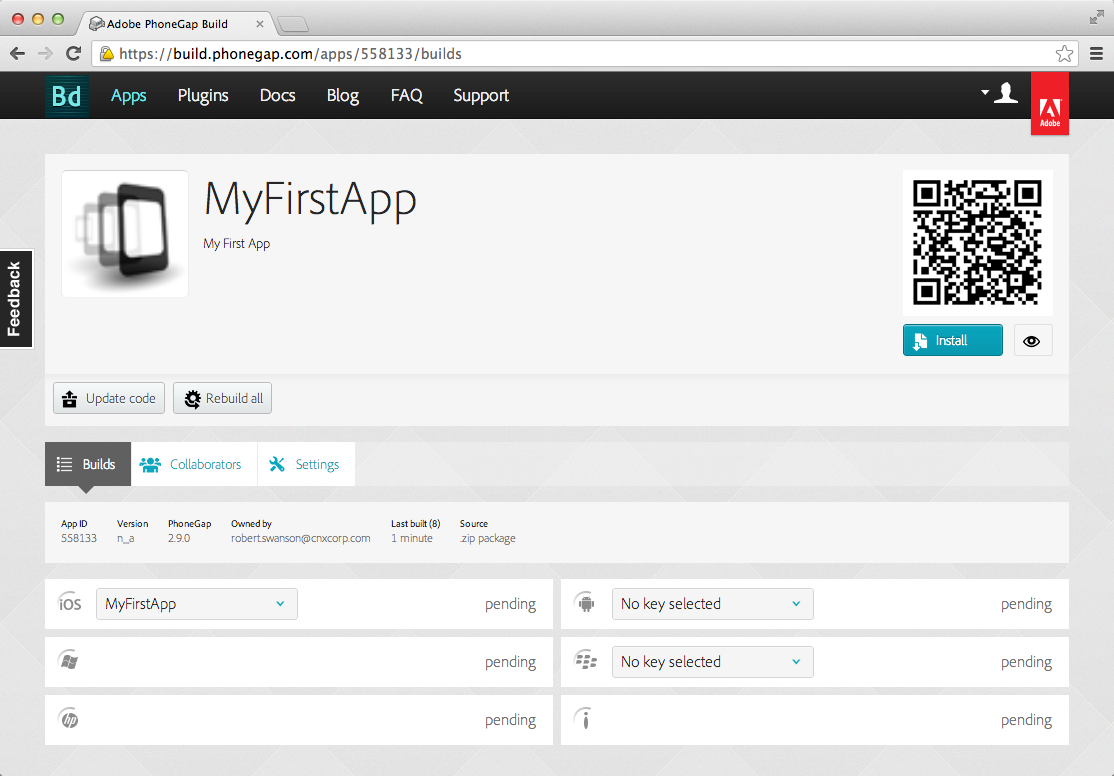
Figure 5: PhoneGap Build is crunching on MyFirstApp.
When the "pending" in the iOS section turns into an "ipa" download button, then you're where you need to be, and you're ready to deploy the app to your users.
Step 4: Deploy It
The final step is to get the app out to your users' devices. As we're bypassing the App Store for this process, you'll need a company server from which your users can download the app directly to their phones. For sake of brevity, I'm going to assume you already have a server available for this purpose. If you don't have one, see this accompanying blog post for instructions on setting up your IBM i to distribute apps using the free Valence Framework.
There are three files required to allow users to download the app to their iPhones:
(1) The .ipa file created via PhoneGap Build in step 3
(2) A .plist file for configuring the install
(3) A simple .html file to which users can navigate to start the install
As a starting point, I recommend creating a directory named the same as your app (MyFirstApp). Place your .ipa file into this directory and then create a MyFirstApp.plist file and an install.html file. The code for these files is listed below:
|
<?xml version="1.0" encoding="UTF-8"?> <!DOCTYPE plist PUBLIC "-//Apple//DTD PLIST 1.0//EN" "http://www.apple.com/DTDs/PropertyList-1.0.dtd"> <plist version="1.0"> <dict> <key>items</key> <array> <dict> <key>assets</key> <array> <dict> <key>kind</key> <string>software-package</string> <key>url</key> <string>http://MyServerPath/MyFirstApp/MyFirstApp.ipa</string> </dict> </array> <key>metadata</key> <dict> <key>bundle-identifier</key> <string>com.cnxcorp.myfirstapp</string> <key>kind</key> <string>software</string> <key>title</key> <string>MyFirstApp</string> </dict> </dict> </array> </dict> </plist> |
Figure 6: This is your code for MyFirstApp.plist.
|
<html> <body style="font-size:4em;"> <a href="itms-services://?action=download-manifest& url=http://MyServerPath/MyFirstApp/MyFirstApp.plist">Install MyFirstApp</a> </body> </html> |
Figure 7: This is your code for install.html.
Be sure to replace the bolded text with values specific to your install. Specifically:
- In both files, replace the MyServerPath strings with the appropriate path to your .ipa file.
- In the plist file, replace the bundle-identifier (com.cnxcorp.myfirstapp) with the ID you used in creating your Apple ID.
With these steps done, you should be able to point users to the URL serving these files, and your users can install the app onto their devices.
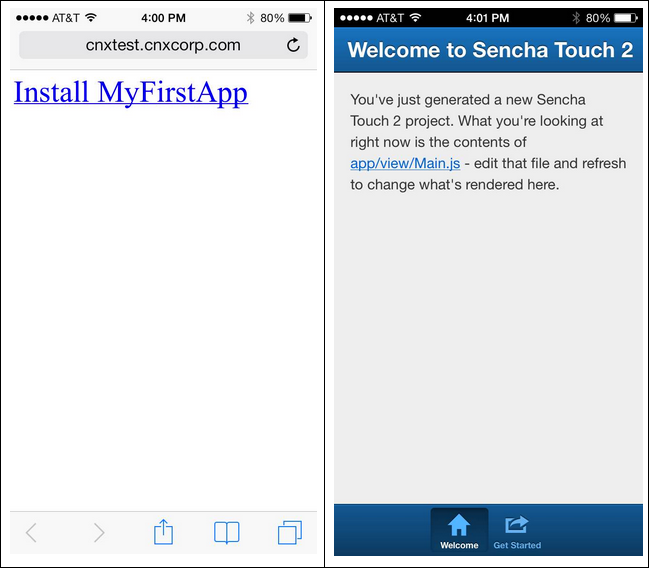
Figure 8: With step 4 completed, you can navigate to a simple installation link on your iPhone (left). Once installed, the new app can be executed as if it were downloaded from the App Store (right).
Next Steps…
With the packaging and deployment process worked out, you're now free to start developing out your Sencha Touch app and publishing updates for download by re-running through steps 2 and 3 above. If you're not already familiar with Sencha Touch, the shell app created in step 1 is a great foundation for honing your mobile app development skills. Getting your standalone app to interface with your IBM i will be fodder for a future article.


 More than ever, there is a demand for IT to deliver innovation. Your IBM i has been an essential part of your business operations for years. However, your organization may struggle to maintain the current system and implement new projects. The thousands of customers we've worked with and surveyed state that expectations regarding the digital footprint and vision of the company are not aligned with the current IT environment.
 TRY the one package that solves all your document design and printing challenges on all your platforms. Produce bar code labels, electronic forms, ad hoc reports, and RFID tags – without programming! MarkMagic is the only document design and print solution that combines report writing, WYSIWYG label and forms design, and conditional printing in one integrated product. Make sure your data survives when catastrophe hits. Request your trial now! Request Now.
 Forms of ransomware has been around for over 30 years, and with more and more organizations suffering attacks each year, it continues to endure. What has made ransomware such a durable threat and what is the best way to combat it? In order to prevent ransomware, organizations must first understand how it works.
 Disaster protection is vital to every business. Yet, it often consists of patched together procedures that are prone to error. From automatic backups to data encryption to media management, Robot automates the routine (yet often complex) tasks of iSeries backup and recovery, saving you time and money and making the process safer and more reliable. Automate your backups with the Robot Backup and Recovery Solution. Key features include:
 Business users want new applications now. Market and regulatory pressures require faster application updates and delivery into production. Your IBM i developers may be approaching retirement, and you see no sure way to fill their positions with experienced developers. In addition, you may be caught between maintaining your existing applications and the uncertainty of moving to something new.
 IT managers hoping to find new IBM i talent are discovering that the pool of experienced RPG programmers and operators or administrators with intimate knowledge of the operating system and the applications that run on it is small. This begs the question: How will you manage the platform that supports such a big part of your business? This guide offers strategies and software suggestions to help you plan IT staffing and resources and smooth the transition after your AS/400 talent retires. Read on to learn:
LATEST COMMENTS
MC Press Online