


Use LightSwitch and a SQL Server proxy to build DB2 for i-based web apps.
In my TechTip "Build Web Apps with the Flip of a LightSwitch", I introduced Microsoft LightSwitch and discussed how it can be used to build mobile-friendly web applications. Because it's a rapid application development (RAD) tool, the increased productivity of churning out simple applications and maintenance screens makes LightSwitch an attractive tool, even for developers who don't have much experience with .NET or web development.
I noted however, for shops that use DB2 for i, that the lack of a freely available Entity Framework .NET data provider can be a stumbling block. But if you have SQL Server (even the free SQL Server express), you can use the technique I'll demonstrate here whereby SQL Server can be used as a proxy to connect a LightSwitch app to DB2 for i.
The SQL Server setup instructions may seem a bit long, but most of these steps need to be done only once.
This article assumes that you have some familiarity with SQL Server, ODBC, IBM i Access, and the Microsoft Visual Studio IDE. Also, before doing loads of reading, you may want to glance through the article and look at the application figures 11-13 toward the end of the article so that you have an idea of the end product in mind.
The Demo Setup
The sample app is used to maintain data in the CorpData.Projects table in DB2 for i. The application is a mobile-friendly web application that can run on many devices.
As for components in the demo, I'm using the following:
- IBM i 7.2 (DB2 for i Group PTF 1)
- IBM i Access 7.1 Service Level SI53584 (using the ODBC driver)
- Microsoft Windows Server 2012 Datacenter
- Microsoft SQL Server 2012 SP1 Dev Edition (SP1) - 11.0.3339.0 (X64)
- Visual Studio 2013 Premium Update 3
It shouldn't matter if you're running a somewhat older version of SQL Server, Windows, System i Access, IBM i, etc. Just make sure the components of the systems are up to date. The big requirement is Visual Studio 2013 Update 3 (Professional edition or higher) because there's an enhancement to LightSwitch that allows a manual declaration of primary key columns on views (more on this later). As already noted, hopefully Microsoft will garner more LightSwitch adherents with the new Visual Studio 2013 Community edition. This is the free equivalent of Visual Studio professional edition (the difference is just in the licensing).
For ODBC connectivity between SQL Server and another database platform, remember that the ODBC data source should be defined as a system DSN (or a user DSN if it's configured for the same user account running the SQL Server service). Also, make sure the ODBC driver version used in the DSN (32/64-bit) matches the SQL Server version (32/64-bit). Finally, I suggest using the *SQL naming convention with the IBM i Access ODBC driver. The last time I tried, using the *SYS naming convention with SQL Server didn't work even though the dot (.) separator is valid using either *SQL or *SYS naming (starting in IBM i 7.1 PTF Group Level 15).
Sample DB2 Data
For data, I use the old iSeries sample DB2 data library called CORPDATA. The library is not installed by default but can be installed by executing the following procedure:
CALL QSYS.CREATE_SQL_SAMPLE('CORPDATA')
Note: If you already have this library on your system and it's been modified, you may want to remove it and recreate it. The table definitions for the sample data can be found here.
SQL Server Setup
Warning: What you're about to read may seem excessive and downright ugly. Keep in mind that many of the items I'm discussing require only a one-time setup. Further, the requirements for journaling and XA transactions apply only to read/write scenarios. If you're working with a read-only app, you don't have to bother with XA transactions. If you have an Entity Framework compatible DB2 for i .NET data provider, you can skip this part and go to the section below on creating a Visual Studio LightSwitch project.
Install IBM i Access on the SQL Server box, including the ODBC driver. Next, set up an ODBC data source called DB2i to connect to your DB2 for i CORPDATA schema.
For the demo, LightSwitch will be updating DB2 for i data vicariously through SQL Server's linked server facility. LightSwitch will update special "views" in SQL Server that are dependent on DB2 for i tables. Reading or updating these SQL Server views actually reads/updates the DB2 tables.
Now, define a linked server to connect SQL Server to DB2 for i using the ODBC driver. Shown below is a T-SQL script that will create a linked server named DB2i (based on an ODBC data source called DB2i). Make sure to place your own DB2 for i user name and password in the script below (highlighted in red). Also, replace all references to S104X7AB with the name of your DB2 for i relational database entry (use the WRKRDBDIRE command if you're not sure what your *LOCAL RDB entry is called). Once the replacements have been made, run the script on your SQL Server using SQL Server Management Studio (SSMS).
USE [master]
GO
EXEC master.dbo.sp_addlinkedserver @server = N'DB2I', @srvproduct=N'DB2 for i', @provider=N'MSDASQL', @datasrc=N'DB2i', @provstr=N'CMT=*NONE;DBQ=CORPDATA;NAM=0;XLATE=1', @catalog=N'S104X7AB'
EXEC master.dbo.sp_addlinkedsrvlogin @rmtsrvname=N'DB2I',@useself=N'False',@locallogin=NULL,@rmtuser=N'MyUser',@rmtpassword='MyPwd'
GO
EXEC master.dbo.sp_serveroption @server=N'DB2I', @optname=N'collation compatible', @optvalue=N'false'
GO
EXEC master.dbo.sp_serveroption @server=N'DB2I', @optname=N'data access', @optvalue=N'true'
GO
EXEC master.dbo.sp_serveroption @server=N'DB2I', @optname=N'dist', @optvalue=N'false'
GO
EXEC master.dbo.sp_serveroption @server=N'DB2I', @optname=N'pub', @optvalue=N'false'
GO
EXEC master.dbo.sp_serveroption @server=N'DB2I', @optname=N'rpc', @optvalue=N'true'
GO
EXEC master.dbo.sp_serveroption @server=N'DB2I', @optname=N'rpc out', @optvalue=N'true'
GO
EXEC master.dbo.sp_serveroption @server=N'DB2I', @optname=N'sub', @optvalue=N'false'
GO
EXEC master.dbo.sp_serveroption @server=N'DB2I', @optname=N'connect timeout', @optvalue=N'0'
GO
EXEC master.dbo.sp_serveroption @server=N'DB2I', @optname=N'collation name', @optvalue=null
GO
EXEC master.dbo.sp_serveroption @server=N'DB2I', @optname=N'lazy schema validation', @optvalue=N'false'
GO
EXEC master.dbo.sp_serveroption @server=N'DB2I', @optname=N'query timeout', @optvalue=N'0'
GO
EXEC master.dbo.sp_serveroption @server=N'DB2I', @optname=N'use remote collation', @optvalue=N'true'
GO
EXEC master.dbo.sp_serveroption @server=N'DB2I', @optname=N'remote proc transaction promotion', @optvalue=N'true'
GO
SQL Server is now ready to communicate with DB2 for i.
Next, create a database in SQL Server called LightSwitchDemo using SSMS (unless you've modified your model database, the default options are probably fine). The database's only purpose is to host objects that will be used to connect to DB2 for i.
It's time to create views in SQL Server that reference DB2 for i tables. Run the following script in SSMS to create views that map directly to DB2 for i tables (using the four-part naming convention.) Remember to replace S104X7AB with your own DB2 for i RDB name.
Use LightSwitchDemo
GO
CREATE VIEW ACT AS SELECT * FROM DB2i.S104X7AB.CORPDATA.ACT;
CREATE VIEW CL_SCHED AS SELECT * FROM DB2i.S104X7AB.CORPDATA.CL_SCHED;
CREATE VIEW DEPARTMENT AS SELECT * FROM DB2i.S104X7AB.CORPDATA.DEPARTMENT;
CREATE VIEW EMP_PHOTO AS SELECT * FROM DB2i.S104X7AB.CORPDATA.EMP_PHOTO;
CREATE VIEW EMP_RESUME AS SELECT * FROM DB2i.S104X7AB.CORPDATA.EMP_RESUME;
CREATE VIEW EMPLOYEE AS SELECT * FROM DB2i.S104X7AB.CORPDATA.EMPLOYEE;
CREATE VIEW EMPPROJACT AS SELECT * FROM DB2i.S104X7AB.CORPDATA.EMPPROJACT;
CREATE VIEW IN_TRAY AS SELECT * FROM DB2i.S104X7AB.CORPDATA.IN_TRAY;
CREATE VIEW ORG AS SELECT * FROM DB2i.S104X7AB.CORPDATA.ORG;
CREATE VIEW PROJACT AS SELECT * FROM DB2i.S104X7AB.CORPDATA.PROJACT;
CREATE VIEW PROJECT AS SELECT * FROM DB2i.S104X7AB.CORPDATA.PROJECT;
CREATE VIEW SALES AS SELECT * FROM DB2i.S104X7AB.CORPDATA.SALES;
CREATE VIEW STAFF AS SELECT * FROM DB2i.S104X7AB.CORPDATA.STAFF;
When accessing the new SQL Server PROJECT view, SQL Server will query the DB2 for i table called CORPDATA.PROJECT. You can test your linked server to DB2 for i by running the following T-SQL query in SSMS in the context of the LightSwitchDemo database:
SELECT * FROM PROJECT
Distributed (XA) Transactions
When SQL Server updates data in another RDBMS using a linked server, it tries to do so using a distributed transaction (DT). DTs are intended to make sure that data modified within a transaction can be successfully committed on multiple platforms or else rolled back in both places. A few configuration issues need attention when getting DTs to work with DB2 for i.
A side effect of distributed transactions is that SQL Server will sometimes attempt to nest transactions. The DB2 for i ODBC driver, however, doesn't support nested transactions. To bypass this unwanted nesting, the XACT_ABORT setting should be on for any SQL Server connection attempting to update DB2 data. Setting XACT_ABORT on will cause SQL Server to abort any in-progress transactions when an error occurs.
There's not an easy way to control the XACT_ABORT connection setting from LightSwitch, but this setting can be overridden globally in SQL Server using the following script:
-- Server wide SET XACT_ABORT ON
EXEC sp_configure 'user options', 16384
RECONFIGURE WITH OVERRIDE
Warning: Changing this setting may alter the behavior of existing database application code. If you're not sure how this setting change will affect SQL Server production databases, use a standalone instance of SQL Server for this demo.
Windows Server Setup for Distributed Transactions (DTs)
For SQL Server to participate in a DT with DB2 for i via the IBM ODBC driver, a Windows service (on the box running SQL Server) called the distributed transaction coordinator must be configured to process XA Transactions. Screen shots for how to do this in Windows Server 2012 are shown here (other versions of Windows may vary slightly):
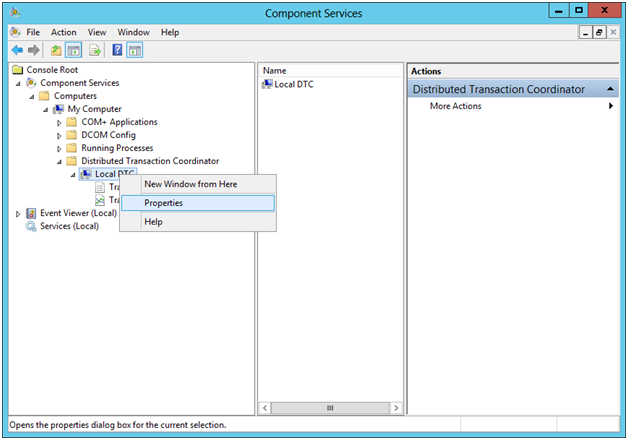
Figure 1: Click on Administrative Tools > Component Services > Computers > My Computer > Distributed Transaction Coordinator > Local DTC (right-click and choose properties).
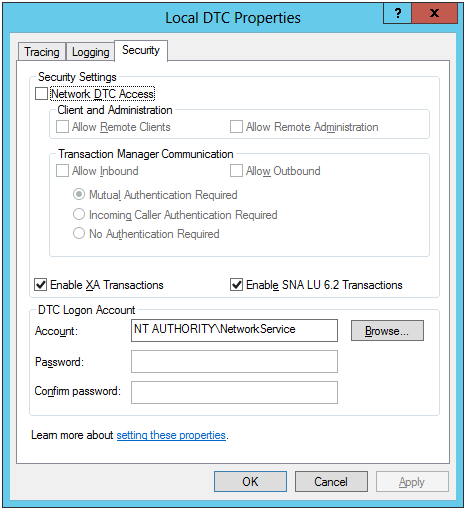
Figure 2: In the Local DTC Properties window, select the security tab and then check "Enable XA Transactions."
If you do not complete this step, most likely you will encounter the following ugly message when you attempt to update data in LightSwitch (read operations from DB2 will be fine):
OLE DB provider "MSDASQL" for linked server "DB2i" returned message "[IBM][System i Access ODBC Driver]Enlist with DTC phase failed. 2".
Because of the distributed transaction requirement of this demo, the DB2 for i tables must be journaled so that in-process transactions can be rolled back if needed. The CORPDATA sample data is journaled by default.
In summary, reading or updating the demo's SQL Server views is equivalent to reading or updating from DB2 for i tables; that's the beauty of linked servers. The LightSwitch app will connect to SQL Server and access the views in the LightSwitchDemo database.
The Visual Studio LightSwitch Demo
This demo assumes you have some familiarity working with a Visual Studio solution. This section is a bit long, but I'll take you step by step through how to create the LightSwitch application (and the project assumes that you have a SQL Server instance ready to go following the previously listed configuration requirements).
To create the demo LightSwitch application:
- Open Visual Studio.
- Choose New Project.
- Under Templates, choose your preferred language (VB or C#), choose LightSwitch, and then choose the LightSwitch HTML application (as shown below in Figure 3).
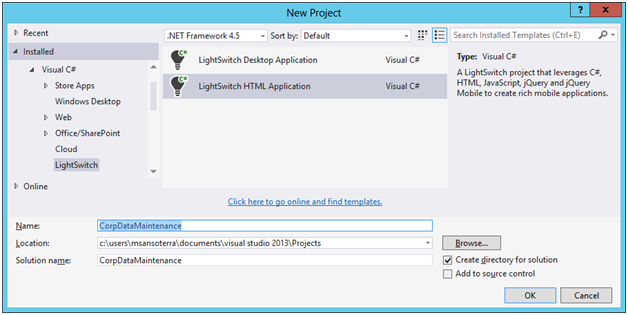
Figure 3: Create a new Visual Studio LightSwitch HTML application.
- Choose a name for the project (I called this sample CorpDataMaintenance).
- When the "Start With data" tab appears, click the "Attach to external Data Source" link and choose Database.
- Enter your SQL Server information (mine is localhost with Windows authentication specified and database "LightSwitchDemo" specified), hit "test connection" to make sure everything is OK, and then click OK. You'll see the "Choose your Database Objects" window.
- Assuming your "LightSwitchDemo" database (or equivalent) is set up correctly, choose "Views" and then select all view objects. You should have a screen that looks something like Figure 4.
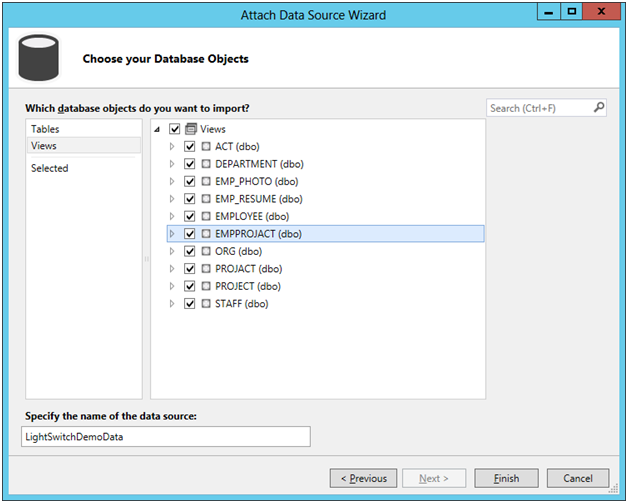
Figure 4: The Attach Data Source Wizard allows you to connect to tables and views in a database.
- Click Finish, and Lightswitch will generate all the code necessary to access these views!
In VS, your Solution Explorer should look something like Figure 5 with the selected SQL Server views shown in the "CorpDataMaintenance.Server" project (i.e., middle tier). You'll also notice a second project called "CorpDataMaintenance.HTMLClient." This is where the client tier (UI) code is placed.
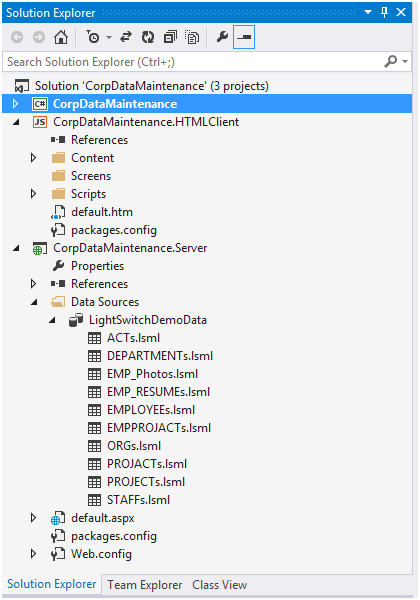
Figure 5: Under "Data Sources," the Solution Explorer shows the views from SQL Server available to the application.
You probably noticed that LightSwitch appends an "s" suffix to each view name so that the EMPLOYEE view is represented in LightSwitch as EMPLOYEEs. If you're creating a new database to be used with LightSwitch, it's a good idea to name your tables or views with a singular name (CUSTOMER instead of CUSTOMERs). Unfortunately, mixed-case names are difficult to work with in DB2 for i, so expect data-related references to look a little clumsy with respect to case because LightSwitch is fond of appending a lowercase "s" to table and view names.
Resetting Primary Keys
At this point, we'll have to rework the primary key (PK) column definitions on the views. Since LightSwitch is accessing a DB2 for i table via a SQL Server linked server view, LightSwitch can't obtain information about the primary key column(s). To compensate, LightSwitch defines its own composite PK on various columns. Therefore you have to manually reset the PK column (and this requires Visual Studio 2013 Update 3) to match the key in the DB2 table.
Start by fixing the employee table. In the Solution Explorer, under project "CorpDataMaintenance.Server" > data sources > LightSwitchDemoData (your name may be different), locate EMPLOYEEs.lsml and double-click on it. You should see something akin to Figure 6. You'll notice a key icon next to each column LightSwitch considers to be part of the PK.
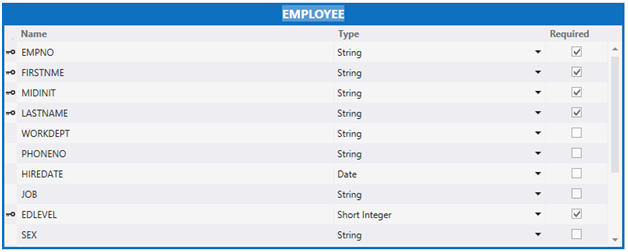
Figure 6: When it can't determine the unique identifier of an underlying table, LightSwitch defines a view's primary key as a composite of non-nullable columns.
The PK column should simply be EmpNo. To rectify this, click on each column in the table that has a key icon (except EMPNO), and in the property window uncheck the "is key" property.
Repeat the same steps for:
- ACTs.lsml (primary key column isACTNO)
- DEPARTMENTs.lsml (primary key column is DEPTNO)
- EMPPROJACT.lsml (primary key columns are EMPNO, PROJNO, ACTNO)
- PROJACTs.lsml (primary key columns are PROJNO, ACTNO, ACSTDATE)
- PROJECTs.lsml (primary key column is PROJNO)
- STAFFs.lsml (primary key columns is ID)
The remaining views aren't required to have their primary keys changed for this demo.
Setting Relationships
One benefit of Lightswitch when you're using a database data source is that it inspects the foreign key (FK) relationships between tables and automatically links related tables for you. However, if you have legacy tables without FKs or if you're using views, as in this demo, the FKs need to be defined manually.
Take the time to define FKs, because when you're designing screens in Lightswitch, if a FK is present, it can automatically build screens to show related data. So if you've done your database-design diligence by defining foreign keys, you will be rewarded, as you will see during the screen-design phase (coming up soon).
Note: I think LightSwitch has a bug in that it will not let you define a child relationship on a nullable column.
To define a FK between PROEJCTs and DEPARTMENTs in the Solution Explorer, within the LightSwitchDemoData data source, navigate to the PROJECTs.lsml file and open it by double-clicking on it. Right-click in a gray area and choose "Add Relationship." The "Edit Relationship" window will appear like the one shown in Figure 7. Set the primary (TO) name to DEPARTMENT and set the PROJECT (Foreign) field name to DEPTNO and click OK. Repeat the same steps by adding a relationship to the EMPLOYEE table based on the column PROJECT.RESPEMP.
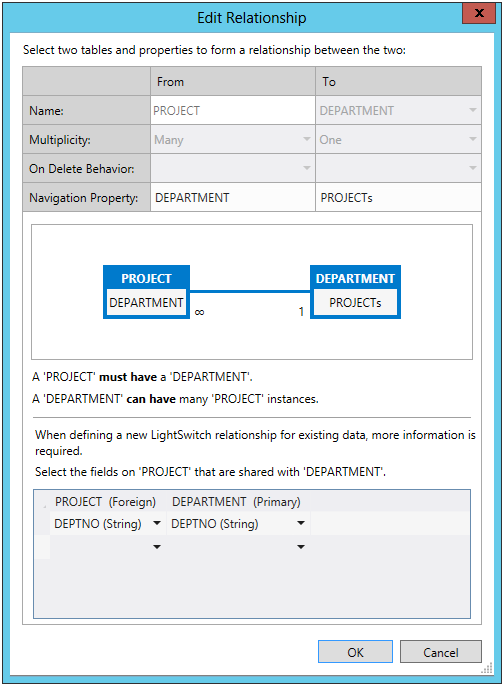
Figure 7: This figure shows a relationship (aka FK) definition between the PROJECTs and DEPARTMENTs views.
Defining the Summary Property on the Parent Table or View
The great thing about the relationship definitions is that when you're building a screen to display or edit Projects, LightSwitch can automatically show a related value in a parent table instead of showing an "id."
For example, the project table holds a department code, but when you're building a screen, in most cases it makes sense to show a user the department name instead of the code. When LightSwitch sees that the department view is related to the project view, it can show a column from the department table (like department name) instead of showing the department code.
But how does LightSwitch know what column in the parent table (in this case, Department) it should show the user? The answer is the view's "summary" property. This property is intended to tell LightSwitch the column (ideally, a unique value) to show the user based on a FK relationship. You can think of it as an alternate PK. For the department table, the department name would be a good choice for the summary property.
To set the department summary property, open the DEPARTMENTs data source, click the "HTMLClient" tab, select the DEPARTMENT properties, locate the summary property, and choose "DEPTNAME." When users are shown a list of departments (on a screen built on any child FK table), they will see a list of department names instead of a cryptic department id. You'll see how wonderfully this works shortly.
Likewise, you can choose an employee name to be the summary property of the employee view. Open the EMPLOYEEs data source and click the "HTMLClient" tab. Then click the word "Employee" on the title bar, and the properties for the EMPLOYEEs view will be displayed. Locate the summary property and choose "LastName" from the list of columns. When users look for a list of employees, they will see a list of last names (not ideal but sufficient for this demo) instead of a list of employee ids.
If your department names or employee names aren't unique, the user is going to have a tough time deciding among duplicates! A common way around this uniqueness problem in SQL Server is to define a computed column, which is a column expression attached to a table. This will allow a developer to concatenate field names so that the user always has something unique (such as a new column called FULL NAME that consists of First, Middle, Last Name columns on an Employee master). Because DB2 for i doesn't support computed columns, we're kind of stuck as is without implementing a workaround in the SQL Server view (which I can't bother demonstrating due to article length).
Marking the Data Source as Editable
Since LightSwitch could not verify that the PROJECT view was read/write, to be safe, it assumed it would be read-only. To change this, double-click the PROJECTs.lsml file. In the properties window, locate the "Is Editable" checkbox and make sure it's checked. PROJECTs is the only read/write view in this demo, but of course you'll have to mark all views you wish to update as editable in the same manner.
Creating Screens
Now for the good stuff.
For this demo, we're done fussing with the data sources. Here is where all the database setup work will pay off. It's time for LightSwitch to build a few screens. The demo app will have a screen for browsing all projects (including a search box), a screen for viewing project details, and a final screen for maintaining a project. Further, because of the defined foreign key relationships on employee and department, the user will be able to select these values from a list of names (the summary property setup) rather than entering a department code or employee number.
In VS, locate the "Screens" folder under the "CorpDataMaintenance.HTMLClient" project, right-click and choose "Add New Screen" (see Figure 8 below). An "Add New Screen" window will appear. On the left, leave the screen template as "Common Screen Set." On the right, choose "PROJECTs" as the screen data, and check the "PROJECT details" box. This will cause LightSwitch to build the aforementioned screens (browse, view detail, and add/edit) based on the PROJECTs view and link them together with an intuitive navigation. You'll be amazed at what is accomplished without an ounce of programming.
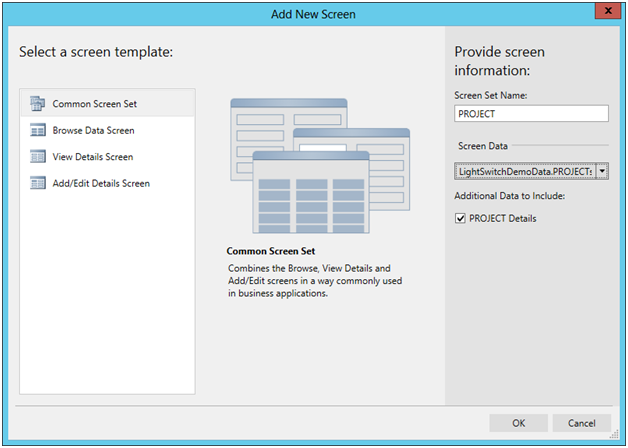
Figure 8: Adding a common screen set will create several related forms that are easy for a user to navigate. If the underlying screen data is updateable, a maintenance screen will be created as well.
Once LightSwitch builds the screens, you'll notice the following screen definitions will show in the Solution Explorer as shown in Figure 9.
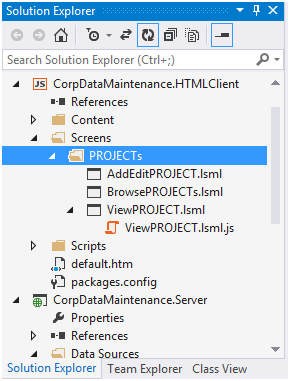
Figure 9: The three project screens from the common screen set now show in the Solution Explorer.
All of the work thus far has been defining primary keys, relationships, summary properties, etc. When all of these are set up correctly, LightSwitch builds functional screens! Further, if you have a data source (such as SQL Server or MySQL) that supports the Entity Framework, when everything is already set up correctly in the database, you won't have to bother with the manual primary key and relationship settings!
There are a few things to do to improve the screen usability. In Solution Explorer, double-click BrowsePROJECTs.lsml to open for editing. BrowsePROJECTs is a top-level screen that shows a list of all projects to the user. You will see a list of three columns that are shown to the user: PROJNO, PROJNAME, and DEPTNO. Delete the DEPTNO column and then add the DEPARTMENT column; this will show the department name from the department table instead of showing the DEPTNO code. (You'll see what the screen looks like below in Figure 11.)
For the next UI improvement, open the AddEditPROJECTs.lsml screen. This is the screen that allows users to enter a new project or to maintain an existing one. Remove the DEPTNO and RESPEMP columns (by clicking on the column names and pressing the DELETE key) because they are unnecessary as the DEPARTMENT and EMPLOYEE columns will show the names and make the codes confusing and redundant. For reference, see Figure 10 below:
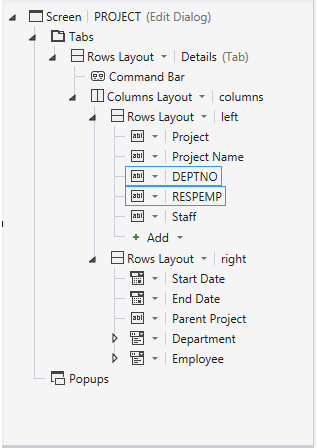
Figure 10: The PROJECT screen designer shows the list of columns to appear on the right and on the left. Remove the DEPTNO and RESEMP columns for a cleaner UI.
That's it! Press F5 in Visual Studio to run the project. The BrowsePROJECTs screen is the first to appear as shown in Figure 11.
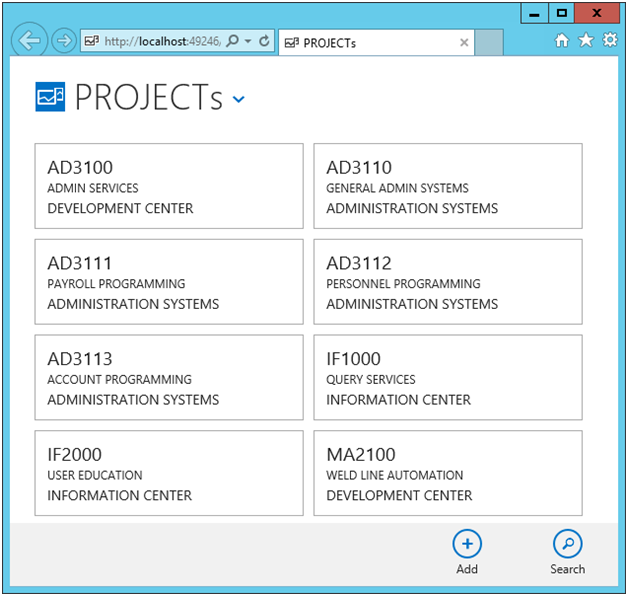
Figure 11: This is the default browse "Projects" screen as shown in Internet Explorer. Each project is represented as a box or "tile" to make sure the app is mobile-browser-friendly.
This web page is fully functional and even has an "add project" and search facility built in. Note that the search facility does not search relationship items. It only searches data in the main table or view the screen is based on.
Each tile can be clicked on to show the "details" or ViewPROJECTs screen as shown in Figure 12:
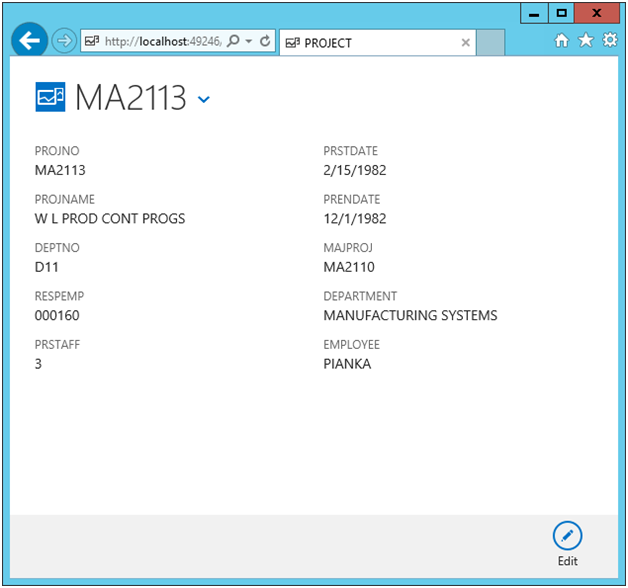
Figure 12: The details are shown for project MA2113. Notice that both the code values and parent summary values are shown for the department and responsible employee.
Finally, to demonstrate the maintenance screen, click the edit button in the lower right corner of the "View" screen. A popup window will appear and allow edits to be made for the selected project; this is the AddEditPROJECTs screen:
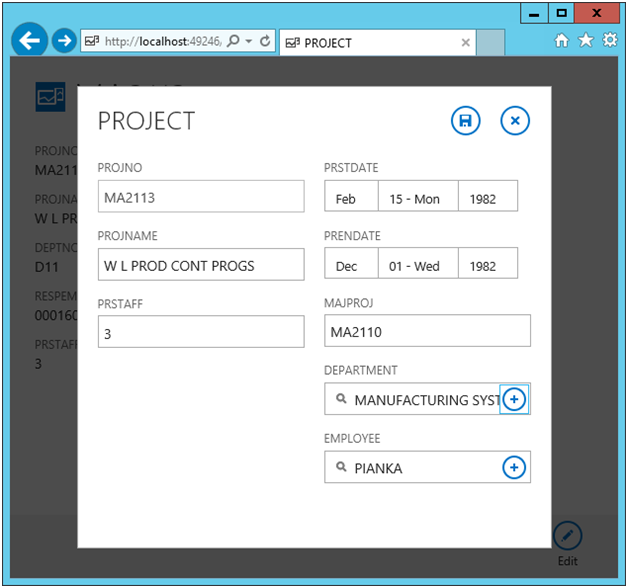
Figure 13: The project maintenance screen is full-featured with date controls and "selection lists" for selecting a department and employee.
Feel free to make some changes and hit the save button (disk icon) at the top of the screen. If you goofed up any of the setup (XACT_ABORT, XA Transactions, journaling, etc.) the update may fail. If the update fails, you'll need to double-check your SQL Server/Linked Server/ODBC configuration.
You may have noticed that the labels on many of these screens can use some help (e.g., mixed case, and text such as Major Project instead of MAJPROJ. But all of these edits can be made rather easily by editing the screens and changing the display name property for the various columns.
Once you're done with your HTMLClient project, you have the option to deploy to a local IIS web server or put it in the cloud with Azure (I've done both with SQL Server projects, and they work great, although details on how to do this are beyond the scope of this article). As you may have guessed, it will pay to read online tutorials or buy a book about LightSwitch.
The Visual Studio project code can be downloaded here (although you will have to change the data source definitions to link to your own correctly configured SQL Server.)
OData Bonus
Recall a LightSwitch project's middle tier makes data available to the client tier by creating an OData service to serve the data. This means that, if desired, other OData-compatible tools can take advantage of this read (and potentially write) data source. Of course, you have to consider security, but space forbids a full discussion!
For this demo project (running in Visual Studio), you can access the OData service by taking the base URL and appending the data source name (in this case, LightSwitchDemoData) and append the .svc suffix:
http://localhost:49246/LightSwitchDemoData.svc/
When looking at the main OData service, it's easy to discern that all of the employees can be retrieved by navigating to the following URL in a browser (I suggest using a browser other than IE for this):
http://localhost:49246/LightSwitchDemoData.svc/EMPLOYEEs
And, if you remember from the OData article, you can do fancy things in the URL because LightSwitch supports many OData features, such as filtering:
http://localhost:49246/LightSwitchDemoData.svc/EMPLOYEEs?$filter=WORKDEPT eq 'A00'
LightSwitch Development Considerations
Here are a few tips worth remembering as you get started with LightSwitch development:
- Remember that the generated app is intended to be mobile-friendly. For example, there is no option to allow someone to right-click on an element to bring up a context menu.
- Legacy DB2 for i columns, such as date/time fields stored in a numeric data type, will not use the date/time controls.
- You need plenty of memory on your PC and/or server.
- Large data sets may be problematic without coding or modifying the default behavior. For example, using the default search facility on a large table could take quite a while to run.
- Unlike some Microsoft products of the past, LightSwitch works well in several modern browsers, including Chrome, Firefox, and Opera.
Conclusion
LightSwitch is a great tool for rapidly developing web/mobile-enabled apps. Because of its dependence on the Entity Framework, DB2 for i developers will have to use SQL Server (including the free SQL Server Express) or purchase an appropriate .NET Entity Framework-compatible data provider to allow data access directly on the IBM i/iSeries. Further, when using SQL Server as a read-write intermediary, quite a bit of additional setup is required to support read/write operations against DB2.
However, once you learn LightSwitch, it's a very effective tool. When you're adept with LightSwitch, the example here takes less than 30 minutes to create. I prefer tools like LightSwitch because I then have the ability to rapidly deploy modern web-based interfaces (instead of the green-screen subfiles) without being intimately familiar with web coding.


 More than ever, there is a demand for IT to deliver innovation. Your IBM i has been an essential part of your business operations for years. However, your organization may struggle to maintain the current system and implement new projects. The thousands of customers we've worked with and surveyed state that expectations regarding the digital footprint and vision of the company are not aligned with the current IT environment.
 TRY the one package that solves all your document design and printing challenges on all your platforms. Produce bar code labels, electronic forms, ad hoc reports, and RFID tags – without programming! MarkMagic is the only document design and print solution that combines report writing, WYSIWYG label and forms design, and conditional printing in one integrated product. Make sure your data survives when catastrophe hits. Request your trial now! Request Now.
 Forms of ransomware has been around for over 30 years, and with more and more organizations suffering attacks each year, it continues to endure. What has made ransomware such a durable threat and what is the best way to combat it? In order to prevent ransomware, organizations must first understand how it works.
 Disaster protection is vital to every business. Yet, it often consists of patched together procedures that are prone to error. From automatic backups to data encryption to media management, Robot automates the routine (yet often complex) tasks of iSeries backup and recovery, saving you time and money and making the process safer and more reliable. Automate your backups with the Robot Backup and Recovery Solution. Key features include:
 Business users want new applications now. Market and regulatory pressures require faster application updates and delivery into production. Your IBM i developers may be approaching retirement, and you see no sure way to fill their positions with experienced developers. In addition, you may be caught between maintaining your existing applications and the uncertainty of moving to something new.
 IT managers hoping to find new IBM i talent are discovering that the pool of experienced RPG programmers and operators or administrators with intimate knowledge of the operating system and the applications that run on it is small. This begs the question: How will you manage the platform that supports such a big part of your business? This guide offers strategies and software suggestions to help you plan IT staffing and resources and smooth the transition after your AS/400 talent retires. Read on to learn:
LATEST COMMENTS
MC Press Online