


Some countries are known for their particular exports. From furs to clocks, their respective connoisseurs know where to turn. In the IT realm, the commodity is data and shrewd businesspeople have long known where it should be found: the AS/400. What may not be so well-known, however, is how these users can export that information to their UNIX networks in a distributed file access environment. Enter AS/400 Support for Network File System (NFS).
In this article, I’ll provide a complete user’s guide to using the AS/400 Change NFS Exports (CHGNFSEXP) command (or its alias, Export File Systems, EXPORTFS) for making an AS/400 file system available to NFS clients on your network. I’ll provide an in-depth look at everything you need to know to export AS/400 Integrated File System (AS/400 IFS) files to the network, including prerequisites, file systems that can be exported, the /etc/exports and /etc/netgroup files, and the EXPORTFS command host options.
Before You Export
What needs to be in place before you should attempt a successful export? Generally, your AS/400 must be configured the following way in order to create file exports:
• You need OS/400 V3R7 or later to use AS/400 NFS support.
• The AS/400 user profile administering NFS must have *IOSYSCFG special authority as well as authority to use the EXPORTFS and Start NFS Server (STRNFSSVR) commands.
• The administrator user profile also needs execute (*X) authority to the /etc directory of the root (/) file system. It may also need read (*R) and write (*W) authority to the /etc directory and the /etc/exports file if entries in the file are being exported or modified. From the green-screen, you can modify /etc directory authority by typing in the Work with Authority (WRKAUT) command as follows: WRKAUT OBJ(‘/etc’).
• The user profile administering NFS must be registered in the system distribution directory with the Add Directory Entry (ADDDIRE) command. To determine if a user is registered in the system directory, type in the Work with Directory Entries (WRKDIRE) command and check to see if an entry exists for that user on your system. You can also add entries from the WRKDIRE screen.
• TCP/IP must be started and configured properly on your AS/400.
TCP/IP configuration is administered through the Configure TCP/IP menu, which is accessed by typing in the Configure TCP/IP (CFGTCP) command. If you are not using a Domain Name System (DNS) for address resolution, you must ensure that the local system name—as well as all the client host names you will be specifically exporting to—are listed in the AS/400 TCP/IP host table with their associated IP addresses. Use option 10 on the Configure TCP/IP menu, Work with TCP/IP Host Table Entries, to configure your AS/400 Host Table entries. For each IP address, you should enter both the short name of the host as well as its fully qualified name that includes the domain name. For example, if MYHOST is a machine name in domain SALES.COMPANY.COM, then both MYHOST and MYHOST.SALES.COMPANY.COM need to be entered for MYHOST’s IP address. Doing so is not necessary if DNS is used to provide this information. Also, ensure that the LOCALHOST and LOOPBACK entries for the 127.0.0.1 local interface are defined in the host table.
The NFS servers do not actually have to be started prior to creating an export, but they must be running before a client can mount the file system. Also, if you are using the /etc/exports file to specify your exports, the entries it contains will automatically be exported when you start the servers. The Start NFS Server (STRNFSSVR) command is used to start each of the following six NFS daemons in the QSYSWRK subsystem: QNFSRPCD, QNFSBIOD, QNFSNFSD, QNFSMNTD, QNFSNSMD, and QNFSNLMD. To start these servers, type in the STRNFSSVR command as follows:
STRNFSSVR *ALL
To end the NFS daemons, run the End NFS Server (ENDNFSSVR) command with the *ALL option as follows:
ENDNFSSVR *ALL
What Can Be Exported?
You cannot export every AS/400 IFS file system through AS/400 NFS. The files systems you can export include the Root (/), QOpenSys, User Defined File Systems (UDFS), QSYS.LIB, QDLS, and QOPT (optical) systems. For more information about each of these file systems, see the OS/400 Integrated File System Introduction (SC41-5711) manual. An important point to remember is that you cannot export another NFS file system that is already mounted on your AS/400 server machine. This restriction avoids ambiguous looping situations where directory A on host X is mounted over directory B on host Y, and then an attempt is made to mount directory B on host Y back over directory A on host X.
You also need to consider what types of file system objects you are exporting. Basically, you can only export a file or a directory. You will usually be exporting a directory, but a single stream file export is just as valid. When you export a directory path name, everything within that directory, including any subdirectories, is also exported with the options specified.
What does this mean for the QSYS.LIB file system? You are allowed to export
.LIB (libraries), .FILE (files), and .MBR (members) objects, however you are not allowed to perform I/O functions against every type of object that may fit these categories or dwell within them. The restriction is that I/O access is allowed only to physical files that are program-described with one field or source physical files containing a single text field. Prior to V4R4, access was not allowed to externally described files (except source physical files). However, this restriction has been removed so that you can export and access externally described files in V4R4 and later releases. Keep in mind though, that it is completely up to the application reading the file to interpret the field delimiters and other special characters that may be contained in the member. To see if a file is externally described or not, use the Display File Description (DSPFD) command on that file. The first
line under the Data Base File Attributes section will indicate whether the file is externally described.
When working with the QSYS.LIB file system through NFS, it is important to keep in mind that NFS always opens a member in binary mode. This means that the data is read out byte by byte to the end of the record and then wraps to the next record without appending special end-of-line characters to each record. So, if the data in a member was created with an AS/400 editor that opened the file in text mode, the QSYS.LIB file system would have stripped out any end-of-line characters and padded out each record with spaces. Then, when the member is read into your client editor through NFS, you will see a single line of data that consists of text, followed by spaces, followed by more text, etc.
Within any file system, an additional export restriction is that you cannot export a parent or child of a path that is already exported. For example, if you export /QSYS.LIB and then attempt to export /QSYS.LIB/QGPL.LIB, the command will fail because the second path is a child of the first (and is technically already exported). However, ‘/’ could still be exported because it is not in the same file system (it is in the Root ‘/’ file system) as QSY.LIB, although it is the parent directory of the the QSYS.LIB mounted namespace.
Exporting a Directory/folder
The AS/400 command to make a directory available to remote NFS clients is Change NFS Exports (CHGNFSEXP) or its alias, Export File Systems (EXPORTFS). Both commands can be typed in directly from the command line or as options on the Network File Systems Commands menu (accessed by typing in GO CMDNFS). The two first-level parameters are the options string and the directory to export, however, only one of the two parameters is required. The options string parameter consists of a list of flags separated by spaces that control how the folder(s) are to be exported. (A complete list of NFS export options and flags can be found by pressing the HELP key—usually F1 or PF1—as you are entering values into the options string parameter.) The options string follows the same conventions used for traditional UNIX platforms. The most important flag is the ‘-O’ flag, which is followed by a comma-delimited list of export characteristics. If this flag is not used, then either the default export characteristics are assumed or, if the entry is specified in the /etc/exports file, the export characteristics given in that file are used.
If you use *DFT or the ‘-A’ flag for the options parameter, then the EXPORTFS command will export all the entries in the /etc/exports file with the options specified in that file. This is the default action for the command. The commands to export all the /etc/exports file entries are:
EXPORTFS OPTIONS(*DFT) or
EXPORTFS OPTIONS(‘-A’)
If ‘-U -A’ is given for the options parameter, then each of the entries specified in the /etc/exports file is unexported (i.e., made unavailable for clients to access):
EXPORTFS OPTIONS(‘-U -A’)
If anything other than *DFT or ‘-A’ is specified for the export options parameter (or if it is not used at all), then the directory parameter must be provided. The command will attempt to export the single entry specified there. The directory parameter must be an absolute path name (i.e., a fully qualified name beginning with a ‘/’). In this case, if the options parameter is not provided and the directory to be exported is also listed in the /etc/exports file, then the export characteristics specified in the exports file are used. If the ‘-I’ flag is specified, then the command is instructed not to look in the /etc/exports file for the directory options to export. Instead, the path name specified in the directory parameter is exported directly with options provided with the ‘-I’ flag. Here’s an example:
EXPORTFS OPTIONS(‘-I’) DIR(‘/data/myexport’)
This configuration says to ignore the /etc/exports file (‘-I’ flag) and export the /data/myexport directory with the default export characteristics because the ‘-O’ flag was not used. The following are the default export characteristics:
• All clients are allowed to mount the directory and have read-write access to the directory tree
• The anonymous profile is the system-supplied user profile, QNFSANON (‘ANON=4294770710’)
• Requests to set bits in the mode other than the permission bits are allowed by the AS/400 NFS server. Specifically, this refers to the SUID and SGID bits, which allow executable binaries to be run on a UNIX client under the effective credentials of the owning User ID and Group ID respectively. The “sticky” bit is never allowed to be set on the AS/400.
• Root authority (sudo), or superuser access, is not allowed for any hosts (‘ROOT=’ list is empty). This does not refer to the mount operation (which is always performed by root from UNIX clients), but rather, subsequent NFS operations after the mount has completed.
The defaults can be modified with the ‘-O’ flag, followed by valid option keywords. For example:
EXPORTFS OPTIONS(‘-I -O RO,ANON=-1,NOSUID’) DIR(‘/data/myexport’)
This export configuration is more restrictive. Although any client is still allowed to mount the directory, the RO keyword says they will be allowed read-only access. The ANON=uid keyword says that any requests made by an unknown user (i.e., one whose User ID is not associated with any profile on the AS/400 server) should be performed using the effective credentials of the AS/400 profile whose User ID number is equal to uid. If you do not specify the ANON=uid keyword, all unknown requests will be processed under the default AS/400 NFS user profile, QNFSANON. In this example, specifying ANON=-1 means that AS/400 NFS will disallow anonymous access entirely and a client will need to access this export with a valid user ID. This does not mean the mount will be unsuccessful (remember mounts are always performed with superuser authority), but that you will be denied access to the mounted file system. The NOSUID keyword says that attempts to set special mode bits (namely SUID and SGID) will not be allowed.
To restrict access on a host-by-host basis, three host list keywords are provided: RW=, ACCESS=, and ROOT=. Here is an example of how to use these keywords:
EXPORTFS OPTIONS(‘-I -O ACCESS=HOST1:78.3.4.167:DEPT5A, RW=HOST1:78.3.4.167,
ROOT=HOST1’) DIR(‘/QDLS’)
Now, requests to mount and use the QDLS file system will only be granted to the clients in the ACCESS list. Notice that each host in the ACCESS list is separated by a colon. In this example, DEPT5A is not a host name, but a netgroup name, which represents a whole group of hosts. It is defined in the /etc/netgroup file. An example netgroup file is shown in Figure 1. You can edit your netgroup file by using the Edit Files (EDTF) command with the ‘/etc/netgroup’ literal in the stream file (STMF) parameter as follows:
EDTF STMF(‘/etc/netgroup’)
The /etc/netgroup file that is shipped with each AS/400 contains a block of help text as comments within the file. These comments explain exactly how to configure your netgroup file.
The RW= list says that only hosts HOST1 and IP address 78.3.4.167 have read- write access. Those in DEPT5A are read-only. In UNIX terms, the ROOT= list specifies that requests originating from HOST1 may be allowed by a root user (i.e., one with sudo authority, a.k.a superuser access) to your exported AS/400 IFS directory. When NFS was implemented on the AS/400, it was decided that having one root user (like QSECOFR), such as UNIX platforms have, left too large of a security hole. So, in AS/400 terms, if a user profile on the AS/400 has *ALLOBJ authority, then NFS considers the user a root user. By default, if a User ID from a client would normally map to a user profile on the AS/400 with *ALLOBJ special authority, then that mapping would not be allowed without the ROOT= option. Instead, the user would be mapped to the anonymous profile if anonymous access is allowed. However, if the request came from a host in the Root list, then the normal mapping is allowed. For example, suppose a client request comes from a user on HOST1 with User ID=725. Now suppose that User ID 725 maps to the profile JERRY on the AS/400 server and JERRY has *ALLOBJ special authority. Because HOST1 is on the Root list, the request is allowed to be executed under the effective credentials of Jerry’s profile rather than the anonymous profile.
Host Options
The Host options parameter is an export feature exclusive to the AS/400. This parameter defines a list of elements that are unique to a particular host (i.e., client) using an export, telling AS/400 NFS how a directory tree should be exported to a specific host. To reach the Host options on the EXPORTFS command, use F10 to bring up these fields. An example of a defined export using host options is shown in Figure 2. For the host or netgroup name specified in the Host name field, the Data file code page value is the code page that file data will be converted to before being sent to the client. It is also the code page it expects the client to send file data in. The default is *BINARY, which means no conversion is done. In Figure 2, I configured this particular Host option list for DEPT2B, which is comprised of AIX clients that will be accessing text data they expect to be in ASCII. The data is stored in EBCDIC on the AS/400, so specify *ASCII here to allow those clients to interpret it correctly.
The Path name code page value is the code page that exported directory and file names are exchanged in. Normally, you will keep the value as *ASCII since this is what most NFS implementations expect paths to be passed in. The Force synchronous write field designates whether write requests are guaranteed to be written to disk before a response is returned. This value is *SYNC by default because the strict NFS protocol requires it to be. However, because of the architecture of the AS/400, you will get much better performance by specifying *ASYNC here for your exports, which lets the system follow its own course of syncing the data to stable storage.
The /etc/exports File
Once you get your exports and options figured out, you’ll want to stick them in the /etc/exports file so they can be easily exported when the servers are started. You could, of course, manually edit the file, being careful to provide the correct syntax. If you want to manually edit the stream file using the EDTF command (as I did for the /etc/netgroup file), you could type in the following command:
EDTF STMF(‘/etc/exports’)
Similar to the netgroup file, the shipped /etc/exports file contains help text as comments for creating export entries in the file.
However, with OS/400 V4R3 or later, there is an easier way to create your exports file. An additional flag (‘-F’) can be used on the EXPORTFS command line that tells it not
only to perform the export, but also to write the given export into the /etc/exports file. For example:
EXPORTFS OPTIONS(‘-I -F -O ACCESS=DEPT2B’) DIR(‘/QOPT/docs’)
After running this command, /QOPT/docs is available to clients in DEPT2B and the /etc/exports file is modified to contain this export entry. If the /etc/exports file already had an entry for /QOPT/docs, that entry will be replaced with this new export.
Exporting the Graphical Way with OpsNav
NFS has gone graphical with OS/400 V4R3 or later and Client Access for Windows 95/NT V3R2 and Client Access Express for Windows. The AS/400 Operations Navigator
(OpsNav) program was enhanced to allow administrators to start NFS servers and export file systems from the GUI interface. There are two ways to create AS/400 NFS Exports. The first way is to select the Exports option from the pop-up menu that appears when you right-click on the NFS Server in the TCP/IP Servers window. (To get to the TCP/IP Servers window, open the Network-Servers-TCP/IP branch in OpsNav.) When you open the NFS Exports window and select the option to create a new export, OpsNav will show you the New NFS Export window (Figure 3) and it will ask you to define a directory to be exported. By clicking on the Access tab, OpsNav allows you to define the access parameters for that directory. Here you can add netgroups, define read and write access, and specify the host options for each host or netgroup. When you are finished, click on the Export button and the directory is available to your NFS clients.
The second method for exporting an AS/400 IFS directory is by locating the folder you want to export and specifying the export from the folder rather than from the NFS server. To do so, open the File Systems-Integrated File System branch of OpsNav and right-click on the AS/400 IFS folder you want to export. This time, there will be an NFS Exports option on the pop-up menu. Click on NFS Exports and select Properties and you will once again be presented with the window in Figure 3. Here you can modify the specific parameters for this export as detailed in this article, adding hosts or netgroups that are allowed to access this directory or file, changing the type of access, changing the code page values, etc. Also, if you click on the General tab, notice that you can make this export permanent (place it in the /etc/exports file) by checking the appropriate box.
Now You’re an Export Expert
As you can see, it is very easy to create NFS exports on your AS/400. With this information on using the EXPORTFS command and the Related Materials listed below, you should be well on your way to performing successful exports and getting vital data into the hands of your waiting NFS clients.
Related Materials
OS/400 Integrated File System Introduction V3R6 (SC41-5711-03), http://publib.boulder.ibm.com/cgi-bin/bookmgr/Books Exploring NFS on AS/400, Redbook (SG24-2158-00), www.redbooks.ibm.com OS/400 Network File System Support V4R4 (SC41-5714-01), http://publib.boulder.ibm.com/cgi-bin/bookmgr/Books
The EXPORTFS Troubleshooting Guide
Once you get started, exporting AS/400 IFS directories will turn out to be a snap, but sometimes you will encounter a few hurdles at the beginning that can cause some frustration. To alleviate that stress, here’s a quick list of some common problems and their solutions:
Problem: The EXPORTFS or STRNFSSVR command displays an authority failure message, such as CPFA0D4: “File system error occurred with error number 3401.”
Solution: Your profile may need more authority to the /etc directory, the /etc/exports file, or the /etc/netgroup file, depending on the type of export you are attempting. Also, make sure it has *IOSYSCFG special authority and that it is authorized to the EXPORTFS command.
Problem: The EXPORTFS or STRNFSSVR command displays the CPFA1CE message: “Cannot find address for specified system name.”
Solution: In the cause portion of the message, a host name was given that could not be resolved to a valid IP address on the network. It is possible to get this error even though you are not specifying this host on any of the export options because the entire /etc/netgroup file is processed each time the EXPORTFS command is run. So, if any host name listed in the netgroup file no longer exists on the network, the host will need to be removed (or commented out) from the file before an entry can be successfully exported.
Problem: The EXPORTFS command displays the CPFA0D4 message: “File system error occurred with error number 3470.”
Solution: You are trying to export a path in a file system that NFS does not support. Double-check that your path name is typed in correctly on your EXPORTFS statement or in the /etc/exports file. Retry the command with the corrected name.
Problem: You can’t tell what is exported on a particular AS/400 server.
Solution: If you are signed on to the server, you can call an API from the command line on OS/400 V4R3 or later: CALL QZNFRTVE. Make sure you are viewing detailed messages (F10 option) on your command interface. This will list the current exports and if you press F1 on any one of the exports, the export options for that folder will be displayed. If you are on a UNIX client, issue the command: showmount -e server_host_name.
Problem: You are enrolled in the distribution directory. You’re able to export /QDLS and your client can mount it, but you get message CPFA0A1 (“An input or output error occurred”) whenever you try to access a document or folder from your client.
Solution: The mapped user profile on the AS/400 that the request runs under may not be enrolled in the system directory. Remember that if the User ID for the client is different from the User ID of the expected profile on the server, or if root access is not allowed for a user with *ALLOBJ authority, then the client user will not map to that profile. It may be that you need to add the QNFSANON profile to the system distribution directory.
Problem: You’re able to export and mount the file system, but the NFS response seems to be slow.
Solution: There are several things you can do on the server side to try to increase performance. The one mentioned in “How to Be an AS/400 NFS Export Expert” is to allow asynchronous writes with the *ASYNC Host option parameter on the EXPORTFS command. You can also use the Number of server daemons option on the STRNFSSVR command to start up several NFS server daemon jobs (QNFSNFSD) at the same time. To start up 10 server jobs at the same time, for example, you can enter the STRNFSSVR command as follows:
STRNFSSVR SERVER(*ALL) NBRSVR(10)
By running more server jobs, you can increase the parallel throughput of your NFS requests. Finally, you can use a faster AS/400 IFS file system, if possible. If you can store and export your data from the native UNIX-like AS/400 IFS file systems (Root, QopenSys), NFS will perform better.
—Carl Pecinovsky
Figure 1: You can edit the /etc/netgroup file with the Edit Files (EDTF) command.
Figure 2: Specify Host options on the EXPORTFS command so that different clients can get the data in the code page they expect.
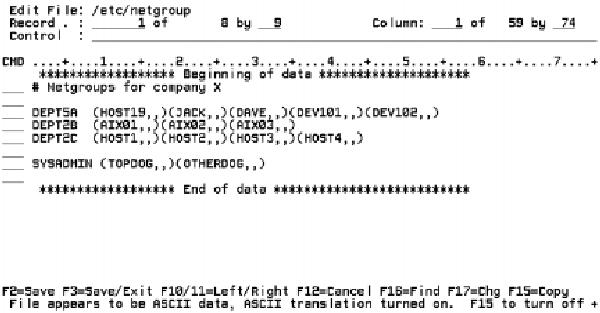
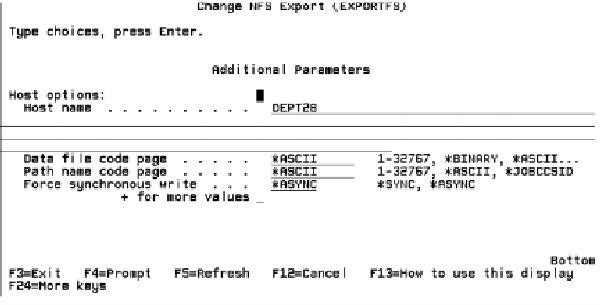
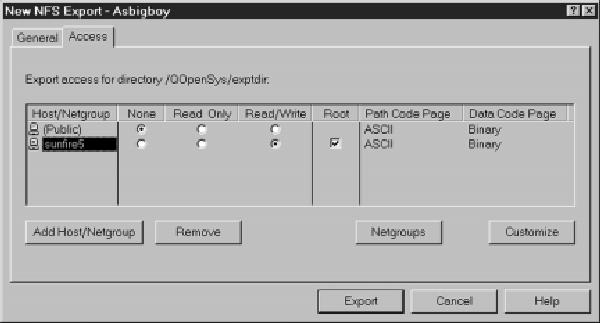
Figure 3: You can also use Operations Navigator for easy exporting and NFS administration.


 More than ever, there is a demand for IT to deliver innovation. Your IBM i has been an essential part of your business operations for years. However, your organization may struggle to maintain the current system and implement new projects. The thousands of customers we've worked with and surveyed state that expectations regarding the digital footprint and vision of the company are not aligned with the current IT environment.
 TRY the one package that solves all your document design and printing challenges on all your platforms. Produce bar code labels, electronic forms, ad hoc reports, and RFID tags – without programming! MarkMagic is the only document design and print solution that combines report writing, WYSIWYG label and forms design, and conditional printing in one integrated product. Make sure your data survives when catastrophe hits. Request your trial now! Request Now.
 Forms of ransomware has been around for over 30 years, and with more and more organizations suffering attacks each year, it continues to endure. What has made ransomware such a durable threat and what is the best way to combat it? In order to prevent ransomware, organizations must first understand how it works.
 Disaster protection is vital to every business. Yet, it often consists of patched together procedures that are prone to error. From automatic backups to data encryption to media management, Robot automates the routine (yet often complex) tasks of iSeries backup and recovery, saving you time and money and making the process safer and more reliable. Automate your backups with the Robot Backup and Recovery Solution. Key features include:
 Business users want new applications now. Market and regulatory pressures require faster application updates and delivery into production. Your IBM i developers may be approaching retirement, and you see no sure way to fill their positions with experienced developers. In addition, you may be caught between maintaining your existing applications and the uncertainty of moving to something new.
 IT managers hoping to find new IBM i talent are discovering that the pool of experienced RPG programmers and operators or administrators with intimate knowledge of the operating system and the applications that run on it is small. This begs the question: How will you manage the platform that supports such a big part of your business? This guide offers strategies and software suggestions to help you plan IT staffing and resources and smooth the transition after your AS/400 talent retires. Read on to learn:
LATEST COMMENTS
MC Press Online