


When you think about displaying a list of records on a screen, a subfile is probably the first thing that comes to mind. However, there is another, more powerful solution. With the User Interface Manager (UIM) and a special type of panel known as a list panel, you can gain some distinct advantages over subfiles. In most cases, list panels require far less code than subfiles do, yet they provide significantly more functionality. They also ensure that your applications maintain a consistent "look and feel." Like DDS, UIM is built into the operating system. So the only additional cost associated with using list panels is the time spent learning how to implement them. By reading this article, you'll gain the knowledge you need to begin coding your own list panels.
Even if you've never coded list panels before, chances are you've used them many times. That's because IBM takes advantage of them extensively throughout the OS/400 operating system. Most "Work with..." panels (such as Work with Spooled Files) present you with a UIM list panel. UIM automatically provides logic for tasks such as selection processing, command prompting, execution and retrieval, and error handling. This means that you don't have to provide code for these events when presenting a list of records on the screen. You can concentrate on the overall design of the application rather than on the detailed mechanics required in a traditional subfile approach.
To implement a list panel in an application program, the first step is to create a panel group. List panels and panel groups are similar to other OS/400 concepts-think of list panels as subfiles and panel groups as display files. The process of creating a panel group is similar to that of creating a display file, except that you can't use SDA to design the screen. However, SDA is really not necessary, because UIM automatically calculates the screen positions of fields and constants for you. You start by entering source code into a source member (type PNLGRP). The source code contains UIM instructions that define a list within the panel group. You then compile the source code with the Create Panel Group (CRTPNLGRP) command, which creates a panel group object (type *PNLGRP).
That's where the similarities between display files and panel groups end. Because a panel group is not a file, you cannot declare it in an application program. The only way to display a list panel is by using a set of APIs. Don't let the APIs keep you from enjoying the benefits of list panels. The example in this article provides all the information you'll need.
The APIs provide the link between the application program and the panel group. Unlike display files, this link is only established at runtime. The screen fields in the panel group are not brought into the application program during compilation. Therefore, one of the few draw-backs to using panel groups is that, unlike display files, they are not externally defined. You have to manually define screen fields in both the panel group and the application program, and the field attributes must match for the list panel to work properly.
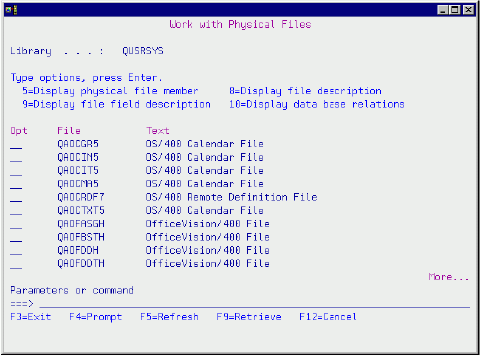
To demonstrate the use of list panels, I have created a utility called Work with Physical Files (WRKPF). The main purpose of this utility is to illustrate how to code list panels, although you'll probably find it useful.
The WRKPF utility lists all physical files in a specified library. The resulting panel is shown in Figure 1. In this example, I have selected the QUSRSYS library, as shown at the top of the screen. Below the library name is a set of four different options that you can select for any file in the list: Display physical file member, Display file description, Display file field description, and Display database relations. These options run OS/400 commands, substituting the selected file for the FILE parameter of the commands. Near the bottom of the screen is a command line for entering commands or additional parameters for selected options. This command line functions just like any other command line in OS/400. You can use it to prompt, execute, and retrieve previously executed commands. At the very bottom of the screen is a list of the available function keys.
While you could probably code this application using a subfile instead of a list panel, it would take a much greater effort. The reason is that UIM automatically performs much of the logic that you would otherwise have to code manually. Let me give you some background to explain what Imean.
As stated earlier, to display a UIM panel, your application program must call an API. At that point, the application program passes control to UIM. As the user performs tasks such as pressing roll keys, selecting options, and entering commands, UIM handles these requests.
UIM also performs any necessary validation. If the user selects an invalid option, UIM positions the cursor, highlights the invalid option, and displays an error message. If the user enters an invalid command, UIM displays an appropriate error message.
Meanwhile, your application program is simply waiting for a CALL statement. UIM handles all the complex logic necessary to validate and execute the user's requests. As you can imagine, this is a tremendous benefit over having to manually code this logic in your application program.
The command definition for the WRKPF command is shown in Figure 2. This command requires the user to enter a library in the LIB parameter. The command then passes control to the CL program PNL002CL, shown in Figure 3. If the library exists, PNL002CL calls the RPG program PNL002RG, shown in Figure 4 on page 42.
The UIM source code for the panel group is shown in Figure 5 on page 42. In the highlighted section of code, there are two variable record definitions: header and detail. These variable records are similar to record formats in a display file. Each variable record has an associated buffer for passing variables (fields). The header record contains a buffer for passing the library name displayed at the top of the screen. The detail record contains a buffer for passing the option, the file name, and the text for the list. For a more detailed explanation of this panel group, see the sidebar, "Overview of UIM List Panels."
PNL002RG uses a cross-reference file, QADBXREF, which is found on every AS/400. This file contains a record for each file on the system. The program uses this file to load the list panel with the names of the physical files in the selected library.
PNL002RG calls six of the user interface APIs to present the panel. Although only six are required for this application, many more are available. You can refer to the System Programmer's Interface Reference for more information on these and other user interface APIs.
The APIs used in this application and the order in which they are called are as follows:
1. Open Display Application
2. Put Dialog Variable
3. Add List Entry
4. Display Panel
5. Delete List
6. Close Application
The PNL002RG program begins by calling the Open Display Application (QUIOPNDA) API. This API opens a panel group and returns a "handle" to the application program. The handle is a unique eight-character value used to identify the active panel group. All of the other user interface APIs require you to pass this handle as an input parameter. Therefore, the Open Display Application API must be the first user interface API called by an application program.
Once PNL002RG opens the panel group, it calls the Put Dialog Variable (QUIPUTV) API. This API updates one or more screen variables by passing a value into the variable buffer of the record. In this case, the API passes the name of the selected library to the header record variable buffer so that the library name is displayed at the top of the screen.
The PNL002RG program then drops into the first of two loops. The outer loop processes the F5 key, which refreshes the screen. Refreshing the screen is one of the few tasks that UIM does not perform for you. If you want a refresh option in your application, you have to provide your own logic for it, as I have in this example.
The inner loop reads all records in the QADBXREF file that have a library name equal to the selected library. For each record with an attribute value of PF, the PNL002RG program calls the Add List Entry (QUIADDLE) API. This API adds a new entry to the list by passing a data structure into the variable buffer of the detail record. The data structure consists of subfields for
the option, the file name, and text values. This API performs a function similar to writing a record to a subfile. Although the mechanics to accomplish this are very different, the concept is the same.
Once the PNL002RG program has added all of the list entries, it calls the Display Panel (QUIDSPP) API. This API displays the panel and causes the program to wait while the user makes use of the various tasks the panel is designed to perform. Until the user presses F3, F5, or F12, the program simply waits while UIM does all the work.
When the user presses F3, F5, or F12, UIM returns control to the program. If the user presses the F5 (refresh) key, PNL002RG calls the Delete List (QUIDLTL) API. This API deletes the active list so that the program can rebuild it.
The last API that PNL002RG calls is the Close Application (QUICLOA) API. This API closes the panel group opened with the Open Display Application (QUIOPNDA) API. These two APIs must always be used in pairs. The application program will not automatically close the panel group for you when the program ends, as it would for a display file. If your program terminates without calling the Close Application API, your job retains a lock on the panel group. You can use the Reclaim Resource (RCLRSC) command to close the panel group and remove the lock, but the Close Application API is the preferred method.
If you're not familiar with UIM, coding list panels may seem somewhat intimidating. However, if you use the code provided in this article as a starting point and make minor modifications a little at a time, you can customize an application to suit your needs rather easily. Take the time to read about list panels and the user interface APIs in the manuals mentioned at the end of this article. It will be time well spent. Any effort you put into learning this technique will be rewarded many times over as a result of the productivity you'll gain by tapping into the power of UIM list panels.
Robin Klima is a freelance writer for Midrange Computing. He can be reached by email at klima@ pacbell.net.
Guide to Programming Application and Help Displays (SC41-0011, CD-ROM QBKA7902)
System Programmer's Interface Reference (SC41-8223, CD-ROM QBKA8402)
The User Interface Manager (UIM) is a function of OS/400 that provides a consistent user interface by providing a way to define display panels. (Print panels can also be defined, but display panels are more commonly used.) Panels are contained in an object of type (*PNLGRP). Many "Work with..." panels you encounter with OS/400 are UIM display panels. Just as display files require a processing program, panel groups require one. The RPG program (PNL002RG) in Figure 4 opens the panel group (PNL002PG) shown in Figure 5, displays it, accepts input from it, and closes it.
UIM-defined display panels force a consistent format and offer more built-in function than the more common method of using DDS display files. When it comes to list processing, a particular type of UIM panel-the list panel-is much less tedious to create than a DDS subfile.
With UIM list panels, most processing is handled by the operating system. For example, with a
list in which selection of more than one item is allowed, UIM automatically performs multiple selection processing and error handling. There's no need for your program to determine what items have been selected, perform the appropriate action for a selected item, or handle error processing (such as setting indicators to highlight items in error).
You create list panels with UIM source statements that you place in a source member (type PNLGRP). UIM source statements always begin with a label (tag) used to identify the purpose of the statement. This is why UIM source statements are often referred to as tag statements (or tags).
Figure A1 illustrates the required UIM statements and their sequence for creating list panels. The list panel source member in Figure 5 follows this same sequence. You can use other tag statements in list panels, but I'll only cover those that are required. At first glance, these statements may look like Greek, but you'll find that they are actually somewhat intuitive as I describe their basic purpose.
All UIM statements must begin in position one, except for continuation statements. It would be helpful if tag statements could be indented, since many of them are grouped as nested blocks (see Figure A1). Unfortunately, statement indention is not possible. However, you can use blank statements to visually separate statement groups. For comments, use the period-asterisk (.*) character sequence beginning in position 1 of the source statement. For example, the "Create panel." comment would look like this:
.* Create panel.
Many tag statements require a tag to mark the end of a statement group. For example, a :HELP statement requires an :EHELP statement, and a :KEYL statement requires an :EKEYL statement. All statements of this type in Figure A1 are indicated by a line connecting them.
I'll start at the beginning of the source member and describe the general purpose of each tag statement. This should give you the ability to interpret the UIM list panel source member found in Figure 5 and allow you to create a basic list panel source member of your own.
PNLGRP (Panel Group): The panel group tag identifies the source member as a panel group. Only one :PNLGRP tag is allowed, and a matching :EPNLGRP tag is required.
CLASS (Class Definition): The class tag is where you set up the attributes for a variable, such as data type (char, bin, packed, and so on), width, and case (upper, lower, or both). For example, in the UIM source code in Figure 5, the CLASS named txtcl (CLASS NAME=txtcls) is defined as a character variable with a length of 50 (BASETYPE="char 50"). Before you can define a variable, a class must exist that contains the attributes for the variable. A class can be used to define multiple variables. Each :CLASS tag requires a matching :ECLASS tag.
VAR (Variable Definition): The variable tag creates a variable. Panel group variables are often refered to as dialog variables, because they are used in the dialog the user performs with the panel. Dialog variables display values passed from a program much like a display file variable. The difference is that dialog variables are not automatically brought into the program through an external definition. You must define a program variable with the same attributes as the variable defined in your panel group. However, the name does not have to be the same.
VARRCD (Variable Record Definition): The variable record tag creates a buffer where all variables used by the calling program are passed. At the time a program interacts with a list panel, you pass the name of the variable record that you want to use as a buffer. For example, in the RPG program in Figure 4, when we add a list entry to the list panel with the call to QUIADDLE, we specify that record name DETAIL is to be used.
LISTDEF (List Definition): The list definition tag defines lists that contain the data for list areas presented on the display. Think of it as a record definition used by the UIM list panel. It must contain every variable that is to be displayed as a column of the list.
KEYL (Key List): The key list tag is used to begin a group of function key definitions. You must specify an end key list tag (:EKEYL) for each :KEYL tag. Since you may have more than one list panel defined in a panel group, you can have more than one key list.
KEYI (Key List Item): This tag is used to define a function key. You must define the key, its associated help module name, and the action to be taken when the key is pressed. For example, the Page Up key (pageup) defined in Figure 5 will display the help text in help module genhelp when the Help key is pressed and will scroll the list when the Page up key is pressed.
PANEL (Display Panel): The panel tag indicates that you are defining a panel group. You must specify a matching end panel (:EPANEL) for each :PANEL tag. The panel tag must follow the class, variable, variable record, list, and function key definitions.
LIST (List Area): The list tag identifies a panel as a list panel. The :LIST tag requires a matching :ELIST tag. Within the :LIST/:ELIST tags, you define the list. Lists are generally defined by columns. The following tags are required to define a list.
o LISTACT (List Action): The list action tag defines an operation that occurs when the user enters the option defined in the same statement. When the Enter or Prompt key is pressed, the action specified in this tag statement occurs. For example, with the first :LISTACT tag in Figure 5, the Display Physical File Member (DSPPFM) command executes when the user presses the Enter key. The same command executes when the prompt key (F4) is pressed, except that the command is prompted. This is because a question mark is used in front of the DSPPFM command (see the second :LISTACT tag in Figure 5).
o LISTCOL (List Column): The list column tag defines a column that belongs to a list view (list views are defined with the :LISTVIEW tag). It specifies the dialog variable, the column width, and the column heading.
o LISTVIEW (List View): The list view tag defines a view of the list area. The view specifies the variable names you want in the list and the order in which you want them displayed.
HELP (Help Module): The help tag creates a UIM help module. For simplicity, PNL002PG contains only one empty help module, which is referenced by every UIM tag statement that requires a help module. You can create additional help modules with meaningful help text for each column, each action, and each function key in your panel.
For more information on the tag statements contained in Figure A1, see the Guide to Programming Application and Help Displays.
- Richard Shaler
Figure 1: The Work with Physical Files (WRKPF) panel
 |
/*===============================================================*/
/* To compile: */
 /* */
 /* CRTCMD CMD(XXX/WRKPF) PGM(XXX/PNL002CL) + */
 /* SRCFILE(XXX/QCMDSRC) */
 /* */
 /*===============================================================*/
WRKPF: CMD PROMPT('Work with Physical Files')
PARM KWD(LIB) TYPE(*NAME) MIN(1) PROMPT('Library')
/*===============================================================*/
 /* To compile: */
 /* */
 /* CRTCLPGM PGM(XXX/PNL002CL) SRCFILE(XXX/QCLSRC) */
 /* */
 /*===============================================================*/
PGM PARM(&LIB)
Figure 3: CL program PNL002CL
DCL VAR(&LIB) TYPE(*CHAR) LEN(10)
 DCL VAR(&MSGID) TYPE(*CHAR) LEN(7)
 DCL VAR(&MSGDTA) TYPE(*CHAR) LEN(80)
/* Send all errors to error handling routine */
 MONMSG MSGID(CPF0000) EXEC(GOTO CMDLBL(ERROR))
/* Check to be sure library exists */
 CHKOBJ OBJ(&LIB) OBJTYPE(*LIB)
/* Call program to display physical files */
 CALL PGM(PNL002RG) PARM(&LIB)
/* Branch around error handling routine */
 GOTO CMDLBL(ENDPGM)
/* Error handling routine */
 ERROR:
RCVMSG MSGTYPE(*EXCP) MSGDTA(&MSGDTA) MSGID(&MSGID)
 SNDPGMMSG MSGID(&MSGID) MSGF(QCPFMSG) MSGDTA(&MSGDTA) +
MSGTYPE(*ESCAPE)
 ENDPGM:
 ENDPGM *===============================================================
* To compile:
 *
* CRTBNDRPG PGM(XXX/PNL002RG) SRCFILE(XXX/QRPGSRC) +
 * ALWNULL(*YES)
*
*===============================================================
FQADBXREF IF E K Disk *
D Pnlgrp S 20A INZ('PNL002PG *LIBL ')
 D Appscp S 9B 0
 D Extprm S 9B 0
 D Errcod S 9B 0
 DFkey S 9B0
 D Varlen S 9B 0
 DLib S 10A
 D Handle S 8A
 D Fulhlp S 1A
 D Rcdnam S 10A
 D Option S 4A
 D Lstnam S 10A
 D Lenhdl S 4A
 D Pnlnam S 10A
 D Redspo S 10A
 D Clsopt S 1A
 D Varbuf DS
 DOpt 1 2B0
 DFil 3 12
 D Txt 13 62
 *
C *Entry Plist
 C Parm Lib *
* Open the display application
 C Call 'QUIOPNDA'
 C Parm Handle
 C Parm Pnlgrp
 C Parm -1 Appscp
 C Parm Extprm
 C Parm 'N' Fulhlp
 C Parm 0 Errcod *
* Put the library name on the screen
 C Call 'QUIPUTV'
 C Parm Handle
 C Parm Lib
 C Parm 10 Varlen
 C Parm 'HEADER' Rcdnam
Figure 4: RPG program PNL002RG
C Parm 0 Errcod *
* Perform a loop for F5 (Refresh) key
 C Dou Fkey 5 *
* Position the file to the selected library
 C Lib Setll QDBXREF
 C Lib Reade QDBXREF 99
 C Eval Option = 'FRST'
*
* Add list entries for the selected library
 C Dow *In99 = *Off
 C If DBXATR = 'PF'
 C Eval Opt = 0
 C Eval Fil = DBXFIL
 C Eval Txt = DBXTXT *
C Call 'QUIADDLE'
 C Parm Handle
 C Parm Varbuf
 C Parm 62 Varlen
 C Parm 'DETAIL' Rcdnam
 C Parm 'DETLST' Lstnam
 C Parm Option
 C Parm Lenhdl
 C Parm 0 Errcod *
C Eval Option = 'NEXT'
 C Endif *
C Lib Reade QDBXREF 99
 C Enddo
 *
* Display the panel
 C Call 'QUIDSPP'
 C Parm Handle
 C Parm Fkey
 C Parm 'WRKPF' Pnlnam
 C Parm 'N' Redspo
 C Parm 0 Errcod *
* Delete the list if F5 pressed and list not empty
 C If Fkey=5andOption 'FRST'
 C Call 'QUIDLTL'
C Parm Handle
 C Parm 'DETLST' Lstnam
 C Parm 0 Errcod
 C Endif
 C Enddo *
* Close the application
 C Call 'QUICLOA'
 C Parm Handle
 C Parm 'M' Clsopt
 C Parm 0 Errcod *
C Move *On *InLR
 .*=====================================================================
.* To compile:
 .*
.* CRTPNLGRP PNLGRP(XXX/PNL002PG) SRCFILE(XXX/QPNLSRC)
 .*
.*=====================================================================
:PNLGRP.
 .*=====================================================================
.* Define clases
 .*=====================================================================
:CLASS NAME=optcls
BASETYPE=action.
 :ECLASS.
:CLASS NAME=objcls
Figure 5: Panel group PNL002PG
BASETYPE='OBJNAME 10'.
 :ECLASS.
:CLASS NAME=txtcls
BASETYPE='CHAR 50'.
 :ECLASS.
:CLASS NAME=prmcls
BASETYPE='CHAR 255'.
 :ECLASS.
 .*=====================================================================
.* Define variables
 .*=====================================================================
:VAR NAME=opt
CLASS=optcls.
:VAR NAME=fil
CLASS=objcls.
:VAR NAME=lib
CLASS=objcls.
:VAR NAME=txt
CLASS=txtcls.
:VAR NAME=prm
CLASS=prmcls.
 .*====================================================================
.* Define variable records and list definition
 .*====================================================================
:VARRCD NAME=header
VARS='lib'
 NOGET='lib'.
:VARRCD NAME=detail
VARS='opt fil txt'
 NOGET='fil txt'.
:LISTDEF NAME=detlst
VARS='opt fil txt'.
 .*=====================================================================
.* Define function keys
 .*=====================================================================
:KEYL NAME=fkeys.
:KEYI KEY=enter
HELP=genhlp
 ACTION=enter.
:KEYI KEY=f1
HELP=genhlp
 ACTION=help.
:KEYI KEY=f3
HELP=genhlp
 ACTION='EXIT SET'
 VARUPD=no.F3=Exit
:KEYI KEY=f4
HELP=genhlp
 ACTION=prompt.F4=Prompt
:KEYI KEY=f5
HELP=genhlp
 ACTION='RETURN 5'
 VARUPD=NO.F5=Refresh
:KEYI KEY=f9
HELP=genhlp
 ACTION=retrieve.F9=Retrieve
:KEYI KEY=f12
HELP=genhlp
 ACTION='CANCEL SET'
 VARUPD=no.F12=Cancel
:KEYI KEY=help
HELP=genhlp
 ACTION=help.
:KEYI KEY=pagedown
HELP=genhlp
 ACTION=pagedown.
:KEYI KEY=pageup
HELP=genhlp
 ACTION=pageup.
:KEYI KEY=print
HELP=genhlp
 ACTION=print.
:EKEYL.
 .*=====================================================================
.* Define the panel
 .*=====================================================================
:PANEL NAME=wrkpf
HELP=genhlp
 KEYL=fkeys
 TOPSEP=space.Work with Physical Files
:DATA DEPTH=2.
 :DATACOL WIDTH=16.
 :DATACOL WIDTH=10.
:DATAGRP GRPSEP=qindent
HELP=genhlp
 COMPACT.
:DATAI VAR=lib
USAGE=out.Library
:EDATAGRP.
 :EDATA.
 .*=====================================================================
.* Define the list
 .*=====================================================================
:LIST DEPTH=16
LISTDEF=detlst
 MAXHEAD=1
 ACTOR=uim
 PARMS=prm.
:TOPINST .Type options, press Enter.
:LISTACT ENTER='CMD DSPPFM FILE(&lib./&fil.) &prm.'
PROMPT='CMD ?DSPPFM FILE(&lib./&fil.) &prm.'
 HELP=genhlp
 OPTION=5.5=Display physical file member
:LISTACT ENTER='CMD DSPFD FILE(&lib./&fil.) &prm.'
PROMPT='CMD ?DSPFD FILE(&lib./&fil.) &prm.'
 HELP=genhlp
 OPTION=8.8=Display file description
:LISTACT ENTER='CMD DSPFFD FILE(&lib./&fil.) &prm.'
PROMPT='CMD ?DSPFFD FILE(&lib./&fil.) &prm.'
 HELP=genhlp
 OPTION=9.9=Display file field description
:LISTACT ENTER='CMD DSPDBR FILE(&lib./&fil.) &prm.'
PROMPT='CMD ?DSPDBR FILE(&lib./&fil.) &prm.'
 HELP=genhlp
 OPTION=10.10=Display data base relations
:LISTCOL VAR=opt
USAGE=inout
 MAXWIDTH=3
 HELP=genhlp.Opt
:LISTCOL VAR=fil
USAGE=out
MAXWIDTH=10
 HELP=genhlp.File
:LISTCOL VAR=txt
USAGE=out
 MAXWIDTH=50
 HELP=genhlp.Text
:LISTVIEW COLS='opt fil txt'.
 :ELIST.
 :CMDLINE SIZE=short.Parameters or command
 :EPANEL.
 .*=====================================================================
.* Define help
 .*=====================================================================
:HELP NAME=genhlp.
 :EHELP.
 :EPNLGRP.


 More than ever, there is a demand for IT to deliver innovation. Your IBM i has been an essential part of your business operations for years. However, your organization may struggle to maintain the current system and implement new projects. The thousands of customers we've worked with and surveyed state that expectations regarding the digital footprint and vision of the company are not aligned with the current IT environment.
 TRY the one package that solves all your document design and printing challenges on all your platforms. Produce bar code labels, electronic forms, ad hoc reports, and RFID tags – without programming! MarkMagic is the only document design and print solution that combines report writing, WYSIWYG label and forms design, and conditional printing in one integrated product. Make sure your data survives when catastrophe hits. Request your trial now! Request Now.
 Forms of ransomware has been around for over 30 years, and with more and more organizations suffering attacks each year, it continues to endure. What has made ransomware such a durable threat and what is the best way to combat it? In order to prevent ransomware, organizations must first understand how it works.
 Disaster protection is vital to every business. Yet, it often consists of patched together procedures that are prone to error. From automatic backups to data encryption to media management, Robot automates the routine (yet often complex) tasks of iSeries backup and recovery, saving you time and money and making the process safer and more reliable. Automate your backups with the Robot Backup and Recovery Solution. Key features include:
 Business users want new applications now. Market and regulatory pressures require faster application updates and delivery into production. Your IBM i developers may be approaching retirement, and you see no sure way to fill their positions with experienced developers. In addition, you may be caught between maintaining your existing applications and the uncertainty of moving to something new.
 IT managers hoping to find new IBM i talent are discovering that the pool of experienced RPG programmers and operators or administrators with intimate knowledge of the operating system and the applications that run on it is small. This begs the question: How will you manage the platform that supports such a big part of your business? This guide offers strategies and software suggestions to help you plan IT staffing and resources and smooth the transition after your AS/400 talent retires. Read on to learn:
LATEST COMMENTS
MC Press Online