


Getting Started
Let's make a couple of assumptions before we get started:
- You have an existing CVS project that you want to work with via Eclipse.
- You have started Eclipse in a fresh workspace.
Now that we've established common ground, you can load your CVS project into your Eclipse workspace by following these simple steps:
- Select File > New > Project.
- Expand the CVS tab, select Projects from CVS, and click Next.
- Fill out the CVS repository's information as shown below in Figure 1 and click Next. (Note that you may need to talk to your CVS administrator to appropriately fill out this form. The Host field specifies the TCP/IP host name of the system hosting the CVS server. The Repository path field specifies the full-qualified path to the CVS repository on the host system (e.g., on a Linux-based system, this might be something to the effect of /home/CVSRep). The Authentication options are of course the user name and password with which connections should be made to the host system. The Connection options instruct Eclipse as to how it should attempt to connect to the host system.)
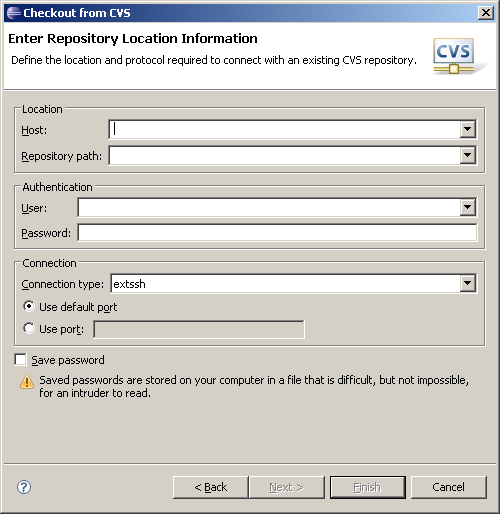
Figure 1: Fill out the CVS repository location information. (Click images to enlarge.)
- Specify the CVS module to import. You can either manually specify the module to check out or load the list of existing modules and then click Next, as shown below in Figure 2.
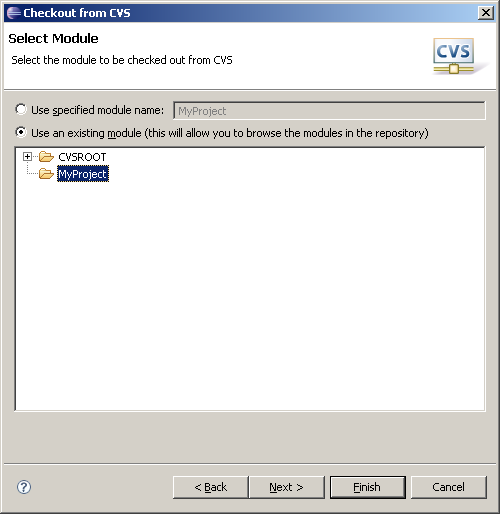
Figure 2: Specify which CVS module to check out.
- On the Check Out As screen, select the Check out as project in the workspace option, using the default project name (unless there's some reason you want to customize these options), and click Next.
- Click Next on the Check Out As screen.
- Select the CVS project branch to check out and click Finish; in most cases, you will want to check out the HEAD branch as this is where most new development occurs.
Congratulations! You have now created your first Eclipse project as it exists in your CVS module!
What Else Can I Do?
Now that you have checked out a CVS module into an Eclipse project, there's a new Team right-click option (Figure 3) available to you on any of your project components (e.g., the project itself, modules, files, etc.).
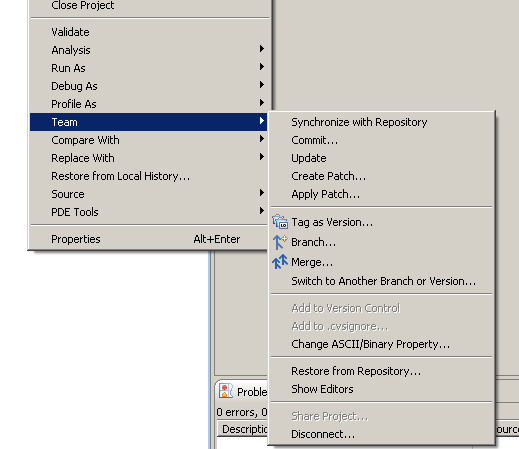
Figure 3: You've unlocked the Team menu.
You may now access any function CVS normally provides: add file(s) to version control, commit new changes, update per the latest version in the repository, create patches, etc. And as I mentioned earlier, not only can you perform these operations at the individual file level, but you can also do them at the directory level (e.g., you can recursively update or commit all children of a specific directory).
Another nice feature is that any file that has been changed since it was checked out will be marked with a greater-than symbol (>) before its name, making it intuitive that something's changed.
Another helpful feature Eclipse provides is the Synchronize with Repository function under the Team menu. This function provides the ability to view a listing of all files that you have changed or that have changed in the CVS repository. You are then given the opportunity to commit new changes, accept incoming changes, or if necessary, merge changes. This provides a simple mechanism to determine which new code you pull from the repository and which code you push to the repository that traditional CVS clients do not offer.
In a nutshell, these integration features allow you to conveniently bundle your versioning system and your development into a single environment (i.e., Eclipse) in an extremely user-friendly fashion. While there are several more features to explore, these steps should point you in the right direction. Until next time, happy coding!


 More than ever, there is a demand for IT to deliver innovation. Your IBM i has been an essential part of your business operations for years. However, your organization may struggle to maintain the current system and implement new projects. The thousands of customers we've worked with and surveyed state that expectations regarding the digital footprint and vision of the company are not aligned with the current IT environment.
 TRY the one package that solves all your document design and printing challenges on all your platforms. Produce bar code labels, electronic forms, ad hoc reports, and RFID tags – without programming! MarkMagic is the only document design and print solution that combines report writing, WYSIWYG label and forms design, and conditional printing in one integrated product. Make sure your data survives when catastrophe hits. Request your trial now! Request Now.
 Forms of ransomware has been around for over 30 years, and with more and more organizations suffering attacks each year, it continues to endure. What has made ransomware such a durable threat and what is the best way to combat it? In order to prevent ransomware, organizations must first understand how it works.
 Disaster protection is vital to every business. Yet, it often consists of patched together procedures that are prone to error. From automatic backups to data encryption to media management, Robot automates the routine (yet often complex) tasks of iSeries backup and recovery, saving you time and money and making the process safer and more reliable. Automate your backups with the Robot Backup and Recovery Solution. Key features include:
 Business users want new applications now. Market and regulatory pressures require faster application updates and delivery into production. Your IBM i developers may be approaching retirement, and you see no sure way to fill their positions with experienced developers. In addition, you may be caught between maintaining your existing applications and the uncertainty of moving to something new.
 IT managers hoping to find new IBM i talent are discovering that the pool of experienced RPG programmers and operators or administrators with intimate knowledge of the operating system and the applications that run on it is small. This begs the question: How will you manage the platform that supports such a big part of your business? This guide offers strategies and software suggestions to help you plan IT staffing and resources and smooth the transition after your AS/400 talent retires. Read on to learn:
LATEST COMMENTS
MC Press Online