


I was tickled pink the day I first ran CODE/400’s Live Parsing Extendable (LPEX) editor on my Windows PC and realized it’s programmable! It’s worlds apart from SEU. I learned SEU on a System/34 years ago and immediately suffered its inability to scroll backwards through a secondary browse/copy source member. (Does anyone else remember that?) SEU was supposed to bring me a great leap forward over punched tape and breakable cards; however, running SEU today seems like I’m watching 1960s black-and-white television with no remote control. I love remote controls. Joy filled me when my 1960s remoteless TV died, and an appliance store salesman subsequently showed me a new way to watch television with a modern remote control in hand: overlapping, multitasking, roving. More joy filled me when I threw orthodox SEU out my comfort nest and converted to the religion of CODE/400. Macros make the CODE/400 LPEX editor fun for a programmer. In this article, I’ll show you an easy way to begin writing LPEX editor macros.
Whether you are an SEU devotee or not, consider that once you start writing LPEX editor macros, you will never want to turn back. Macros open up a whole new world for you to enhance the editor to be anything you can think of. Running a macro in the LPEX editor is simple:
1. Press the Escape key.
2. A command line window pops up.
3. Type a macro name and optional parameters.
4. Press the Enter key.
5. The macro executes.
6. The command line window disappears.
Running a macro typically modifies something in your 0document. You can audition and discard all sorts of things in the command line window, from sensible and practical macro logic to crazy, corny, one-time-only macro logic. Want an RPG I-spec-to- O-spec converter? Write a macro. Want an alphabetical subroutine sorter? Write a macro. Want to convert CALLP to EVAL statements on alternate Tuesdays? Write a macro. If the macro isn’t just right, press Ctrl-Z to undo the changes. You can edit and reedit the macro
in a secondary editor session on the fly, save it, and immediately rerun the modified macro over your original document, without ever leaving the editor.
The Language of Choice
Object REXX is the language of editor macros. The object part of this language is optional, so if you know plain REXX, you can write editor macros. (Java can also create editor macros in the latest CODE/400 version, but that’s another story.) REXX is interpreted, not compiled, so you can develop and test macros fairly quickly. You get two online REXX manuals when you install CODE/400: Object REXX Programming Guide and Object REXX Programming Reference. You also get an online editor manual: LPEX Command Reference. Good luck finding them. I think IBM teases us with these manuals and hides them somewhere new inside each release of CODE/400. If you want to learn REXX in a hurry, I recommend you get the wonderful little book The REXX Language: A Practical Approach to Programming by Michael Cowlishaw.
A simple PC text file with an .LX extension contains a REXX editor macro. Over 100 ready-to-run REXX macros with .LX extensions come shipped in two CODE/400 subdirectories, ADTSWIN MACROS and ADTSWINEXTRAS. Reading through the
.LX files in these subdirectories is one way to learn tips and techniques for writing macros. Here are some examples of the ready-to-run macros:
• FIELDS.LX—The FIELDS.LX macro gets the AS/400 file name under the current cursor position on an RPG F-spec or a CL DCLF statement and inserts that file’s record and field names after the RPG F-spec or CL DCLF statement.
• RPGENT.LX—The RPGENT.LX macro, sometimes called “RPG Smart Enter,” creates a new line with a specification type in column 6 that is the same as the prior line. The cursor is placed where characters are most likely to be typed (for example, in the Factor One column on a C-spec).
• RPGINC.LX—The RPGINC.LX macro opens a new edit window containing the RPG source member named in the /COPY statement under the current cursor position.
• MATCH.LX—The MATCH.LX macro highlights all RPG lines between the cursor’s current position on an IFxx/CASxx/DOxx control statement, up to the matching END statement. An optional parameter (JUMP) moves the cursor between the IFxx/CASxx/DOxx control statement and the corresponding END statement.
• SIGNATUR.LX—The SIGNATUR.LX macro enables RPG signatures, which are unique five-character identifiers that some programmers like to write into the first five characters of each RPG line.
• ASCII.LX—The ASCII.LX macro queries the ASCII value of the character in the current cursor position. An optional parameter (ASSIST) pops up an ASCII value table; position the cursor on a character in this table and press the Enter key to insert the character into your original document.
Create Your Own PROFILE.LX Macro
Here’s a way to start writing your own custom macros. First of all, I recommend you create a new subdirectory to contain your custom macros. CODE/400 stores its own macros in the ADTSWINMACROS and ADTSWINEXTRAS subdirectories, which get overlaid during a CODE/400 upgrade. In this article, I’ll use C:MyMacros for a custom macro subdirectory name. If you want to use a different drive or subdirectory name on
your machine, then substitute your drive or subdirectory name anywhere this article uses C:MyMacros. The following DOS command will create the directory:
mkdir C:MyMacros
When CODE/400 starts, or when it loads a file into the editor, it searches for a macro named PROFILE.LX and runs it if found. The PROFILE.LX macro serves to initialize the editor with personal preference commands you specify. The first thing you’ll want to do is create a PROFILE.LX macro. From the Windows Run prompt, enter the following command to start the editor and create the PROFILE.LX macro:
codeedit C:MyMacrosProfile.LX
The file name must be PROFILE and the extension must be .LX. Case doesn’t matter. When the editor opens on a blank document, you need to tell the editor where it can find custom macros during future invocations of the editor. Press the Esc key to pop up the editor command line window. (The Escape key will move the cursor onto the command line footer, not the command line window, if you have previously checked Options/Controls/Command Line in the editor menu bar.) Type the following editor command and press the Enter key (again, case does not matter):
extras on C:MyMacros
It’s only necessary to do this once after you install CODE/400. You do not need to run the EXTRAS ON command every time you invoke the editor. The editor will save the path information you specify here (“C:MyMacros” in this case) in the Windows registry under the HKEY_LOCAL_MACHINESoftwareIBMEditorCODELPATH4 key. Once this is in place, the editor will search this path in addition to the ADTSWINMACROS and ADTSWINEXTRAS subdirectories to find macros.
After your macro path is set using the EXTRAS ON command, use the editor and type the following three lines of REXX source code into your PROFILE.LX, substituting your name in the third line.
/* PROFILE.LX */
‘set messages on’
‘msg Hello, Gene!’ /*substitute your name */
The first line is a standard REXX comment. Macros must begin with at least one comment. The remaining two lines are editor commands. Notice these commands are surrounded by quotes. REXX ordinarily passes a quoted command string out to an external command processor. On the AS/400, that external processor is typically CL, SQL, or CPIC. But in the LPEX editor on the PC, the external command processor is the processor for LPEX editor commands. The SET command on line two is an LPEX editor command that allows messages to be displayed at the bottom of the editor screen. The MSG editor command on line three displays Hello, [your name]! on the bottom of the editor screen.
Now, press the Function-3 key to save this PROFILE.LX macro and exit the editor. From the Windows Run prompt, type “codeedit,” and press Enter to invoke the editor again.
You should see Hello, [your name]! at the bottom of the editor. If it happens, congratulations, your macro worked! You can later remove the SET and MSG commands from PROFILE.LX if you find them annoying. If you don’t see Hello, [your name]!, then here are some troubleshooting tips. Try the following editor command from the editor command line or command window:
query lpath
This editor command will display the path names that the editor searches to find macros. If you don’t see C:MyMacros in the list, then execute the EXTRAS ON command again, exit the editor, and restart it. If no message line appears at all, select the Windows/Macro Log menu bar item to open a log file that contains messages sent from macros. The macro log opens in a separate editor ring, which is another instance of the editor. See if Hello, [your name]! appears in the macro log. Press the Alt-Ctrl-Right and Alt-Ctrl-Left keys to move between editor rings.
If you still don’t see Hello, [your name]!, then check for a preempting PROFILE.LX macro in the ADTSWINMACROS or ADTSWIN EXTRAS subdirectories. If it exists, rename the preempting PROFILE.LX file and try again.
Standard Comment Box
Some programmers like to start their source files with a standard comment box containing the name, language, compiler options, RPG indicator dictionary, etc. Figure 1 (page 83) shows a macro named BOXTOP.LX that inserts a CL-style comment box into the top of a document. You might use this as a template to develop your own comment box. Put this macro in your C:MyMacros directory. To call it, type the following macro name in the editor command line and press the Enter key:
boxtop
You do not have to type the .lx extension to run a macro. The BOXTOP.LX macro will insert a standard comment box at the top of your file. The file name will be inserted after the word “NAME”. The cursor will position to row 3, line 25 after the word “PURPOSE”. Notice that this macro contains two commands that modify the current line: CONTENT and INSERT. The current line is the line that contains the cursor when you call a macro. Some commands can change the current line. For example, the TOP command in Figure 1 changes the current line to the top line. For more information on all of the editor commands, see the LPEX Editor Command Reference.
Set Records to a Date
You know how the F13 key in SEU gives you a way to set the last-changed dates through every record? The LPEX editor gives you a way to display the last-changed dates using the View/Date Area menu bar item, but no way to set them all at once. Figure 2 shows a macro I wrote, FILLDATE.LX, that lets you set the last-changed date in every record. Put this macro in your C:MyMacros directory. To run it, load an AS/400 source member into the editor, press the Esc key, and type the following in the editor command line and press the Enter key:
filldate
The macro accepts an optional six-digit date parameter. If you don’t enter a date, the macro prompts you for it. Figure 3 is a snapshot of the prompt that Figure 2 creates. Notice the SET LINEREAD.TITLE command sets the window title, and the SET LINEREAD.PROMPT command sets an input prompt. The window displays when the LINEREAD 255 command is executed. Perhaps this example of on-the-fly prompting will get you ruminating over more prompts you can create for the editor.
Customize the Menu Bar
If you write many macros, it may become hard to remember all of their names. Sometimes you might prefer to click the mouse in a pull-down menu to select a macro, rather than type
it from memory in the editor command line. The LPEX editor helps you in this regard by letting you create dynamic menu bar items. In your PROFILE.LX macro, use the SET ACTIONBAR command to create items for the menu bar. The following example shows a way to create a menu bar item, “My Macros,” with two subitems, “Comment box” and “Set records to date.” Put these commands in your PROFILE.LX macro:
‘set actionbar.~My_Macros.~Comment_box macro boxtop’
‘set actionbar.~My_Macros.~Set_records_to_date macro filldate’
Figure 4 shows a snapshot of the editor menu bar that is created when these two SET ACTIONBAR commands exist in the PROFILE.LX macro. Perhaps this example of on-the-fly menu bar items will get you ruminating on ways to make more custom menu bars, too!
/******************************************************************************/
/* NAME - BOXTOP.LX */
/* PURPOSE - macro to insert standard comment box into top of file */
/* LANGUAGE - REXX */
/******************************************************************************/
‘Extract Name’ /* get current file name */
‘Top’ /* position to top line */
‘SplitJoin’ /* insert above top line */
‘Content /’ || Copies( ‘*’, 78 ) || ‘/’ /* draw line 1 */
‘Insert’ Overlay( ‘*/’, ‘/* NAME - ‘ || Name, 79 ) /* insert line 2 */
‘Insert’ Overlay( ‘*/’, ‘/* PURPOSE - ‘, 79 ) /* insert line 3 */
‘Insert’ Overlay( ‘*/’, ‘/* LANGUAGE - ‘, 79 ) /* insert line 4 */
‘Insert /’ || Copies( ‘*’, 78 ) || ‘/’ /* insert line 5 */
‘Top’
‘Set CursorRow 3’
‘Set CursorCol 15’
Figure 1: The BOXTOP.LX macro adds a standard comment box.
/******************************************************************************/
/* NAME - FILLDATE.LX */
/* PURPOSE - set all records to a date (like F13 in SEU) */
/* LANGUAGE - REXX */
/******************************************************************************/
Arg OurDate /**** get optional command line parameter ****/
OurDate = Strip( OurDate )
Do While Length( OurDate ) = 0 /**** if no command line parameter ****/
‘Set LineRead.Title Set Records To Date’
‘Set LineRead.Prompt Enter date YYMMDD:’
‘LineRead 255’ /**** prompt the user ****/
‘Extract LastKey’
If LastKey = ‘ESC’ Then Return
‘Extract LastLine’ /**** retrieve user input ****/
 OurDate = Strip( LastLine )
End
If Verify( OurDate, ‘0123456789’ ) > 0 | Length( OurDate ) <> 6 Then Do
‘Msg Date must be YYMMDD’
 Return
End
‘Extract AutoPrefix’ /**** save some current stuff ****/
‘Set AutoPrefix On’
‘Mark Set FillDateMark’
‘Set PrefixDefaultText’ OurDate /**** set our default date ****/
‘Top’
Do Until RC <> 0 /**** loop through every line ****/
‘Extract Content’
‘Set Content’ Content /**** rewrite line will update date ****/
 ‘Next’
End
‘Set AutoPrefix’ AutoPrefix /**** restore the current stuff ****/
‘Mark Find FillDateMark’
Figure 2: Set all records to a specific date with the FILLDATE.LX macro.
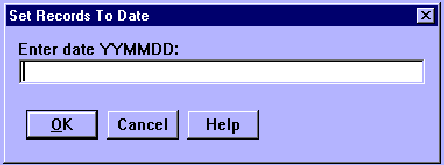
Figure 3: The LINEREAD 255 command displays this window.
Figure 4: Two SET ACTIONBAR commands in PROFILE.LX can extend the menu bar.


 More than ever, there is a demand for IT to deliver innovation. Your IBM i has been an essential part of your business operations for years. However, your organization may struggle to maintain the current system and implement new projects. The thousands of customers we've worked with and surveyed state that expectations regarding the digital footprint and vision of the company are not aligned with the current IT environment.
 TRY the one package that solves all your document design and printing challenges on all your platforms. Produce bar code labels, electronic forms, ad hoc reports, and RFID tags – without programming! MarkMagic is the only document design and print solution that combines report writing, WYSIWYG label and forms design, and conditional printing in one integrated product. Make sure your data survives when catastrophe hits. Request your trial now! Request Now.
 Forms of ransomware has been around for over 30 years, and with more and more organizations suffering attacks each year, it continues to endure. What has made ransomware such a durable threat and what is the best way to combat it? In order to prevent ransomware, organizations must first understand how it works.
 Disaster protection is vital to every business. Yet, it often consists of patched together procedures that are prone to error. From automatic backups to data encryption to media management, Robot automates the routine (yet often complex) tasks of iSeries backup and recovery, saving you time and money and making the process safer and more reliable. Automate your backups with the Robot Backup and Recovery Solution. Key features include:
 Business users want new applications now. Market and regulatory pressures require faster application updates and delivery into production. Your IBM i developers may be approaching retirement, and you see no sure way to fill their positions with experienced developers. In addition, you may be caught between maintaining your existing applications and the uncertainty of moving to something new.
 IT managers hoping to find new IBM i talent are discovering that the pool of experienced RPG programmers and operators or administrators with intimate knowledge of the operating system and the applications that run on it is small. This begs the question: How will you manage the platform that supports such a big part of your business? This guide offers strategies and software suggestions to help you plan IT staffing and resources and smooth the transition after your AS/400 talent retires. Read on to learn:
LATEST COMMENTS
MC Press Online