


As an example, I'll use the production of mailing labels from a customer master file. This seems to happen a lot where I work. We need labels for a catalog mailing, a flyer, or a given sales representative. Then comes the hard part: Using mail merge with an external data source is complicated enough that we wouldn't want to ask a user of average skills to try to do it. So we do it for them.
IT people like to provide a high level of customer service, but doing so often means we saddle ourselves with things that seem, well, inappropriate for us to be doing. We should be designing, configuring, and installing systems, not creating mailing labels.
Fortunately, it's easy enough in VBA to ask the user some questions, set a criteria, and execute a query.
I'll begin at the beginning. (I could begin from some other point, but that would be way too confusing). For this example, you have to access (or create) an ODBC data source, create a merge document, and insert VBA code.
Before Our Summer Break, We Covered...
To create an ODBC data source in the Windows environment, you must open the control panel (for 2000/XP it is necessary to open the Administrative Tools applet) and then open the ODBC data sources applet. When you open the ODBC data sources administrator, choose either the User DSN tab (to create a data source available only to the current user of the Windows machine) or the System DSN tab (to create a data source available to all users of the Windows machine). Click the Add button, choose the Client Access driver, and fill in the values as needed on the General and Server tabs.
For specific examples with illustrations, see last month's column. It is also possible to create the DSN in code, and I'll cover that in a later column.
With a DSN in place, you can create as many merge documents as you want to access the data it provides.
Starting Afresh: Setting Up a Document
In this example, you'll create a document to print mailing labels from the data source. As with last month, you'll start a new document and then use the Merge Wizard to help you set things up. So, start a new document and name it CustomerLabels.doc
Click on Tools and choose Mail Merge to start the Mail Merge Wizard. Note that this may vary depending on your version of Word. In 2002, you choose Letters/Mailings/Mail Merge from the tools menu. When the wizard comes up, click the Create button and choose Mailing Labels from the drop down list that the button presents. You will be prompted to either use the active document window or create a new main document. Choose the active document window.
Next, click the Get Data button and choose Create Data Source from the drop-down list. This brings up Word's Create Data Source dialog. In the bottom left corner is a button labeled MS Query. Click it. You'll use the MS Query tool (free with Office) to set up your document's data source.
When MS Query opens, it first asks you to choose a data source. This is where you pick the data source that you created earlier. Said data source points to a library on your iSeries, and that library contains the tables you want to use.
The next dialog is the Choose Columns dialog, which presents a list of tables. Each table can be expanded to show its fields. In this example, I've chosen the customer master table and picked the fields CNME, CAD1, CAD2, CAD3, CSTE, and CZIP, which you may have guessed contain the customer's name, address, city, state, and ZIP code. Please see Figure 1.
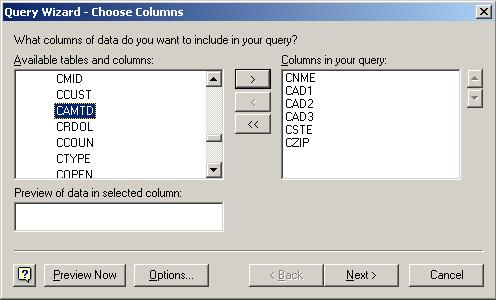
Figure 1: From this dialog, you choose columns for the merge.
Pressing Next takes you to the Filter Data dialog. Choose to include records whose ZIP code starts with 85253 (this way, you'll catch both the older 5-digit and newer ZIP+4 entries). Check Figure 2 for a look.
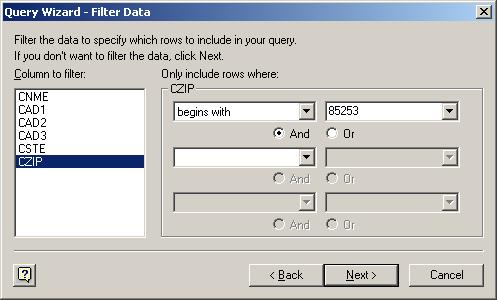
Figure 2: Here, you select records based on the ZIP code.
Having selected by ZIP code, you can also sort if you want. In Figure 3, I've chosen to sort by name. Sorting isn't necessary; you can include unsorted data or sort on multiple fields. In other words, make the data fit your need of the moment.
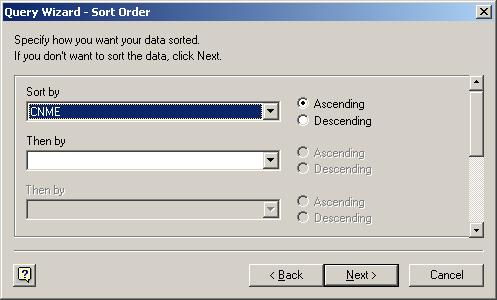
Figure 3: Sort it, don't sort it...whatevah!
When you press the Next button, you come to the Finish Dialog. In the upper right corner is a Save Query button. Push it and name the query MailingLabels, using the default extension of .dqy.
Then, click Finish to return your data to Microsoft Word. When you've done that, you'll be asked to "Finish setting up your document." This brings you to the Label Options dialog (Figure 4). Choose the label product and type, and click OK to go on to the Create Labels wizard (Figure 5).
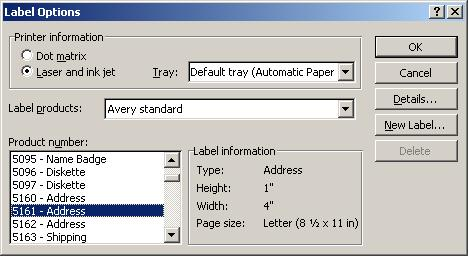
Figure 4: Choose a label type.
In the Create Labels wizard, use the drop-down list to insert your merge fields into the sample label shown. Note that you've put the name, address lines, city, state, and ZIP into your label. Pressing OK will then set up the main document for labels and return us to the Mail Merge wizard (Figure 6).

Figure 5: Place fields on the sample label.
You've now completed your main document (see Figure 6 for a look). Note some attributes as reported by the Mail Merge wizard: The document type, the data source, and the merge options are all properties that belong to objects you'll be working with. Using these objects in code, you can affect things like your data source and document options.
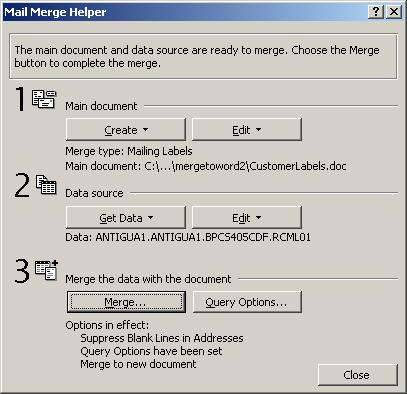
Figure 6: The Merge wizard reports the settings for your document.
What you've done is set up a document ready to be merged. In Figure 7, you'll see a part of the document with the merge fields as placed by the wizard.
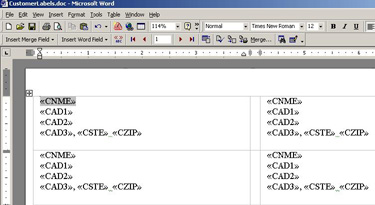
Figure 7: Here's the resulting mailing label document.
Now, you could just press Merge to New Document, get a new document with filled-out labels, and get on with your life.
But I won't let you.
The whole point is to start automating this process. Now that you've built the road, it's time for a car. Well, maybe a bicycle...
So start the Visual Basic Editor (press Alt+F11 or choose Visual Basic Editor from Tools/Merge) and add a module to your CustomerLabels project. By default, the module will be Module1, but rename it to AutoMerge.
In the AutoMerge module, create the following subroutine:
|
First, the variables: sZipCode is a string variable to contain the ZIP code you want to use for your query. Then, bZipError is a Boolean used to do some rudimentary error checking. If you read the code, you'll notice that the inputbox method gets a ZIP code from the user, and then there's some simple error checking to make sure the ZIP code is really a number.
Once you're satisfied that the value the user has given you is actually a ZIP code, you go on. First, you set yourself up to bail if an error occurs:
The errorMain label contains the following code:
MsgBox Err.Description & " Perhaps you entered an invalid zip code?", vbOKOnly
If an error occurs, you jump down here, display the description with the messagebox method, and add on the question "Perhaps you entered an invalid zip code?" In the code, you must include the space in front of the word "Perhaps" so that the resulting message looks properly formed. You can do this with confidence because you can be pretty sure that the only error you'll get is no records found.
Earlier, when you saved your query as MailingLabels.dqy, you associated it with your document. Now, all you do is change the SQL statement used by MailingLabels.dqy to return the value you want:
"SELECT RCML01.CNME, RCML01.CAD1, RCML01.CAD2, RCML01.CAD3, RCML01.CSTE, RCML01.CZIP " _
& "FROM ANTIGUA1.BPCS405CDF.RCML01 RCML01 " _
& "WHERE (RCML01.CZIP LIKE '" & sZipCode & "%') "
Note that the field selection doesn't change; you just adjust the WHERE clause of the SQL statement, building it from the SELECT and FROM clauses and appending your ZIP code value. Note that you use LIKE and the % operator to indicate that you are looking for fields that start with the value in sZipCode. If you refer back to Figure 2, you'll see how you did this in the query wizard.
This, by the way, is the statement that will result in an error if the ZIP code provided doesn't return a recordset. That's why you establish your error handling right ahead of this statement.
With the query set up, you can execute the merge:
.Destination = wdSendToNewDocument
.Execute
End With
This is where you control many attributes of the mail merge. For example, you could set the destination attribute to one of the following, with obvious results:
.Destination = wdSendToPrinter
.Destination = wdSendToFax
So, you could fax it, email it, print it, right out of your macro. Kinda lights up the old idea bulb, doesn't it?
Next Steps
So you've successfully built a merge document and, to some degree, automated it. In my next column, I'll show you how to enhance your level of automation with a user form, giving you the opportunity to create a more complicated WHERE clause and a more independent application.
Chris Devous is the Director of IT Systems Development at The Antigua Group, Inc., a Peoria, Arizona, garment manufacturer. Chris has been in IT since '82 and lives Arizona with his wife, three children, a bird, two dogs, a cat, and various marine life forms. He can be reached by email at


 More than ever, there is a demand for IT to deliver innovation. Your IBM i has been an essential part of your business operations for years. However, your organization may struggle to maintain the current system and implement new projects. The thousands of customers we've worked with and surveyed state that expectations regarding the digital footprint and vision of the company are not aligned with the current IT environment.
 TRY the one package that solves all your document design and printing challenges on all your platforms. Produce bar code labels, electronic forms, ad hoc reports, and RFID tags – without programming! MarkMagic is the only document design and print solution that combines report writing, WYSIWYG label and forms design, and conditional printing in one integrated product. Make sure your data survives when catastrophe hits. Request your trial now! Request Now.
 Forms of ransomware has been around for over 30 years, and with more and more organizations suffering attacks each year, it continues to endure. What has made ransomware such a durable threat and what is the best way to combat it? In order to prevent ransomware, organizations must first understand how it works.
 Disaster protection is vital to every business. Yet, it often consists of patched together procedures that are prone to error. From automatic backups to data encryption to media management, Robot automates the routine (yet often complex) tasks of iSeries backup and recovery, saving you time and money and making the process safer and more reliable. Automate your backups with the Robot Backup and Recovery Solution. Key features include:
 Business users want new applications now. Market and regulatory pressures require faster application updates and delivery into production. Your IBM i developers may be approaching retirement, and you see no sure way to fill their positions with experienced developers. In addition, you may be caught between maintaining your existing applications and the uncertainty of moving to something new.
 IT managers hoping to find new IBM i talent are discovering that the pool of experienced RPG programmers and operators or administrators with intimate knowledge of the operating system and the applications that run on it is small. This begs the question: How will you manage the platform that supports such a big part of your business? This guide offers strategies and software suggestions to help you plan IT staffing and resources and smooth the transition after your AS/400 talent retires. Read on to learn:
LATEST COMMENTS
MC Press Online