


This article will teach you how to authenticate with IBM i credentials in a Node.js application using the Hapi framework.
In the words of Oliver Hardy, "Here's another nice mess you've gotten me into." That's what I was saying to myself as the enormity of the code base of this article continued to grow. BTW, if you haven't checked out the "Laurel and Hardy" comedy acts, let's just say you've been missing out. They’re timeless. I grew up watching them with my dad, and my kids can't get enough of them. Hilarious. But I digress.
One of the common questions I've gotten this past year is how to authenticate your IBM i profile and password in a Node.js app and have it retain a session across many pages. That's the primary premise of this article. Of course, if we're going to require authentication, then we need the authentication to be protecting a page with sensitive information. Figure 1 shows a Customer Search page that has balance due information; we definitely should protect that with a login form so no one knows about the sheer amount of sugar-free gummi bear purchases. Suffice to say, Johnson needs treatment.
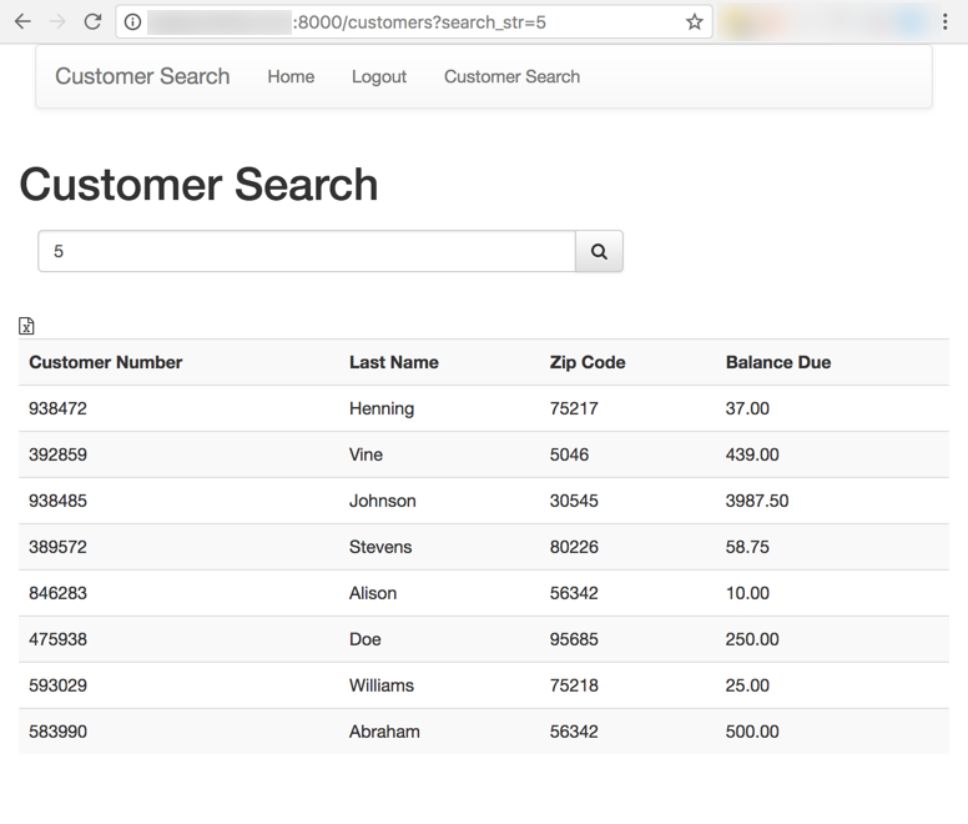
Figure 1: Customer Search page
The login page will look like Figure 2. If a user tries to go to the Customer Search URL (i.e., /customers) while they are not logged in, they will be redirected to the login form.

Figure 2: Login form
I've made the implementation of this article simple by putting it all in the Node.js IBM i Collaboration Git repository. You can install it by running the following commands. If you don't have Git installed, you can manually download a zip file of the repo and unzip it into your /home folder on the IFS.
$ cd ~
$ git clone ssh://git@bitbucket.org/litmis/nodejs.git nodejs_collab
$ cd nodejs_collab/examples/hapi_ibmi_auth
$ . env.sh
$ npm install
$ npm start
Let's briefly talk about the install. First, we change into your home directory with cd ~. Next, we clone the Git repo and put it into a directory that is slightly more descriptive, namely nodejs_collab, and cd into the hapi_ibmi_auth directory where the application is located. Then we run the env.sh shell script to set the Node.js version, v6.9.1 as of this writing. The period is necessary so the commands inside the shell script affect this IBM i job instead of spawning another job. The npm install will look at the package.json file and install all of the dependencies. And finally, npm start will start your app by looking, by default, for a file named server.js and attempt to invoke it.
Now you can open your browser and see the application at http://your_ibmi_ip:8000. Use a valid IBM i profile and password to log into the application. Note the application doesn't implement TLS (formerly known as SSL), so your profile and password are being passed in cleartext over your local network. It’s best to create a temporary, and powerless, profile to run this sample application. You've been warned. If you run into issues getting the application started, you can ask questions in the repo's Issues section.
Ok, now that you've seen the application in action, it's time to dive into the code and start explaining how it works. When I first start looking into a Node.js application I am unfamiliar with, I usually look at either the package.json file or the primary .js file, and the latter is usually the only .js file in the root of the directory. In this case, let's review the server.js file by first looking at the external Node.js modules being required at the top of the program, as shown below.
const Hapi = require('hapi');
const Path = require('path');
const Hoek = require('hoek');
const ibmi = require('./lib/ibmi');
const db = require('./models/db2ipool')
const pool = new db.Pool();
We'll be using the Hapi Node.js web framework instead of Express in this article. Either web framework can be used to accomplish business goals, and neither is a wrong decision to pursue, but I am finding Hapi has approaches that I prefer over Express, some of which we'll see in this article. The Hoek module has general-purpose Hapi utilities that we'll see later in the code. The ./lib/ibmi module is one I developed that contains a function named QSYSGETPH, which is an IBM i API that can be used to validate a user and password combination. The ./models/db2ipool module goes back to my previous article where I introduced a Node.js connection pool code base.
First let's look at the ./lib/ibmi module, shown below.
function QSYSGETPH(user, pw, cb){
var xt = require('/QOpenSys/QIBM/ProdData/OPS/Node6/os400/xstoolkit/lib/itoolkit')
var conn = new xt.iConn("*LOCAL");
var pgm = new xt.iPgm("QSYGETPH",{"lib":"QSYS","error":"off"})
pgm.addParam(user.toUpperCase(), "10A")
pgm.addParam(pw.toUpperCase(), "10A")
pgm.addParam("", "12A", {"io":"out", "hex":"on"})
var errno = [
[0, "10i0"],
[0, "10i0", {"setlen":"rec2"}],
["", "7A"],
["", "1A"]
];
pgm.addParam(errno, {"io":"both", "len" : "rec2"});
pgm.addParam(10, "10i0")
pgm.addParam(0, "10i0")
conn.add(pgm.toXML())
conn.run(function(str) {
var results = xt.xmlToJson(str)
cb(null, results[0].success)
}, true) // <---- set to sync for now because bug in iToolkit. Hapijs hangs if this isn't done.
}
exports.QSYSGETPH = QSYSGETPH
Here we see the Node.js iToolkit being used to call a *PGM object, namely QSYSGETPH. A special thanks to Brian Garland for putting together a foundation that wraps this API. One thing I wanted to point out is that this code needs to be run synchronously when used in conjunction with Hapi, as is noted by the comment in the code. I have not yet found out why this is the case. If you find the issue, please write it out on the back of a $100 bill and mail it to me.
Next, look to line 28 of server.js, which is the first line shown below.
server.register(
[require('vision'), require('hapi-auth-cookie'), require('inert')],
function(err){
Hoek.assert(!err, err);
server.views({
engines: { pug: require('pug') },
path: __dirname + '/views',
compileOptions: {
pretty: true
}
});
There are several things here worth noting. First, we see an array of require(...) statements. These are the Hapi-aware modules we want to register for subsequent use in our app. I say "Hapi-aware" because these modules were written for Hapi. The thing that's very significant, which will sink in further in the next code block, is that all subsequent Hapi configuration code needs to be contained within the callback of the server.register(...) function call. The reason for this is that Hapi configuration APIs were previously synchronous but have now been made to be asynchronous, which inherently means we need to place code in the callback to make it wait to execute until the previous function has completed.
The server.views code section is configuring this application to use the Pug Template Engine (formerly known as Jade), as noted on the engines property. The path property declares the .pug files will be stored in directory /views. The compileOption of pretty has been added to make the HTML delivered to the browser easier to read.
Next, we have the authorization configuration code starting at line 41, as shown below. Again, this code is in the server.register(...) callback function to make sure it runs after the hapi-auth-cookie module registration occurs. There are a lot of settings in this chunk of code, and we'll be discussing only those most relevant to this article. First, it's important to note that Hapi is expecting you to have authorization be part of your application, so they've documented how that fits into the big picture with tutorials and the API reference. This is one of the reason's I prefer Hapi over Express; it just feels a little more complete. That makes sense, given Express has a goal of being a minimalist web framework.
const cache = server.cache({ segment: 'sessions', expiresIn: 3 * 24 * 60 * 60 * 1000 });
server.app.cache = cache;
server.auth.strategy('session', 'cookie', true, {
password: 'password-should-be-32-charactersss-or-maybe-alot-more',
cookie: 'hapi_ibmi_auth',
redirectTo: '/login',
redirectOnTry: false,
isSecure: false,
validateFunc: function (request, session, callback) {
cache.get(session.sid, (err, cached) => {
if (err)
return callback(err, false);
if (!cached)
return callback(null, false);
request.isLoggedIn = true;
return callback(null, true, cached.account);
});
}
});
In the above code, it's also important to point out the relationship between the redirectTo and validateFunc settings. The latter is the function that will be invoked when any request is made, and then the server's cache will be checked to see if a session for this user has been created. If one doesn't exist, then it will return false and redirect to the URL specified on the redirectTo setting.
Next, the routes are configured starting on line 61 in server.js, as shown below. I've omitted sections of code that aren't related to logging in and out.
server.route([
. . .
{ method: 'GET',
path:'/login',
config: {
auth: { mode: 'try' },
plugins: {
'hapi-auth-cookie': { redirectTo: false }
},
handler: function (request, reply) {
return reply.view('login', {
loggedIn: request.auth.isAuthenticated,
messages: 'To login please specify your profile and password.'
});
}
}
},
{
method: 'POST',
path:'/login',
config: { auth: false },
handler: function (request, reply) {
let profile = request.payload.profile
let password = request.payload.password
ibmi.QSYSGETPH(profile, password, function(err, result){
if(result==true){
const sid = String(++uuid);
var account = {profile: profile, password: password};
request.server.app.cache.set(sid, { account: account }, 0, (err) => {
if (err)
return reply(err);
request.cookieAuth.set({ sid: sid });
return reply('Please wait while we log you in').redirect('customers');
});
} else {
reply.view('login', {
loggedIn: request.auth.isAuthenticated,
profile: profile,
messages: 'Login failed. Please try again.'
});
}
})
}
},
{
method: 'GET',
path: '/logout',
config: {
handler: function (request, reply) {
request.cookieAuth.clear();
return reply.redirect('/');
}
}
}
. . .
]);
The first route is for method: 'GET' and path: '/login', which is used to obtain the login form and display it to the user. Normally, you'd have the handler: function next, but in this case we have it inside a config: section so we can enlist some hapi-cookie-auth module config options—namely auth: and plugins:. The goal of those two settings is to declare that, if the user isn't authenticated, it shouldn't attempt to redirect because we are on the authentication page. Inside the handler: function, we see the Pug template engine in action with the call to reply.view(...). The core concept here is we declare the view we want to render, login, and provide name-value pairs of the data we want to pass to the view—namely, loggedIn and messages. The Hapi web framework will look in the /views directory for a file named login.pug, based on how we configured it earlier.
Below is the content of login.pug.
extends layout
block content
.container
.wrapper
form.simple-form(method='post', action='/login')
h2.form-signin-heading Please login
label
| Profile:
input.form-control(type='text', required='', name='profile', value=profile)
br
label
| Password:
input.form-control(type='password', required='', name='password')
button.btn.btn-lg.btn-primary(type='submit') Login
if messages
.alert.alert-info(role='alert')
p=messages
What we see in login.pug is the Pug syntax, a short-form way to write HTML and JavaScript. Over the years, I've learned to appreciate these types of template engines because they clean up your code a lot, which makes it easier to maintain. HTML examples on the web aren't often in Pug syntax, so I also make use of tools like html2jade.org to convert from HTML to Pug syntax. It's important to know that you don't have to convert all of your files to Pug syntax. For example, public/js/main.js is plain and raw JavaScript. I only convert HTML and JavaScript to Pug syntax for files ending in .pug, or more specifically, for situations in which I am dynamically rendering the view by calling on the view from the controller, like we did with the reply.view(...) call mentioned earlier.
Doing an in-depth review of Pug is beyond the scope of this article, though I will mention a few things. The opening and closing of tags (aka scope of HTML tags and JavaScript) is based on indentation. I use two spaces of indentation as my standard, though you can use however many you want as long as it is uniform throughout a single document. The other interesting thing is I can have JavaScript inline with my Pug syntax. We see this on the last line with p=messages, where the messages variable supplied by the controller is being placed in an HTML <p> tag.
Time to go back to the Hapi routes and look at the one with method: 'POST' and path: '/login', copied again below for simplicity of referencing.
{
method: 'POST',
path:'/login',
config: { auth: false },
handler: function (request, reply) {
let profile = request.payload.profile
let password = request.payload.password
ibmi.QSYSGETPH(profile, password, function(err, result){
if(result==true){
const sid = String(++uuid);
var account = {profile: profile, password: password};
request.server.app.cache.set(sid, { account: account }, 0, (err) => {
if (err)
return reply(err);
request.cookieAuth.set({ sid: sid });
return reply('Please wait while we log you in').redirect('customers');
});
} else {
reply.view('login', {
loggedIn: request.auth.isAuthenticated,
profile: profile,
messages: 'Login failed. Please try again.'
});
}
})
}
},
In the above code, we can see the config setting set to auth: false, which is effectively telling hapi-auth-cookie to not attempt authenticating this web request. It makes sense that we're not authenticating this route because this is processing the login HTML form we previously discussed. You'll notice the handler function isn't inside the config setting. I do not know why it’s like this; it’s how I found it in the documentation. I am conveying this to you so you know it's OK to not have an in-depth understanding of every single feature; and sometimes it's "good enough" when it works as you need.
Within the handler function, we first obtain the profile and password variables from the HTTP form submission and assign them to same-named local variables. I didn't need to do this, but I wanted to make subsequent code less verbose.
The next line is where we make the call into the ibmi.QSYSGETPH(...) module and function, and pass the previously obtained profile and password variables. This is checking to see if the IBM i profile exists and whether it is the correct password. If the user exists and the password is correct, then the callback result variable will contain true. If there is a match, then a server cache will be set for this user’s session, a cookie will be set, and the user will be redirected to the customers URL. If there isn't a match, then the login page will be redisplayed with a message detailing the failure. It's worth noting that you can disable your IBM i profile by triggering enough invalid sign-in attempts.
The final authentication route to discuss is the logout, which I've pasted again below for ease of reference.
{
method: 'GET',
path: '/logout',
config: {
handler: function (request, reply) {
request.cookieAuth.clear();
return reply.redirect('/');
}
}
},
The above code is very simple. When a user clicks the logout link, we simply want to clear the cookie and redirect to the home page.
The only route we haven't talked about is the one that relates to doing the actual searching for customers, which I've pasted again below for ease of reference.
{
method: 'GET',
path:'/customers',
handler: function (request, reply) {
if(request.query.search_str==undefined){
return reply.view('customers',{
customers:[],
loggedIn: request.auth.isAuthenticated,
});
}
var search_str = request.query.search_str.toUpperCase();
var sql =
`select * from QIWS.QCUSTCDT \
WHERE (UPPER(CUSNUM) LIKE '%${search_str}%' or \
UPPER(LSTNAM) LIKE '%${search_str}%' or \
CAST(ZIPCOD AS VARCHAR(5)) LIKE '%${search_str}%') \
LIMIT 20`;
pool.easy(sql, function(result) {
reply.view('customers', {
loggedIn: request.auth.isAuthenticated,
search_str: search_str,
customers: result,
messages: ''
});
})
}
}
I've cheated a little on this one because I have both the conveyance of the page and the processing of the page in the same route and handler. Specifically, the first six lines of the handler function could have been put in a separate route. If the code had been more complex, I would have separated them out.
The content of this code doesn't need too much explaining because we've covered most of the concepts, though I will comment on each piece for the sake of repetition learning. First, we obtain the search_str variable from the query string and store the uppercase version by invoking toUpperCase(). The goal of this search is to be "Google-like," meaning we will search many columns for the same value without the user having to occupy specific UI fields. That's why we needed to uppercase the search_str and also why the WHERE clause uses the UPPER(...) function for the LIKE comparison. If you aren't familiar with the backticks, then you should check out the newish JavaScript template literals, an easy way to do string interpolation.
Once the SQL has been composed, we can send it to DB2 for processing via a call to pool.easy(...). The database connection pool capabilities were introduced in a previous article, and this is a tangible example implementation of how to make use of them. When the database transaction is complete, we then call reply.view(...) with the search results, which will iterate through the result variable in the customers Pug view to display the list to the user. At this point, the user can peruse the customer list or type in new search criteria.
The final feature I want to convey to you is how the currently displayed data can be exported to a CSV file, which is easily importable into Excel. This feature is available through a small Excel icon located immediately above the customer listing, which you can see in the screenshots at the beginning of this article. The implementation of this feature is in file public/main.js, which is shown, in part, below.
$( "#csv_export" ).click(function() {
var csvContent = "data:text/csv;charset=utf-8,";
var json = JSON.parse($('#csv_export_data').html());
csvContent += json.map(function(d){
return JSON.stringify(d);
})
.join('\n')
.replace(/(^\{)|(\}$)/mg, '');
window.open( encodeURI(csvContent) );
});
The above code listens for a click on the Excel icon. When it is clicked, the code will obtain a JSON object from a page id named csv_export_data. If you go back to the views/customers file, you'll find the result variable is used to convey an HTML listing for visual purposes and also to be held in JSON form should the user desire to export the data. I could have used JavaScript to iterate over the existing HTML table and saved duplicate data from being sent from the server, but simplicity of code won out.
Once the JSON is obtained, it is converted into CSV format and the window.open(...) API is invoked to simulate a file download so the file is saved to the user’s local computer.
That concludes this article. I hope this has equipped you to authenticate using IBM i credentials and also helped you see how Hapi and Pug work in Node.js. As always, if you have any questions or comments, then please comment below or email me at


 More than ever, there is a demand for IT to deliver innovation. Your IBM i has been an essential part of your business operations for years. However, your organization may struggle to maintain the current system and implement new projects. The thousands of customers we've worked with and surveyed state that expectations regarding the digital footprint and vision of the company are not aligned with the current IT environment.
 TRY the one package that solves all your document design and printing challenges on all your platforms. Produce bar code labels, electronic forms, ad hoc reports, and RFID tags – without programming! MarkMagic is the only document design and print solution that combines report writing, WYSIWYG label and forms design, and conditional printing in one integrated product. Make sure your data survives when catastrophe hits. Request your trial now! Request Now.
 Forms of ransomware has been around for over 30 years, and with more and more organizations suffering attacks each year, it continues to endure. What has made ransomware such a durable threat and what is the best way to combat it? In order to prevent ransomware, organizations must first understand how it works.
 Disaster protection is vital to every business. Yet, it often consists of patched together procedures that are prone to error. From automatic backups to data encryption to media management, Robot automates the routine (yet often complex) tasks of iSeries backup and recovery, saving you time and money and making the process safer and more reliable. Automate your backups with the Robot Backup and Recovery Solution. Key features include:
 Business users want new applications now. Market and regulatory pressures require faster application updates and delivery into production. Your IBM i developers may be approaching retirement, and you see no sure way to fill their positions with experienced developers. In addition, you may be caught between maintaining your existing applications and the uncertainty of moving to something new.
 IT managers hoping to find new IBM i talent are discovering that the pool of experienced RPG programmers and operators or administrators with intimate knowledge of the operating system and the applications that run on it is small. This begs the question: How will you manage the platform that supports such a big part of your business? This guide offers strategies and software suggestions to help you plan IT staffing and resources and smooth the transition after your AS/400 talent retires. Read on to learn:
LATEST COMMENTS
MC Press Online