


Use callbacks to create an "online" monitoring tool.
Well, it's been a while since I started this jQuery fundamentals series, but I hope you haven't forgotten about it. If you have, please read up (parts I, II, and III) because this time, I'll put a lot of functionality into the script. This tip contains all the elements of a "real" web application, so it's important that you know your way around.
You'll see XML, RPG, PHP, and of course a lot of jQuery in action. Although it can seem a bit overwhelming, I tried to create an application that you can run by installing it locally on your PC and then changing just a few things. Then you can drill into the details step by step and study the various functions.
A few conditions must be in place to run this: you must be able to run a CGI program on your System i, and you must be able to run PHP scripts either locally or on a server.
What Does It Do?
The application simulates a situation in which you want to monitor some users to see how their online state is. You do that by firing an AJAX request either by pressing a button or by putting the application in the auto update mode, where it will check every five seconds.
You can choose whether you want to check a System i (IBM i) or check locally. In either case, the input to the application is XML, so from an application point of view, it doesn't matter where the data comes from.
Depending on the status of the user, you'll be able simulate sending him/her a message.
Along the way, various messages will be shown to let you know what happens.
Getting an Overview
I can't cover every detail in this TechTip, but I'll discuss the parts I find the most interesting.
Let me start by giving you an overview of the application.
First of all, it looks like the figure below:
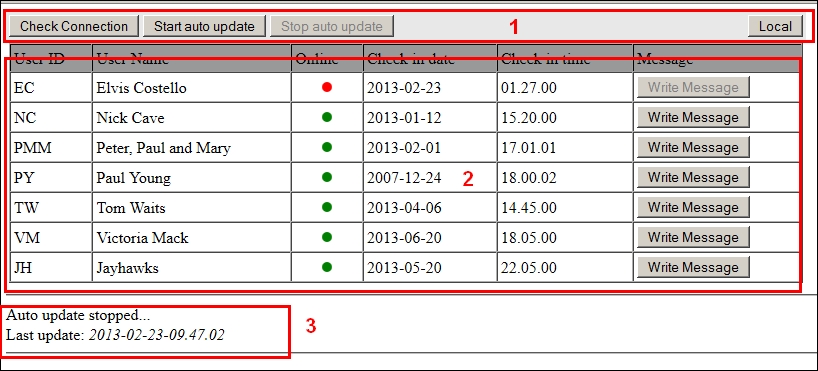
Figure 1: The app looks like this.
1) This is the button area. Here, you can control how the data is displayed and where it is fetched from. This is done by pressing the Local/Remove button. You can also control how data is fetched by pressing the various connection buttons.
2) This is the data area. It shows the data retrieved from the data source. In this case, it's from either local XML or a System i file.
3) This is the message area. It displays the various messages generated by the application while it's running.
Please Serve My Code, Sir
When you look into the code of the conncetion.php script, you'll see very little HTML but a lot of JavaScript/jQuery functions. This is to me is how modern web applications should be: most of the content will be generated on the fly by requesting data from some server.
If we start by looking at a subset of the getStatus function and look at the AJAX call, we'll see that a PHP script called proxy-connection.php is always used. The proxy-connection.php script is where the fun starts. The script takes one parameter called "servermode," and this is what controls where the data comes from. In this case, the parameter can contain either the value "Server" or "Local," depending on where the data will be received.
// Get server mode
parms = 'servermode=' + $('#modebutton').val();
$.ajax({
type: "GET",
url: 'proxy-connection.php',
data: parms,
dataType: 'xml',
cache: false,
success: function( dataStream ) {
$(dataStream).find('data').each(function(){
current_timestamp = $(this).find('update').attr('timestamp');
});
$('#lastupdate').html('Last update: <i>' + current_timestamp + '</i>');
// Parse XML
$(dataStream).find('userdata').each(function(){
if ( firstTime == false ) {
$("#data").html( '<tr bgcolor="#999999"><td>' + 'User ID' + '</td><td>' + 'User Name' + '</td><td>' + 'Online' + '</td><td>' + 'Check in date' + '</td><td>' + 'Check in time' + '</td><td>' + 'Message' + '</td></tr>');
firstTime = true;
}
var user = $(this).find('user').text();
var name = $(this).find('name').text();
var activ = $(this).find('activ').text();
var cdate = $(this).find('cdate').text();
var ctime = $(this).find('ctime').text();
if ( activ == 'Y' ) {
var onlineStatus = '<div title="activ=' + activ + '" class="statusClassOnline roundCorners"> </div>'
var sendMsgButton = '<button onclick="ShowMessage()">Write Message</button>';
} else {
var onlineStatus = '<div title="activ=' + activ + '" class="statusClassOffline roundCorners"> </div>'
var sendMsgButton = '<button class="setDisabled">Write Message</button>';
}
// Write out the data returned
$("#data").last().append( '<tr><td>' + user + '</td><td>' + name + '</td><td align="center">' + onlineStatus + '</td><td>' + cdate + '</td><td>' + ctime + '</td><td>' + sendMsgButton + '</td></tr>');
});
},
error:function (xhr, ajaxOptions, thrownError){
// Error handling goes here...
},
complete:function (){
if ( mode == '1' ) {
fadeValue = 1.0 // If auto do not fade
} else {
fadeValue = 0.4
}
// When ajax call done - fade send messages buttons for users that are offline and when
// fading is done - use callback function to disable the buttons
$('.setDisabled').fadeTo('slow', fadeValue, function() {
$( ".setDisabled" ).attr("disabled", true);
});
// If manual fetch show message
if ( mode == '0' ) {
$("#message").html('Data fetched...');
}
}
});
Figure 2: This is the AJAX call in the getStatus function.
Then, depending on the success of the call, the XML data shown in Figure 3 will be returned in the dataStream object and parsed using the .each()/.find() functions.
<?xml version="1.0" encoding="utf-8"?>
<data>
<update timestamp="2013-02-23-09.47.02"></update>
<userdata><user>EC</user><name>Elvis Costello</name><activ>N</activ><cdate>2013-02-23</cdate><ctime>01.27.00</ctime></userdata>
<userdata><user>NC</user><name>Nick Cave</name><activ>Y</activ><cdate>2013-01-12</cdate><ctime>15.20.00</ctime></userdata>
<userdata><user>PMM</user><name>Peter, Paul and Mary</name><activ>Y</activ><cdate>2013-02-01</cdate><ctime>17.01.01</ctime></userdata>
<userdata><user>PY</user><name>Paul Young</name><activ>Y</activ><cdate>2007-12-24</cdate><ctime>18.00.02</ctime></userdata>
<userdata><user>TW</user><name>Tom Waits</name><activ>Y</activ><cdate>2013-04-06</cdate><ctime>14.45.00</ctime></userdata>
<userdata><user>VM</user><name>Victoria Mack</name><activ>Y</activ><cdate>2013-06-20</cdate><ctime>18.05.00</ctime></userdata>
<userdata><user>JH</user><name>Jayhawks</name><activ>Y</activ><cdate>2013-05-20</cdate><ctime>22.05.00</ctime></userdata>
</data>
Figure 3: Here's localdata.xml, the returned XML data from the AJAX call.
When the AJAX call has been fired using the jQuery.ajax() function serval, callback functions are available for checking on how the call went. In this example, we will use the success, complete, and error callback functions to check for various things to happen. In the "success" callback function, the resulting HTML is created based on the returned XML data using the .append function and some HTML table tags.
Below is the code that shows how the "activ" node will control whether the "Send Message" button is disabled or not.
if ( activ == 'Y' ) {
var onlineStatus = '<div title="activ=' + activ + '" class="statusClassOnline roundCorners"> </div>'
var sendMsgButton = '<button onclick="ShowMessage()">Write Message</button>';
} else {
var onlineStatus = '<div title="activ=' + activ + '" class="statusClassOffline roundCorners"> </div>'
var sendMsgButton = '<button class="setDisabled">Write Message</button>';
}
When the AJAX call is complete, the "complete" callback function is called and will control the button area according to the mode the application is running in (auto or manual). It will also send out a message that data has been fetched.
I haven't coded any error-handling in the "error" callback function, but as you can see, I have made space for it. Please note that all the exception data will be in the xhr, ajaxOptions, thrownError arrays/variables that are anobject returned by the .ajax() function .
The other functions in the connection.php are pretty straightforward. With the knowledge you have so far, they should be fairly easy to understand the meaning of.
But what about the proxy-connection.php script? Let's have a look at that and see what happens here.
<?php
//======================================================================================
//
// jQuery fundamentals – part 4
//
// Function: Get data from server
//
//======================================================================================
//======================================================================================
// Get input
//======================================================================================
if (isset($_REQUEST["servermode"])) $servermode = $_REQUEST["servermode"];
else {
$servermode = 'Local';
}
//======================================================================================
// Set your return content type
//======================================================================================
header('Content-Type: text/xml; charset=utf-8');
//header('Content-Type: text/xml; charset=ISO-8859-1');
//======================================================================================
// Get data from somewhere...
//======================================================================================
if ( $servermode == 'Local' ) {
$daurl = 'localdata.xml';
} else {
$daurl = 'http://your-system-i/cgi-bin/connection';
}
//======================================================================================
// Get that website's content
//======================================================================================
error_reporting( E_ERROR );
if (!fopen($daurl, "r")) {
echo "<data>";
echo "<update timestamp=\"No connection to server\"></update>";
echo "</data>";
} else {
$handle = fopen($daurl, "r");
}
//======================================================================================
// If there is something, read and return
//======================================================================================
if ($handle) {
while (!feof($handle)) {
$buffer = fgets($handle, 5000);
echo htmlspecialchars_decode($buffer);
}
fclose($handle);
} else {
}
?>
The script is pretty easy to understand. All it does is to "read" the contents of the data returned from the data source using the fopen() and fgets() functions.
The most important part is where the $daurl variable is set because this is the part that controls where data is retrieved from; this is where you should add your own code if you want to take the code from whatever source you might want.
In the code below, you can see that the servermode variable passed to the program is controlling the server source code.
I have created a small RPG program that you can test with by downloading the jqury.savf savefile, which contains a library called JQUERY4 that contains all source and objects needed.
Just move this to your RPG-CGI lib and change the "your-system-i" to point to your System i, where you want to test from.
if ( $servermode == 'Local' ) {
$daurl = 'localdata.xml';
} else {
$daurl = 'http://your-system-i/cgi-bin/connection';
}
Because of space constraints, I won't go through the RPG as it is very basic and I'm sure you can find your way through it. However, I will just mention that it will read a file and return the same XML as shown in Figure 3.
That's It
This completes the jQuery fundamentals part IV. This TechTip has a lot of code, and I haven't even mentioned the startAutoUpdate() and stopAutoUpdate() functions, but they're very straightforward; all they do is use the JavaScript setInterVal and clearInterVal to handle the auto update loops.
I hope you can use these TechTips to further expand your jQuery work. If you have any questions, put them into the forum or send me an email. I'll do my best to answer.
Download the Code
As I always do, I've uploaded the examples to my own website, where you can see the examples in real life.
Please note that I have disabled the server function so that it will always give you the local XML data.
Till next time, happy programming and have a nice summer.


 More than ever, there is a demand for IT to deliver innovation. Your IBM i has been an essential part of your business operations for years. However, your organization may struggle to maintain the current system and implement new projects. The thousands of customers we've worked with and surveyed state that expectations regarding the digital footprint and vision of the company are not aligned with the current IT environment.
 TRY the one package that solves all your document design and printing challenges on all your platforms. Produce bar code labels, electronic forms, ad hoc reports, and RFID tags – without programming! MarkMagic is the only document design and print solution that combines report writing, WYSIWYG label and forms design, and conditional printing in one integrated product. Make sure your data survives when catastrophe hits. Request your trial now! Request Now.
 Forms of ransomware has been around for over 30 years, and with more and more organizations suffering attacks each year, it continues to endure. What has made ransomware such a durable threat and what is the best way to combat it? In order to prevent ransomware, organizations must first understand how it works.
 Disaster protection is vital to every business. Yet, it often consists of patched together procedures that are prone to error. From automatic backups to data encryption to media management, Robot automates the routine (yet often complex) tasks of iSeries backup and recovery, saving you time and money and making the process safer and more reliable. Automate your backups with the Robot Backup and Recovery Solution. Key features include:
 Business users want new applications now. Market and regulatory pressures require faster application updates and delivery into production. Your IBM i developers may be approaching retirement, and you see no sure way to fill their positions with experienced developers. In addition, you may be caught between maintaining your existing applications and the uncertainty of moving to something new.
 IT managers hoping to find new IBM i talent are discovering that the pool of experienced RPG programmers and operators or administrators with intimate knowledge of the operating system and the applications that run on it is small. This begs the question: How will you manage the platform that supports such a big part of your business? This guide offers strategies and software suggestions to help you plan IT staffing and resources and smooth the transition after your AS/400 talent retires. Read on to learn:
LATEST COMMENTS
MC Press Online