


With OS/400 V4R4, AS/400 NetServer has added a number of powerful features to make network printing easier to configure, install, and use. This article looks at the new V4R4 AS/400 NetServer functions and explains how you can use them in conjunction with
Express Client to build a stronger Windows-to-AS/400 print serving environment.
When you print with the newest member of the Client Access family, IBM’s AS/400 Client Express for Windows (Express Client), you will want to use the services provided by IBM AS/400 support for Windows Network Neighborhood (AS/400 NetServer). Unlike the Client Access for Windows 95/NT product, Express Client does not contain these features. For Express Client, the network printing and network drive functions are being redistributed to AS/400 NetServer. This makes AS/400 NetServer a companion product to Express Client, providing some of the functions previously available in Client Access for Windows 95/NT.
In this article, I’ll examine how to use AS/400 NetServer and OS/400 V4R4 to provide network printing services for your Windows PCs. (In a future issue, I’ll look at the network drive-side of the equation.) I’ll discuss what network printing is, why IBM is shifting its network printing functions to AS/400 NetServer, what’s new in OS/400 V4R4, and what has remained unchanged from V4R3. I’ll also describe some related AS/400 NetServer enhancements you’ll be interested in. You’ll see how you can easily build a stronger connectivity environment by allowing your Express Client PCs to access AS/400 NetServer using the print sharing capability found in Windows 95, Windows 98, and Windows NT.
What Is Network Printing?
In contrast to printer emulation (see “The Basics of PC5250 Printer Emulation” elsewhere in this Focus section), network printing involves redirecting PC and network printouts to TCP/IP-networked printers via the AS/400. You can send Lotus WordPro or Microsoft Word documents, for example, to remote AS/400 output queues that are
configured for Line Printer Requester/Line Printer Daemon (LPD/LPR) printers in your TCP/IP network. You can also print Lotus Domino documents from your PC network to AFP printers that are directly attached to your AS/400. Network printing allows your AS/400 to become a network print server that redirects printouts from any TCP/IP- networked PC to TCP/IP-networked printers and directly attached AS/400 printers.
You use AS/400 NetServer to provide network printer support to a Windows client PC. The use of AS/400 NetServer by the client does not require the installation of any member of the Client Access family. By redistributing network printer support to AS/400 NetServer, you can provide these services to any Windows client PC. You no longer need to have Client Access installed to use AS/400 network printing because AS/400 NetServer uses industry-standard print services.
Like Express Client, AS/400 NetServer is available only on a TCP/IP network. So, you need to make sure that both the AS/400 and the PC client have TCP/IP configured. On your Windows desktop, you also need to install and configure the Client for Microsoft Networks network component included with Windows 95/98/NT, which provides the PC’s native print sharing capability.
AS/400 NetServer employs the services of the AS/400’s Network Print Server to spool Windows PC printer jobs to AS/400 output queues that have been previously configured by AS/400 administrators. These output queues can be configured for printers that are directly attached to the AS/400, are attached to a PC in the network, or are LAN- attached. Once the print job has been spooled to the AS/400 output queue by the combined efforts of both AS/400 NetServer and the Network Print Server, Network Print Server sends the spooled file to the destination printer based on the configuration of the writer.
For more information on how to configure AS/400 NetServer on your AS/400 and your client PCs, see the sidebar, “Setting Up AS/400 NetServer in 1,000 Words or Less.” It is also a good idea to periodically check the IBM AS/400 NetServer Web site to verify that you have the latest level of AS/400 PTFs required by AS/400 NetServer and to keep abreast of any new information.
Why Change?
With AS/400 NetServer, IBM provides print serving access to AS/400 output queues using the industry-standard Server Message Block (SMB) protocol. Express Client PCs can rely on AS/400 NetServer to provide this function while enjoying the richer functions of the Client Access family clients. By shifting AS/400 output queue access to AS/400 NetServer (and Windows default print services), the Express Client desktop footprint can be smaller, leaner, and more manageable.
A distinct change from the Client Access for Windows 95/NT to the Express Client involves background tasks. By depending on AS/400 NetServer to provide print services, the Express Client Windows desktop does not require network printer daemons and background tasks that are tied into the Windows architecture. Removing the existing 32-bit client’s print service tasks frees up memory, lowers processor usage on the client, and provides for a slimmer Express Client installation.
What’s Different in V4R4?
With the AS/400 Operations Navigator included in V4R4, the Basic Operations folder still allows you to easily manage lists of printer output and printers, but you will no longer be able to add network printers with Express Client. You need to use the PC’s native print sharing capability and AS/400 NetServer to install and use network printers available on the AS/400.
To install a network printer using AS/400 NetServer, left-click the Start button on your Windows desktop, then select Find, Computer, and enter the AS/400 NetServer server name to find your target AS/400 NetServer in the network. Once found, double- click the AS/400 NetServer icon to list the currently shared resources. Double-click on the shared resource you would like to install a printer for, and you will be presented with the Add Printer wizard. Follow the steps to install the network printer. This procedure
configures a Windows printer for the AS/400 output queue configured in your AS/400 NetServer printer share. Once configured, you can access this printer through the Find feature technique outlined here, or you can select Start, then Settings, and then Printers.
Because the Express Client no longer provides print services, you will notice that your Client Access Properties screen no longer has a Printer Profiles tab. In previous clients, you could add a default AS/400 print profile for each AS/400 system, but now you will enter this information when configuring an AS/400 NetServer print share. Now, take a look at an example of which properties where migrated from Client Access for Windows 95/NT V3R2M0 and how they can be replicated using the Express Client and AS/400 NetServer.
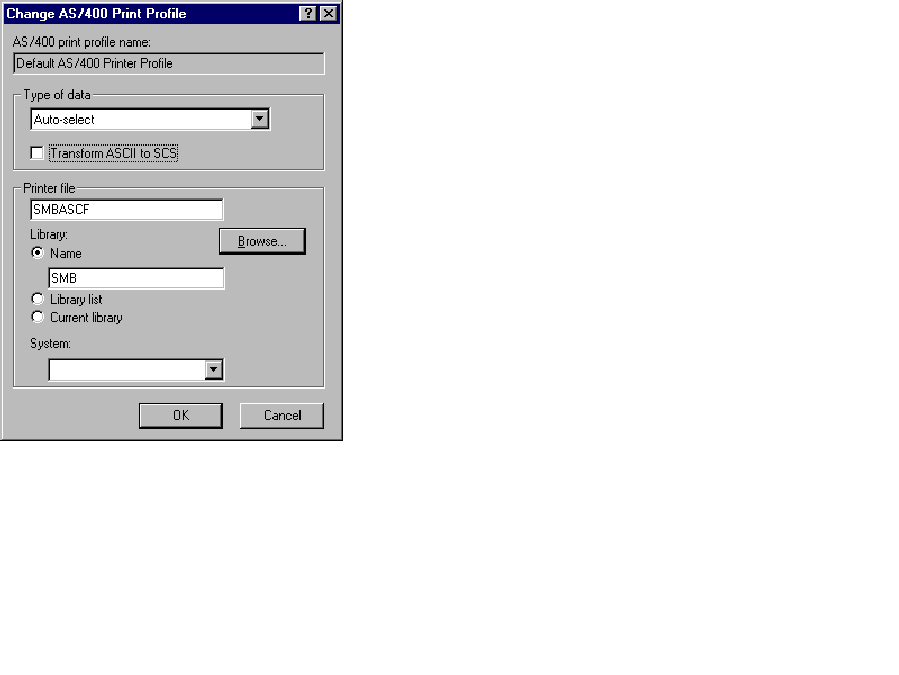
Using Client Access V3R2, double-click on the Client Access Properties icon in the IBM AS/400 Client Access folder, select the Printer Profiles tab, and left-click the Add or Change button to reach the AS/400 Printer Profile dialog shown in Figure 1.
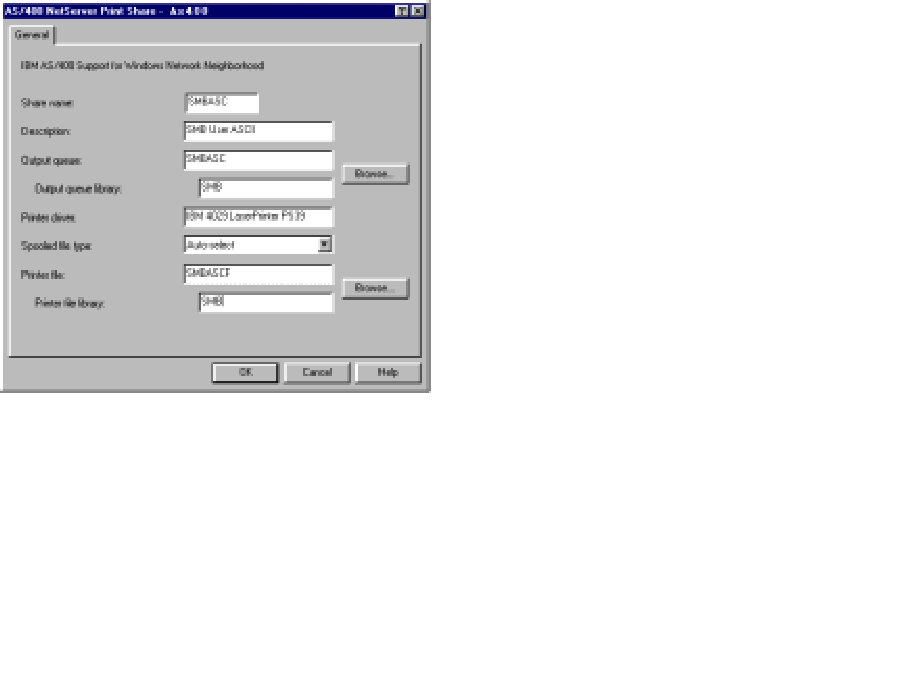
Using Operations Navigator in the Express Client, the AS/400 administrator can find the Shared Object icon by following the Network-Servers-TCP/IP-AS/400 NetServer path. Double-click on the AS/400 NetServer icon, right-click on the Shared Object icon, and select New and Printer to access the AS/400 NetServer Print Share dialog shown in Figure 2. You may also right-click on the specific printer icon under Printers in Operations Navigator, select Sharing, and then select New Share to access the AS/400 NetServer Print Share dialog shown in Figure 2.
If the AS/400 output queue associated with the AS/400 writer is currently shared with the network, the printer icon for that AS/400 writer in Operations Navigator will show the printer being held by a hand, as illustrated in Figure 3. If you right-click on a printer icon held by a hand, you can either add a new share or work with currently configured AS/400 NetServer print shares. You will need the *IOSYSCFG special authority in your AS/400 user profile to add or change print share information. In V4R4 OS/400, AS/400 NetServer also allows the owner of the output queue to add to, change, or remove an AS/400 NetServer print share configuration without *IOSYSCFG special authority. Changes to print shares take effect immediately.
The “Type of data” previously specified with the CA/400 V3R2 AS/400 Printer Profile, shown in Figure 1, is now specified on the AS/400 NetServer print share as the “Spooled file type” field, shown in Figure 2. In V4R4 OS/400, AS/400 NetServer will now automatically sense the spooled file type by parsing the incoming print job data stream when the Autoselect Spooled File Type is configured.
The Printer File previously specified with the AS/400 Printer Profile, shown in Figure 1, is now specified on the AS/400 NetServer print share as the “Printer file,” shown in Figure 2. In V4R4 OS/400, AS/400 NetServer will create all spooled files using a printer file, if configured. The printer file is used by Network Print Server to identify the printer device used and the spooling requirements. However, the AS/400 NetServer print share “Spooled file type” (shown in Figure 2) always takes precedence over any value specified in an AS/400 printer file when using AS/400 NetServer.
With Client Access for Windows 95/NT V3R2 network printers, you could select the Transform ASCII to SCS check box (shown in Figure 1) to transform ASCII printer output to SNA Character Stream (SCS) output when using DOS applications and from DOS prompts. With Express Client, this function is no longer available. Because the Express Client relies on the native print serving capability in Windows, with no additional code on the client, the Express Client can no longer intercede on a print request in order to perform the transformation.
Please note that the Printer Profile properties (the printer file field on your OS/400 V4R4 AS/400 NetServer print shares) were migrated from Client Access for Windows
95/NT to AS/400 NetServer print shares only for AS/400 installations running V4R4. If you use the Express Client to access AS/400 NetServer print shares on V4R2 or V4R3 OS/400, you will not be able to configure AS/400 NetServer shares with a printer file; neither will you be able to autoselect the spooled file type.
What’s the Same?
You will still be able to use standalone SCS and Advanced Function Printing (AFP) printer drivers found under the /QCA400 AS/400 integrated file system directory. You may access this directory by using the QCA400 AS/400 NetServer file share. Find the printer driver for your client desktop type by selecting the appropriate path. For example, to install the AFP printer driver on a Windows NT client, you would use the following path: /Qca400/Win32/Install/ Printer/Afp/Nt. Select Have Disk during the Add Printer wizard in order to install these standalone printer drivers.
Client Access Express still provides a specialized C programming interface for working with AS/400 spooled files, AFP resources, writer jobs, output queues, and printers. This interface is known as the AS/400 Object API. This API is used to provide all the printer output and printer functions available in AS/400 Operations Navigator, such as starting and ending writers, working with output queues, retrieving and setting attributes, and other functions. The AFP Workbench Viewer also uses this API to view information from a print file, and that will not change.
Related AS/400 NetServer Enhancements
Because AS/400 NetServer requires that TCP/IP be active in V4R4, AS/400 NetServer will now be started and ended as a TCP/IP server. There will no longer be a QZLSSERVER autostart job in the QSERVER subsystem description, but the QZLSSERVER job will still reside in the QSERVER subsystem. You can specify whether or not the AS/400 NetServer starts automatically when TCP/IP is started by selecting the “Start when TCP/IP is started” check box on the AS/400 NetServer General Next Start dialog panel (as shown in Figure 4). This value affects TCP/IP start behavior; it is not an AS/400 NetServer property, so the changes take effect immediately.
Using AS/400 Operations Navigator in the Express Client, the AS/400 administrator can find the AS/400 NetServer icon by following the Network-Servers- TCP/IP-AS/400 NetServer path. Right-click on the AS/400 NetServer icon, select Properties, select the General tab, and then press the Next Start button to reach the dialog panel shown in Figure 4.
From this same dialog, you can also specify whether or not to allow access to AS/400 NetServer by your AS/400 system name. If the “Allow AS/400 NetServer access using AS/400 name” check box is selected, then you can use the AS/400 system name (as configured in your AS/400 network attributes) to access AS/400 NetServer. This access is in addition to the AS/400 NetServer server name access that you already have set up. You need *IOSYSCFG to change the AS/400 NetServer configuration, and changes take effect the next time AS/400 NetServer is started.
Be cautious when you select this option. AS/400 system name access is not enabled by default because it can cause conflicts if you still have Client Access for Windows 95/NT clients in your network. When Client Access family members (other than Client Access Express) and AS/400 NetServer use the same server name, both AS/400 servers (the Client Access server and the AS/400 NetServer) recognize the name, and both servers will attempt to answer a client request. The first one to satisfy the client’s request takes control, producing inconsistent results for the client. If you are using Client Access Express only on your AS/400, or if you have only Express Clients in your network, then it is safe (and recommended) that AS/400 NetServer and the AS/400 system name are the same. But if you have a mixed Client Access network (user PCs that are running Client Access Express and other members of the Client Access family), then I recommend that you use different names for your AS/400 NetServer and your AS/400 system name.
Printing Serving Is Improved
By relying on AS/400 NetServer to handle the Express Client’s print serving needs, you now have more industry-standard printing capabilities and the footprint on the client is smaller. Options previously available on a systemwide basis with the use of Printer Profiles are now available on an individual AS/400 NetServer share. Your users will see that the
Express Client satisfies their printing needs better while freeing up resources on their PCs.
References
AS/400 Printing IV, Redbook (GG24-4389) Client Access Express for Windows—Setup (SC41-5507) “Client Access Without Client Access,” Client Access/400 Expert, July/August 1998 IBM’s AS/400 NetServer Web site at www.as400. ibm.com/netserver IBM’s Client Access Web site at www.as400. ibm.com/clientaccess “Transform Your AS/400 into a Network Print Server with AS/400 NetServer,” AS/400 Network Expert, January/
Setting Up AS/400 NetServer in 1,000 Words or Less
While many options are available to you in AS/400 NetServer, it’s relatively easy to set up and start using your AS/400 NetServer installation. There are two components to your AS/400 NetServer installation: the AS/400 server setup and the Windows PC client setup. In less than 1,000 words, here are the steps you take to get AS/400 NetServer up and running as quickly as possible.
On Your AS/400
• Double-check that TCP/IP is configured correctly and is active. Start TCP/IP by using the Start TCP/IP (STRTCP) command with the correct server and interface parameters for your location. The QSERVER subsystem should be active.
• Use AS/400 Operations Navigator to configure your AS/400 NetServer. For Client Access/400 V3R2 and the Express Client, use this Operations Navigator path: Network-Servers-TCP/IP-AS/400 NetServer. For CA/400 V3R1M3, use this path: Network-Servers-NetServer.
• Set up your AS/400 NetServer name and domain name. Right-click on the Operations Navigator AS/400 NetServer icon and select Properties from the pop-up menu. This brings you to the AS/400 NetServer Properties panel. Here, you need to set up your AS/400 NetServer server name and the AS/400 NetServer domain name. Since AS/400 NetServer is a relatively new product, there are different dialogue panels for CA/400 V3R1M3, CA/400 V3R2, and the new Express Client. Reach the panel for your configuration by doing the following:
• For CA/400 V3R1M3, click on the General tab.
• For CA/400 V3R2, click on the Next Start tab.
• For Express Client, click on the General tab, and then click on the Next Start button on the General tab screen. This brings you to a screen on which you can change your AS/400 NetServer properties (similar to Figure 4). Fill in the server name, domain name, and description fields. IBM convention recommends you name your AS/400 NetServer by using the letter Q plus your AS/400 system name (e.g., if your system name is MCRISC, your AS/400 NetServer should be QMCRISC). For domain name, put in the name of the domain where your client PCs reside. By using the same domain name as your clients, the AS/400 NetServer may show up in your client’s Windows Network Neighborhood or Windows Explorer programs. However, if the client resides on a different network segment or is accessed over the Internet, the client may not be able to see the AS/400 NetServer in its Windows configuration because AS/400 NetServer broadcasts are not generally forwarded across TCP/IP subnets. Fill in a description of your choice. Ignore the other parameters for now, and click on OK to save your configuration.
• Stop and restart your AS/400 NetServer by right-clicking on the AS/400 NetServer icon and selecting Stop from the pop-up menu. The status of AS/400 NetServer on the Operations Navigator screen will be changed to “Stopped.” Right-click on the AS/400 NetServer icon again and select Start to restart your AS/400
NetServer. Your AS/400 NetServer status will be changed to “Started.” This restarts your AS/400 NetServer with the new names.
• Identify and configure any locally attached AS/400 printers or Line Printer Requester/Line Printer Daemon (LPD/LPR) remote printers that you want to redirect printouts to. Make sure these printers are accessible from your AS/400 and test sending output to them.
• Add any AS/400 NetServer print shares you want for your output queues by double-clicking on the Operations Navigator AS/400 NetServer icon and by using the Shared Objects function. See IBM’s AS/400 NetServer Web site (www.as400.ibm.com/netserver) for instructions on creating printer shares, or see “Transform Your AS/400 into a Network Print Server with AS/400 NetServer” in the January/February issue of AS/400 Network Expert.
• Verify that the AS/400 Network Print Server is active by looking for the QNPSERVD job in the QSYSWRK subsystem. If this job is not there, run the Start Host Server command with the network print server daemon option as follows:
STRHOSTSVR *NETPRT
On Your Windows Client PCs
• Make sure your PC is configured with TCP/IP and the Client for Microsoft Networks. These are configured in the Network icon of the Windows Control Panel. See your Windows documentation for information on how to configure these items.
• Verify that you can resolve the IP address of your AS/400 NetServer. This can be done by adding an entry to your network’s Domain Name System (DNS), Windows Internet Name Service (WINS), or by adding an entry to your PC’s HOSTS or LMHOSTS file.
• Try reaching your AS/400 NetServer by locating it in your Windows Network Neighborhood. If it does not show up there, it may be that your AS/400 NetServer is not on the same network as your local PC or that you are accessing the AS/400 NetServer over the Internet. If you cannot locate it in the Network Neighborhood, click on your Windows Start button, then select Find and Computer. Type in the AS/400 NetServer name you previously defined and, if everything is configured correctly, that should locate your AS/400 NetServer. Once the AS/400 NetServer is located, double-click on the AS/400 NetServer icon and you will see a screen showing all the file and print shares that you can access. Double-click on the print share you want to install and follow the installation instructions. Windows will start up the Add Printer wizard to install your printer, so if the printer driver isn’t already present on your system, you will need the printer installation media to install the printer.
• Once the printer is installed, you can start printing PC reports to your AS/400 NetServer network printer. The AS/400 NPS will redirect those reports to the proper printer output queue.
These are the steps you need to follow for basic configuration of an AS/400 NetServer in your TCP/IP network. On the AS/400 configuration end, the IBM AS/400 NetServer Web site also offers an AS/400 command-line miniguide that contains instructions for configuring an AS/400 NetServer from the green- screen. However, it is much easier to perform your AS/400 NetServer configuration from AS/400 Operations Navigator.
While there are more options you can configure, these basic instructions should be enough to get you up and started with AS/400 NetServer. For more information, be sure to visit the AS/400 NetServer Web site for the latest news and techniques.
Ñ Joe Hertvik
 |
 |
 |
 |
 More than ever, there is a demand for IT to deliver innovation. Your IBM i has been an essential part of your business operations for years. However, your organization may struggle to maintain the current system and implement new projects. The thousands of customers we've worked with and surveyed state that expectations regarding the digital footprint and vision of the company are not aligned with the current IT environment.
 TRY the one package that solves all your document design and printing challenges on all your platforms. Produce bar code labels, electronic forms, ad hoc reports, and RFID tags – without programming! MarkMagic is the only document design and print solution that combines report writing, WYSIWYG label and forms design, and conditional printing in one integrated product. Make sure your data survives when catastrophe hits. Request your trial now! Request Now.
 Forms of ransomware has been around for over 30 years, and with more and more organizations suffering attacks each year, it continues to endure. What has made ransomware such a durable threat and what is the best way to combat it? In order to prevent ransomware, organizations must first understand how it works.
 Disaster protection is vital to every business. Yet, it often consists of patched together procedures that are prone to error. From automatic backups to data encryption to media management, Robot automates the routine (yet often complex) tasks of iSeries backup and recovery, saving you time and money and making the process safer and more reliable. Automate your backups with the Robot Backup and Recovery Solution. Key features include:
 Business users want new applications now. Market and regulatory pressures require faster application updates and delivery into production. Your IBM i developers may be approaching retirement, and you see no sure way to fill their positions with experienced developers. In addition, you may be caught between maintaining your existing applications and the uncertainty of moving to something new.
 IT managers hoping to find new IBM i talent are discovering that the pool of experienced RPG programmers and operators or administrators with intimate knowledge of the operating system and the applications that run on it is small. This begs the question: How will you manage the platform that supports such a big part of your business? This guide offers strategies and software suggestions to help you plan IT staffing and resources and smooth the transition after your AS/400 talent retires. Read on to learn:
LATEST COMMENTS
MC Press Online