


Are your users using Office XP yet? Many shops have been putting off an upgrade because Office 97 or Office 2000 fits the bill adequately for most people. However, there are lots of Office XP users out there, and that's what new machines usually shop with. I'm glad I upgraded to Office XP awhile back, because it includes many helpful enhancements that I use daily. One of those enhancements, for example, is voice dictation. In fact, I am dictating this article right now, and after training, it is working quite well.
In recent product releases, it seems that Microsoft is trying to justify the expense of an upgrade by including features and functions that used to require third-party programs. For example, Windows XP includes a photo browser and zip file support built right in to Windows Explorer. Those functions used to exist only as third-party options. While that may be bad news for companies that provide those programs, it is good news for customers (at least in the short run). In addition, Microsoft has changed how some things are done, generally for the better. One of those things is how you do a mail merge in Word XP using iSeries data.
Prior to the version of Word included with Office XP, the basic procedure for integrating external data from an ODBC data source such as the iSeries (which is, oddly enough, a word that the voice dictation refuses to recognize) changed little between versions. However, with Word XP, although the fundamentals are still the same, the procedures have changed enough to warrant a closer look. All in all, the changes are an improvement to the process. Let's take a look at the changes so you can get a sense of how things have changed in XP.
Hauling the Mail with ODBC and Word XP
Although more and more methods for data integration are becoming available, one of the primary means of accessing external database data from Microsoft Word remains ODBC. As you probably know, ODBC is a middleware protocol, and vendors provide ODBC drivers that can be used with Word and other programs to connect with databases. IBM provides a free ODBC driver for the iSeries that is included as part of the base support of iSeries Access for Windows (formerly known as Client Access for Windows). If you've installed any version of that application, you already have an ODBC driver installed.
The basic procedure is to use ODBC to retrieve records from your database and insert them into predefined locations within your document. Generally, Word creates one document (or one section within a document) for each record. Let's take a look.
Mail Merge Step 0: Configure a Data Source Name
Before you can access external data from many applications, including Word, you need to create a Data Source Name (DSN) that stores the appropriate driver and configuration information to connect to your database, which for this example will be my iSeries machine. I will use the ODBC driver included with the base version of IBM iSeries Access (aka Client Access) to connect to a customer information table in a library called DATALIB.
To configure an ODBC data source, go to the Client Access folder (off of the Program menu) and click the ODBC Administration icon. That brings up the screen shown in Figure 1, which is where you configure your data sources. There are three main types of data sources. User DSNs are available to the current Windows user and any who have access to that user's settings. System DSNs are available to the entire system, including other users. File DSNs are stored in the filing system, meaning they can be copied around just like any other file. For this example, make sure the User DSN panel is showing by clicking the User DSN tab, and then click the Add button.
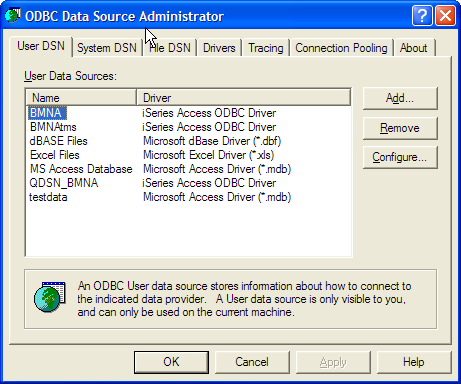
Figure 1: Configure an ODBC DSN using the ODBC Data Source Administrator. (Click images to enlarge.)
On the next screen, select Client Access ODBC Driver (32-bit) and click Finish.
The iSeries Access for Windows ODBC Setup dialog has three main settings to make ODBC work. On the General tab (shown in Figure 2) , enter a name for your new data source and select the iSeries system you want to connect to. Then click the Server tab.
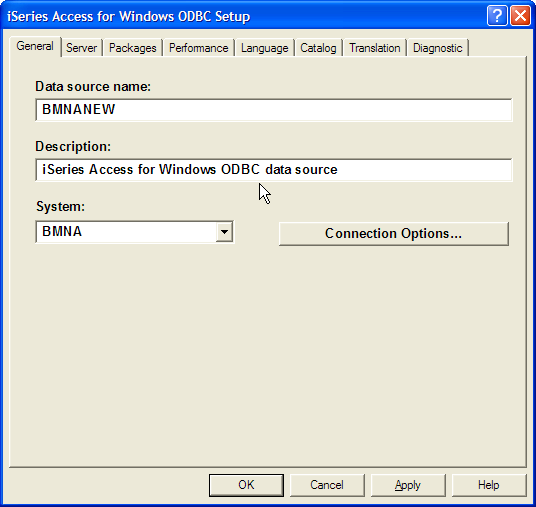
Figure 2: Set the data source name and choose the system to connect to.
On the screen shown in Figure 3, enter your library name in the SQL Default Library dialog. Then click OK.
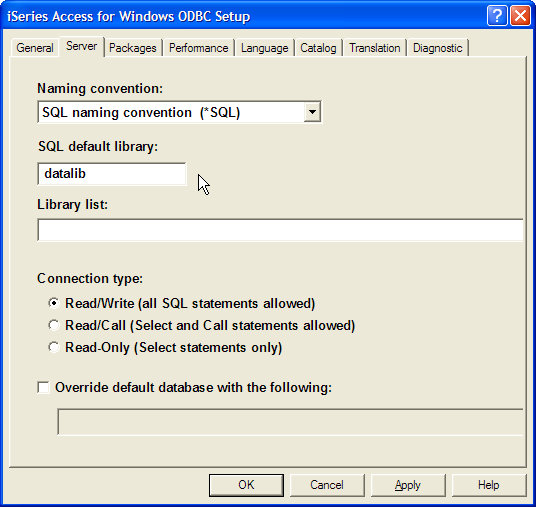
Figure 3: Under the Server tab, enter the SQL default library.
Click OK to dismiss the last dialog, and your DSN should be ready to use.
Mail Merge Step 1
From the Tools menu, select Letters and Mailings, Mail Merge Wizard. That begins the process of creating a mail merge. From the panel on the right side of the screen (Figure 4), select the type of document you want to create and click the link to the next step. For this example, I'll choose Letters, but as you can see, there are a number of options including email messages, envelopes, labels, and a directory, which is "a single document containing a catalog or printed list of addresses." To continue, click the Next step in the lower right corner.
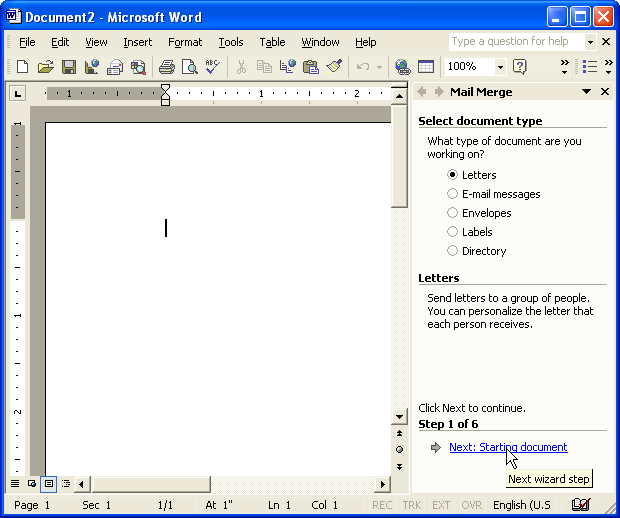
Figure 4: Select the type of document you want to create
Mail Merge Step 2
On the next panel, you choose whether you want to merge the current document, start from a template, or start from an existing document. For this example, use the Current Document, which is the default setting. Click the option for the next wizard step on the lower right portion of the panel to continue to step 3.
Mail Merge Step 3
In this step, shown in Figure 5, you choose the recipients of your letter. You can choose from an existing list that resides in another Word document, your Outlook contacts database, or an external file or database. To retrieve data from your ODBC data source (such as your iSeries), click the option to browse for an existing list.
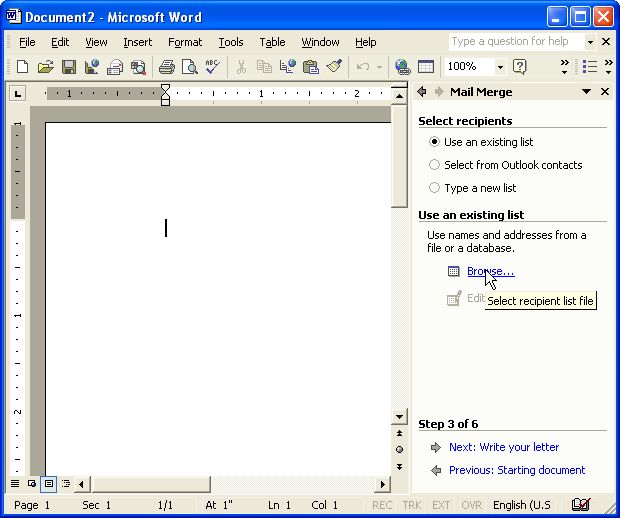
Figure 5: Choose the recipients from an existing list or click Browse to see ODBC data sources.
Now, you're at the screen shown in Figure 6, where you can choose a data source for your address list. Data sources that you have previously configured will be displayed in this list. This is not the same list of DSNs that includes the one we created in Step 0; we have to go through an additional step for that. If you've got a data source already configured, select it, click the Open button, and skip to the screen titled Mail Merge Recipients. If you don't see your ODBC DSN, click the New Source button.
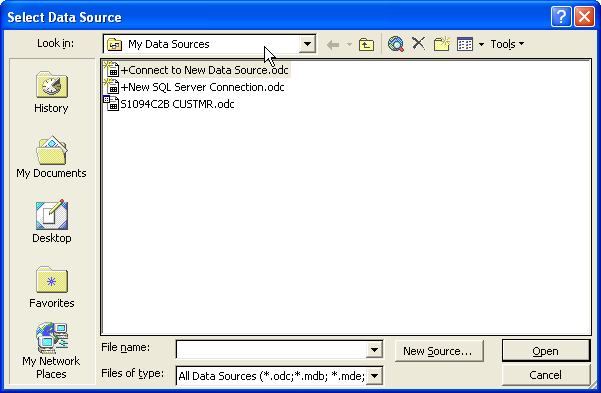
Figure 6: Choose your ODBC data source from which to retrieve addressee information.
When the first screen shown in the Data Connection Wizard appears, select "ODBC DSN" and click Next. ODBC is the stalwart database middleware protocol that has been a primary means of client/server communication for many years, so it's always a good choice. Note that if you select Other/Advanced, you can select the IBM iSeries Access OLE/DB driver, should you wish to use that driver instead.
On the next screen, shown in Figure 7, choose the ODBC data source that points to the data that you want to include in the document. Then, click Next. Depending upon your connection settings, you may be asked to log in to your iSeries machine at this point. If so, go ahead and log in.

Figure 7: Choose the ODBC data source you wish to use.
On the next screen, you're shown a list of tables available from your data source. Select the table you want to retrieve names and addresses from and click the Finish button. That brings up the screen shown in Figure 8, which displays the records from your ODBC DSN. By default, all records will be selected. To filter records, click the drop-down arrow at the top of each column to bring up a screen where you can specify a filter. Once you have the records you want, click the OK button to continue with the next step of the wizard.
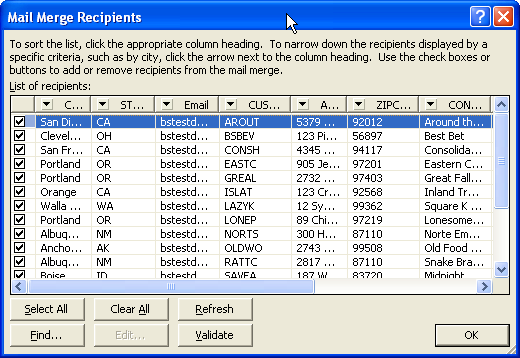
Figure 8: Filter and sort the data from the table you wish to merge.
After clicking the OK button, you should return to step 3 of the Mail Merge Wizard and see the main document again. Information about where your data is coming from is displayed on the right side of the screen in the Mail Merge Wizard. Click the link to go to the next step of the wizard, step four.
Mail Merge Step 4
In step 4, you compose a letter that you want to merge your data into. To insert elements from the database into your letter, click the appropriate link on the right hand side of the screen. Options include an address block, a greeting line, electronic postage, postable barcodes, and more. For example, clicking the address block link brings up the dialog box shown in Figure 9, where you can specify options for the address block.
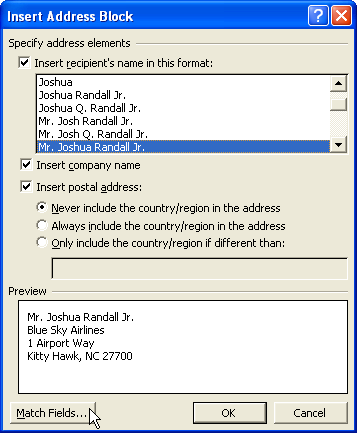
Figure 9: Specify options for the address block. Then, click the Match Fields button.
Clicking the Match Fields button brings up the screen shown in Figure 10, where you can match address fields with fields from your database table. For each field, select the field from your database that matches the requested information.
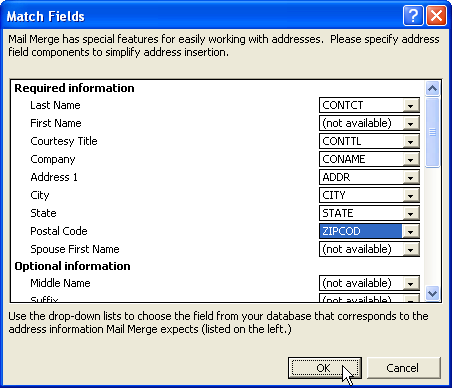
Figure 10: Match the fields from your database to fields Word understands.
If you do not have or are not using a particular data field, leave the setting as "(not available)." Once you have matched the fields that you need, click the OK button to continue. The address block will be inserted into the document, as shown in Figure 11. To insert your fields directly into the document, click the More Items link on the right panel and select your fields from the list. They will be inserted into the document at the current insertion point.
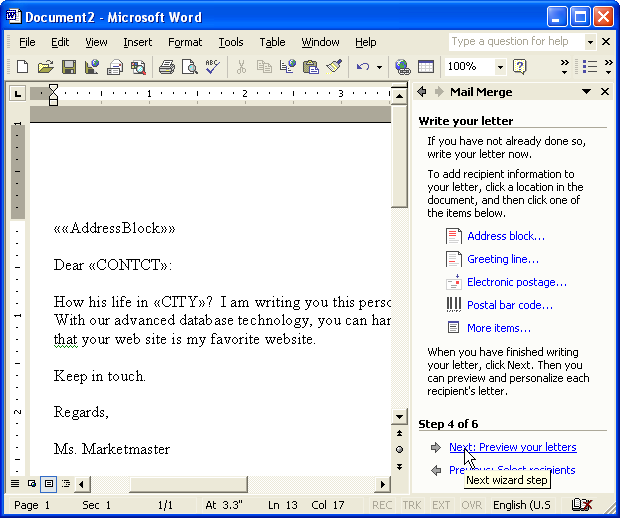
Figure 11: Word displays the merge document with an address block and other fields.
Continue formatting the document to get it to look as desired, and then click the link to continue to step five.
Mail Merge Step 5
In this step, you can preview your letters with live data to see if they're formatted correctly and appear the way you want them to. In Step 5, you have options to find a particular recipient, or you can edit the recipient list to filter for specific values. Once you're satisfied with your list, click the Next link to bring up step six.
Mail Merge Step 6
For this step, which is the final step of the Mail Merge Wizard, you choose to either print your letters immediately or edit the individual letters. The latter option will merge the letter and the data into a new document within Word, as shown in Figure 12.
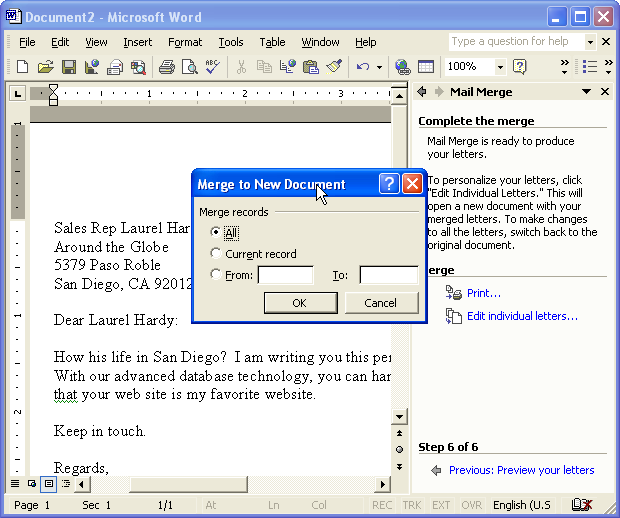
Figure 12: Select whether to merge all records, the current record, or a numeric range.
When you click the print link, the Merge Records dialog appears. In this dialog, you can specify all records, the current record, or a numeric record range. The last option is good if you have a large number of records to merge and you want to break them into smaller groups.
Merge Complete
Word XP offers new features and makes existing features easier to use. The mail merge function is no exception. As you saw, creating form letters for print is pretty easy.
Word XP even offers options to guide you through the creation and distribution of an email newsletter, for example, so you could use Outlook to send out an email blast to your customers. A word of caution if you want to try this: Be sure that the email can be delivered to and read from the email systems your customers use. Nothing irritates customers more quickly than an email they can't read. Although each version offers more options in this area, Word is notorious for generating ugly HTML that may not work in all browsers. Sounds like an article for another time! In the meantime, send an email blast to me if you use (or don't use) this technique, and happy merging.
Brian Singleton, formerly editor of Midrange Computing magazine, is a freelance author, trainer, and consultant. Over the past few years, Brian has developed a line of best-selling training videos, authored the best-selling The OS/400 and Microsoft Office Integration Handbook--Second Edition, and spoken at many popular seminars and conferences. He can be reached at www.bsing.com.

MC Press books written by Brian Singleton available now on the MC Press Bookstore.
 |
i5/OS and Microsoft Office Integration Handbook Harness the power of Microsoft Office while exploiting the iSeries database. List Price $79.95 Now On Sale
|

 Business users want new applications now. Market and regulatory pressures require faster application updates and delivery into production. Your IBM i developers may be approaching retirement, and you see no sure way to fill their positions with experienced developers. In addition, you may be caught between maintaining your existing applications and the uncertainty of moving to something new.
 IT managers hoping to find new IBM i talent are discovering that the pool of experienced RPG programmers and operators or administrators with intimate knowledge of the operating system and the applications that run on it is small. This begs the question: How will you manage the platform that supports such a big part of your business? This guide offers strategies and software suggestions to help you plan IT staffing and resources and smooth the transition after your AS/400 talent retires. Read on to learn:
LATEST COMMENTS
MC Press Online