IBM has been expanding the functionality of the Operations Navigator client for a long time. With OS/400 V4R3 and Client Access/400 for Windows 95/NT V3R2, IBM has given us even more new features. In this article, I will look at a few of the more useful features built into the V3R2 version of Operations Navigator and show you how to use them.
Drag-and-drop Printing
Printing has been and will always be one of the most common and useful features in the world of IS. Despite all the talk of GUIs and visual languages, there will still be a demand for the printed report. As a result, there is also going to be a demand for new printer technology and tools and utilities. With the plethora of desktop clients, printing to PC and network-attached printers has become commonplace. One thing that’s been missing, though, is the ability to do drag-and-drop printing from AS/400 output queues to local or network-attached printers. This problem has been remedied with Operations Navigator V3R2.
We all know how to move a spooled file from one AS/400 output queue to another. Type in the Work with Spool Files (WRKSPLF) command, locate the spool file you want to change, place a 2 in front of it, press Enter, type in the new output queue, press Enter again, and you’re done. Whew! Do you want to send that spool file to your locally attached PC printer? That’s no problem as long as you already have it defined to your AS/400 via a Client Access/400 printer session (or some other emulation tool equivalent). If it’s not defined to your AS/400, then you’re not going to be able to get it there. This problem existed before OS/400 V4R3 and CA/400 V3R2. Now, moving spool files from one output queue to another or from your AS/400 to your PC desktop is as simple as clicking on the file to highlight it and dragging it to wherever you want it to go.
You can even move multiple spooled files at once by clicking on the first spool file in the list that you wish to move, holding down the shift key, and clicking on the last spooled file in the list you wish to move. Now the top and bottom spool files and all those between them will be highlighted. To move them as one unit, position the mouse cursor over them, hold down the left mouse button, and drag them to wherever you want them to go. When you drag a spool file from the AS/400 to your desktop, the file will be converted
to a text file (.txt), which you can then edit or print on your local or network printer. Spool file administration just got a whole lot easier. With this drag-and-drop technique, you can move AS/400 spool files from one AS/400 printer queue to another or from an AS/400 printer queue to a folder on your Windows desktop where it can be manipulated any way you want. The only caveat is that you cannot copy spool files directly to your local or network printer. You are limited to using a two-step method: copy to the Desktop to create a .txt file, then drag that text file to your printer. Still, this is a great enhancement to manipulating spool files.
Creating Shortcuts to Operations Navigator Functions
Prior to OS/400 V4R3 and CA/400 V3R2, the only way to open one of the Operations Navigator tools such as the Job Management tool was to open Operations Navigator itself. Many times, when you use a tool such as the Operation Navigator, you only use one or two of its features consistently. If you find that you’re coming back to the same functions, you may find that a shortcut to that function on the Windows Desktop may make your life simpler. For example, what if you want to monitor a specific AS/400 output queue on a consistent basis? You could leave Operations Navigator up and running with the selected output queue opened, but it’s much easier to have a shortcut to the needed queue that you can quickly access from the desktop.
To create a shortcut to any Operations Navigator function, open Operations Navigator and click and scroll until you get to the desired feature. Click once on the feature to highlight it, and, with the right mouse button held down, drag it to your Windows 9x desktop. When you release the mouse button, you will be prompted to create a shortcut. Click on Create Shortcut(s) Here, and you’ll have a fast and simple means of getting to your function.
Sending AS/400 Messages from Your PC
When you have a full-function tool such as Operations Navigator that lets you control jobs, spooled files, security, and pretty much all other AS/400 operations, it seems silly to not be able to send messages to AS/400 users from the PC. Although you’ve always been able to review messages from Operations Navigator, until now, you couldn’t send a message to an AS/400 user.
Now, sending a message to an AS/400 user ID is easy. To send a message, open Operation Navigator and click on Basic Operations. You should see the following three options: Messages, Printer Output, and Printers. Click on Messages and you will see a list of all the messages that currently exist for the user ID you logged in as.
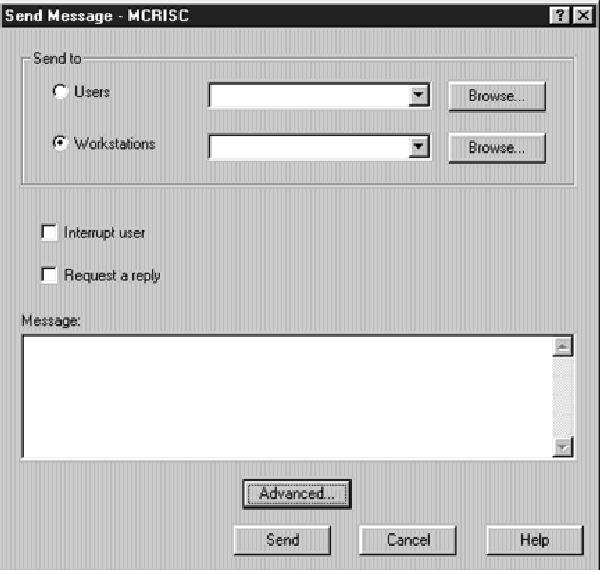
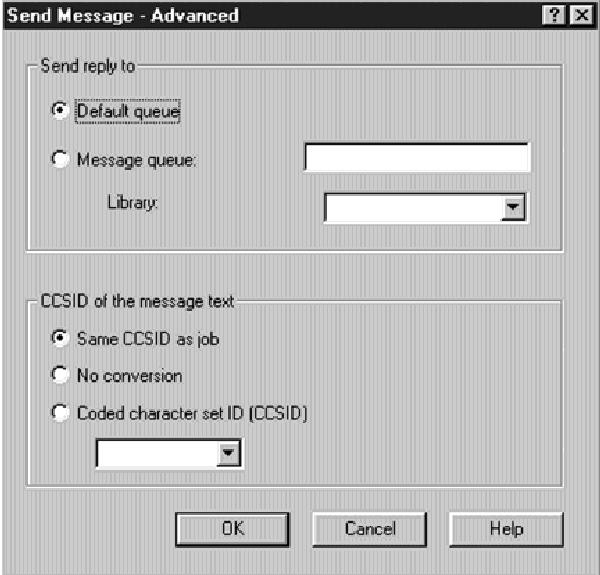
To send a message to some other user ID, right-click on the Messages option in the left panel, or right-click on any message in the right panel, and select the option Send Message that appears in the pull-down menu. You can also get to the Send Message panel by right-clicking on an AS/400 user ID under the Users and Groups option from within Operations Navigator. A panel will open like the one shown in Figure 1. From this panel, you can enter a specific AS/400 user ID or select one of the special categories from the pull- down list, e.g., All users, All signed-on users, or System Operator. You can also choose to send a message to a specific workstation instead of a user ID by clicking on the Workstation radio button and entering the workstation ID. For either of these options, if you don’t know the name (user ID or workstation), click on the Browse button next to that option and a list of all valid AS/400 user IDs or workstation names will be returned from which you can select. You can also choose whether to interrupt the user or workstation when the message is sent and whether this message requires a reply from the user or workstation. The default is to not interrupt the user or workstation and no reply is requested. Once you have entered the required parameter, which is either the user ID or the workstation ID, you can type in your message in the Message box. You can also enter more detailed message settings by clicking on the Advanced button. When you click on the button, you’ll see the Send Message - Advanced panel like the one shown in Figure 2. From this panel, you can enter the message queue that will get the message reply (if you
chose that option) as well as change the CCSID of the message text. A coded character set ID (CCSID) is a 16-bit number identifying a specific set of encoding scheme identifiers, character set identifiers, code page identifiers, and other relevant information that uniquely identifies the coded graphic representation used. You might want to change the CCSID of a message if the queue it is going to is using another CCSID than the one you are using. When you are done typing, click on the Send button to transmit your message.
Limiting Access to Operations Navigator Functions
For me, one of the most annoying features of Client Access/400 occurs during the installation process. When you install the software, you are given the option of performing a Typical install, installing to a network, or performing a Custom install. Almost without fail, folks doing the installation will select the Typical install option. In and of itself, there’s nothing wrong with this approach because it lets you install pretty much any function of CA/400 that a user will ever need. The problem is that the software that is installed with the Typical install option is often not needed or used. It is even more dangerous that Operations Navigator is installed on the user’s PC and an icon is placed on the desktop. To compound this infraction in logic, if you are using a version of CA/400 older than V3R2M0, you can’t even easily delete this icon! Normally, deleting an icon is no more complicated than right- clicking on the icon with your mouse and selecting the Delete option from the pull-down list. When you try this deletion with the older versions of CA/400 on the Operations Navigator icon, you’ll discover that the Delete option doesn’t exist. For those versions, the only way to delete an icon is to find and then delete its Registry entry. If you’ve already installed CA/400 on hundreds of machines, going back to each one to delete that icon may prove to be more trouble than it’s worth. You could just tell your users not to use that function, but we all know how far that will get you. There’s a better way.
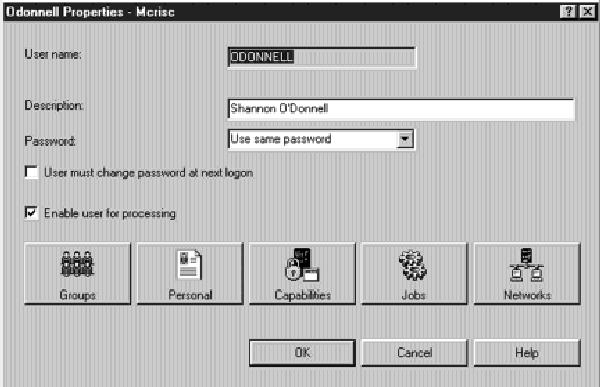
When you log on to your AS/400 using Operations Navigator and you have sufficient authority (*SECADM) in your own user profile, you can use Operations Navigator to limit what other users have access to when using this tool. To use this function, log on to your AS/400 via Operations Navigator as QSECOFR or some other profile with the necessary authority to change user profiles. From within Operations Navigator, click on the Users and Groups entry in the left pane. Double-click All Users and you will be presented with a list of all AS/400 user IDs in the right-hand pane. Locate the user profile you wish to change, right-click on it, and select Properties. You’ll see a screen like the one shown in Figure 3. Click on the Capabilities button and then click the Applications tab. Once you have opened the Applications panel, you should see a panel like the one shown in Figure 4. This is the Capabilities screen for Operations Navigator. If you don’t see this screen, click on the down arrow next to the Usage for: list and select Operations Navigator from the pull-down list.
From the Capabilities screen, you can grant or limit access to any major function of Operations Navigator. The check marks in Figure 4 denote which functions of Operations Navigator a user is authorized to use. A check mark inside a box means that you can grant or revoke access to this major function. You cannot change the check marks that are not inside a box; they are displayed to show you what subfunctionality is authorized to a user.
For example, in the list shown in Figure 4, Odonnell has authority to Operations Navigator, Basic Operations, System Configuration, and Network, as well as all the subfunctions of each major function. If I wanted to revoke this user’s ability to control or change system configurations via Operations Navigator, I would uncheck the box next to System Configuration. If I didn’t want the user to have access to any of the Operations Navigator functions, I would uncheck the box next to AS/400 Operations Navigator at the top. This is a lot easier than going out in the field to each PC and removing the Operations Navigator icon from the desktop.
Note that, although a function such as System Configuration may be checked in the Operations Navigator Capabilities window, the user is not automatically authorized to perform that function on the AS/400. OS/400 security still applies. This means that if a user
isn’t allowed to change system values because he doesn’t have the proper OS/400 security authorization, then he still won’t be allowed to change them just because he is authorized within Operations Navigator. Checking or unchecking the function in Operations Navigator only allows the user to perform this function via Navigator if he is also authorized to the same function on the AS/400.
A Whole Lot of Functionality Going On
As you can see, there is a lot of new functionality built into Operations Navigator. In fact, there’s even more available than I had room to list here, such as allowing system administrators to set which first-level (and most second-level) folders can be accessed by a user. I encourage you to explore the features of Operations Navigator on your own. The best way to learn about anything is by doing, so get out there and start exploring! For more information, check out the Client Access/400 home page at www.as400.ibm.com/clientaccess.
Figure 1: Now you can send messages to AS/400 users from Operations Navigator.


Figure 2: Use the Send Message - Advanced panel to designate an output queue to receive your message’s reply.

Figure 3: Use the user ID properties panel to set Operations Navigator Limits.
Figure 4: Revoke or grant authority to Operations Navigator from the Capabilities screen.


 Business users want new applications now. Market and regulatory pressures require faster application updates and delivery into production. Your IBM i developers may be approaching retirement, and you see no sure way to fill their positions with experienced developers. In addition, you may be caught between maintaining your existing applications and the uncertainty of moving to something new.
 IT managers hoping to find new IBM i talent are discovering that the pool of experienced RPG programmers and operators or administrators with intimate knowledge of the operating system and the applications that run on it is small. This begs the question: How will you manage the platform that supports such a big part of your business? This guide offers strategies and software suggestions to help you plan IT staffing and resources and smooth the transition after your AS/400 talent retires. Read on to learn:
LATEST COMMENTS
MC Press Online