


Client Access’ Operations Navigator (OpsNav) is IBM’s graphical interface operations manager to the AS/400 that enables its users to perform a variety of work management functions such as application administration, database management, and security configuration. In fact, there’s very little in the way of work management on the AS/400 that you can do with a green-screen interface that you cannot do with OpsNav. You can open up OpsNav even further through the use of plug-ins. A plug-in is a self-contained module that performs a specific function, which you “plug into” the OpsNav GUI. IBM has enabled plug-in development by building all the hooks to the Windows operating system for you, leaving you the comparatively simple task of just developing code for your plug-in and attaching it to those hooks.
I’m going to detail for you the process you need to go through to develop your own plug-in using Java. To use this information, you need V4R4 of both OS/400 and Client Access Express, and you need Modification 2 of the AS/400 Toolbox for Java. (This version of the Toolbox comes standard with V4R4 of OS/400.) You also need the sample plug-in code available from IBM’s Web site at www.as400.ibm.com/clientaccess/toolkit/java.htm.
Getting Started
The easiest way to learn how to build your own plug-in is to take an example and modify it to see how it works. IBM has provided three examples of OpsNav plug-ins in its sample file. When you download the file containing the plug-in sample, install it to the root (C:) directory on your PC. The downloaded file contains several folders and subfolders, beginning with the parent folder, JVOPNAV. Drill down through the C:JVOPNAV folder until you get to the C:JVOPNAV COMIBMAS400OPNAV subfolder. In this subfolder, you’ll find three additional folders labeled MessageQueueSample1, MessageQueueSample2, and MessageQueueSample3. Each of these folders contains Java code for a particular plug-in sample.
There are several steps to go through to create your own plug-in, and, when you’re first learning, they can seem quite daunting. Hang in there. You’ll find that, as you become familiar with all the pieces, they’ll soon make sense. To make things as painless as possible, though, I’ll step through the process in a somewhat logical order. I’ll first look at the basic OpsNav interface and then identify the components required for a plug-in. After
that, I’ll step through modifying the sample code. To keep things as simple as possible, I’ll use only the first sample provided by IBM, MessageQueueSample1, shown in Figure 1. This plug-in displays a list of messages for the AS/400 user profile logged in with OpsNav and lets you add new messages to and delete messages from that user’s message queue.
The OpsNav Tree
If you look at the OpsNav GUI, you’ll see that it has a treelike interface. The left-hand pane displays all the branches of the tree. When you click one of these branches to expand it, you can see the leaves of the tree. Clicking a node either displays additional leaves or displays a list of objects in the right-hand pane of the GUI. All the functions available through the OpsNav client behave in exactly the same manner. Every plug-in you create must also conform to this basic framework of the OpsNav GUI.
This means that the plug-in must provide a branch on the OpsNav tree with an icon and a description to identify itself. When the user clicks the icon with the mouse pointer, it must either expand to display leaves underneath or build a list of objects in the right-hand pane. If a user right-clicks your plug-in node on the OpsNav tree, it must have the capability of displaying a context menu and then acting on the user-selected options found there.
Indentifying the Java Pieces
To ensure that each of these steps is followed, all plug-ins are broken down into various components. When using Java to create your plug-in, you have four basic Java classes:
• List Manager—manages the list (i.e., causes a list to be built or rebuilt as items are added or deleted)
• Actions Manager—handles context menu actions, such as adding or deleting
• Object Details—extracts individual item details
• Object List Interface—logic that builds the list (which is called from the List Manager)
If your particular plug-in requires more functionality, such as the ability to add an item to the list, you’ll need to create a Java class for those functions as well.
In the sample, the components are named MqMessagesListManager. java, MqActionsManager.java, MqMessage.java, and MqMessageQueue.java. Two additional components are used to add and delete messages: MqNewMessageBean.java and MqDeleteMessageBean.java.
GUI Builder
In addition to the object classes, the sample plug-in contains a couple of Java GUI panels: one to add new messages to the list and another to confirm the deletion of messages from the list. These interface panels were designed and generated as Panel Definition Markup Language (PDML) files from IBM’s GUI Builder utility. Many Java programmers are familiar with Program Call Markup Language (PCML), which is a subset of Extensible Markup Language (XML) and was created to ease the difficulty of interfacing with legacy data and applications. PDML is designed to ease the pain of developing and using Java GUIs.
GUI Builder is a set of Java classes that comes free with Modification 2 of the AS/400 Toolbox for Java. Using GUI Builder, you can design a Java user interface very quickly. Your interface can contain text fields, list windows, trees, buttons, and, in fact, pretty much any type of GUI component you can think of. After you have developed your
GUI panels, GUI Builder generates PDML source files and (optionally) skeleton Java code and HTML documentation.
Registering Your Plug-in
In addition to Java classes and PDML files, you will find a couple of *.REG files in each Samples directory. A *.REG file is a type of file that adds keys to the Windows Registry. When you create your own plug-in, you copy these *.REG files and modify them to suit your requirements. The MsgQueueSample1.reg file contains registration information for registering the Java plug-in to Windows when that plug-in resides on the PC’s hard drive itself. You also have the option, with Client Access Express, of distributing your plug-in from the AS/400 Integrated File System (AS/400 IFS) on your AS/400.
It works like this. You load all the pieces of your plug-in code (Java classes, PDML panels, and the *.DLL files and icons used by your plug-in) into a directory in the AS/400 IFS. When the user installs Client Access Express (either for the first time or using the Selective Install option), he sees your plug-in as an installable module under OpsNav and has the option of installing it from there, making distribution of your plug-in a snap. The MsgQueueSample1Install.reg file contains the registration set you need to install the plug-in from the AS/400.
Modifying the Sample Plug-in
As mentioned, the first sample plug-in displays a list of messages from the AS/400 message queue of the person signed on through OpsNav. The plug-in displays the text of the message as well as the date and time it was received. What you’re going to do is modify the basic Java code to also display the message ID and message type. This is a pretty simple modification, but it gives you a good idea of how the pieces fit together. For this modification, you need to change only two source files: MessageQueueGUI.pdml and MqMessagesListManager.java. You change the first one using GUI Builder, and you change the other using a Java editor. IBM was kind enough to add many extra methods in the other Java classes that enable you to extract much more of the message detail information than you’ll be going after here. If you want to expand on what you’re doing here, take a look at the MqMessage.java source file. You can see all the methods available for you to access.
Modifying the PDML File
The first thing you need to do is start GUI Builder. There isn’t enough room in this article to take you on a step-by-step tour of GUI Builder and how to use it. However, you can find a very good tutorial on GUI Builder in the AS/400 Toolbox for Java documentation at www.as400.ibm.com/toolbox; refer to that to get started with GUI Builder.
When GUI Builder starts, open the MessageQueueGUI.pdml file. For the modification, the only thing you need to change is the String Table entry, so double-click this node to open it for editing. A string table in PDML is nothing more than a set of character strings you can use to display error or informational text. You’re going to use these strings as column headings.
You’re going to add two new entries to the string table that will be used as new column headings for your plug-in. The first entry is for the message ID; the second is for the message type. When you open your sample string table, you will see two entries, column.msg.col1 and column.msg.col2. Add two more entries to this sequence by clicking the Add String icon. Add the entry column.msg.col3 with the text Message ID and the entry column.msg.col4 with the text Message Type. When you’re done, your sample should look like the one in Figure 2.
Now close the String Table panel, save your file, and close GUI Builder. When you do this, GUI Builder rebuilds the MessageQueueGUI.pdml file for you. Now you
need to modify the MqMessagesListManager.java source file to use these new strings and to retrieve values to display under them for each message in the user’s message queue.
Modifying the Java Program
Since this isn’t a tutorial on how to program in Java, I won’t go into the various tools and requirements for programming in Java on your PC. I’ll assume that you know how to edit and compile a Java source file. If you’re not familiar with these processes, check the references at the end of this article for some great resources to get you started.
Once you’ve opened the MqMessagesListManager.java source file, scroll through the source until you get to the method named ColumnDescriptor. In this method, you identify to the List Manager how many columns of data your plug-in has. In the sample program, two columns are identified for you, but you need to add two more columns. To do this, you need to increase the number of elements in the array named descriptors. Look for this line:
ColumnDescriptor[] descriptors = new ColumnDescriptor[2]
Change the value in the last instance of ColumnDescriptor in this line from 2 to 4. Just underneath this line, you’ll see a couple of lines that set the value for the elements in the descriptors array. Add the following two lines to the source file, just under the last line that sets the descriptors element values:
descriptors[2] = new ColumnDescriptor(
 m_loader.getString(“column.msg.col3”), 30, 3);
descriptors[3] = new ColumnDescriptor(
m_loader.getString(“column.msg.col4”), 35, 4);
Doing this adds the two new columns to the class. Notice that the values in these columns are the same as the entries you made in the MessageQueueGUI.pdml file in GUI Builder.
Now scroll down until you find the method named getColumn-Data. Look for the following line:
sData = “”; sDataint = 0;
This variable is used to hold the numeric value of the message ID. The last thing you need to do is retrieve the values for the message ID and message type. Search for the “switch” control block in the getColumnData method. You need to add two more “case” statements to this block to get the required data. Under the last “case” block but before the “default” block, add the code shown in Figure 3 to your source file.
Msg.getID() is a method in the MqMessage Java class that retrieves the message ID from the message object on the AS/400. Msg.getType() is the method in MqMessage that retrieves the message type from the message object on the AS/400. That’s it; now you can compile the MqMessagesListManager.java source file and create the Java class.
Modifying the Windows Registry
The last thing you should be familiar with is the *.REG files. If you installed the sample source files to the C:JVOPNAV directory on your PC, you don’t need to modify anything in this file.
Just underneath it, add this line:
However, when you begin to create your own plug-ins, you need to copy these files to your new plug-in folder and modify them to fit your needs. The *.REG files can be edited with any text editor and contain some pretty good instructions on how to use them.
The last step in modifying the sample plug-in code is to register the plug-in to Windows. Double-click the MsgQueueSample1.reg file. You’ll be asked whether or not you want to add a key to the Windows Registry. Click the Yes box, and you’re done!
The Moment of Truth
Now that you’ve modified the GUI and Java source file and compiled everything, it’s time to see whether or not it all works. Open an OpsNav session on your PC and connect to your AS/400. Each time you start OpsNav, it will “scan” your AS/400 and the Windows Registry to see whether or not any new plug-ins have been added. It should find your new sample plug-in. Double-click the Java Message Queue Sample 1 node in the OpsNav GUI to display the message on the AS/400 associated with the user ID currently logged on. To see the new columns you added, scroll to the right in the right-hand pane of the resulting list. Cool, huh?
The Nasty Part
So far, you’ve worked with some pieces that any AS/400 green-screen programmer with a little Java experience should be able to handle. As new functionality and new plug-ins are developed, you may want to brush up a bit more on your Java skills, since the code can get complex very quickly. Relatively speaking, all of what you’ve done so far is fairly easy to do. If you don’t have a PC programming background, however, the next part may make you quail.
Every plug-in must have a Dynamic Link Library (DLL) file defined for it. At this point, your only choice for creating this DLL is to use a tool such as C++ or Visual Basic. Windows uses the DLL to find things such as the icons used by your plug-in as well as to determine version number and other relevant data. For the sample programs, you could get by with the DLL file that resides in the C:JVOPNAVWIN32MRI folder, but, when you create your own plug-in, you have to use one of the previously mentioned tools to create all the unique icons and DLL files for that plug-in.
Final Thoughts
The changes you’ve made to the sample plug-in are pretty minor but should give you a feel for how all these pieces fit together to create a plug-in. The best way to learn more about developing plug-ins is just to do it. For more information, visit the IBM AS/400 Information Center at www.as400.ibm.com/infocenter.
There’s no limit to what you can do with a plug-in. Creating plug-ins for the OpsNav client isn’t for the faint of heart, but, if you stick with it, you can provide your users with some rather unique functionality.
REFERENCES AND RELATED MATERIALS
• IBM AS/400 Information Center Web site: www.as400.ibm.com/infocenter
• IBM AS/400 Toolbox for Java and JTOpen Web site: www.as400.ibm.com/toolbox
• Zappie home page (includes AS/400 Java tutorials): www.zappie.net
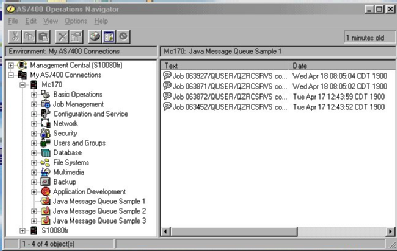
Figure 1: The MessageQueueSample1 plug-in displays message text and the date and time it was created.

Figure 2: You modify the String Table entries used by the plug-in using the GUI Builder utility.
// Get the Message ID
case 3:
sData = msg.getID();
break;
// Get the Message Type
case 4:
sDataint = msg.getType();
if (sDataint == 1)
sData = “Completion”;
if (sDataint == 2)
sData = “Diagnostic”;
if (sDataint == 4)
sData = “Informational”;
if (sDataint == 5)
sData = “Inquiry”;
if (sDataint == 6)
sData = “Sender’s Copy”;
if (sDataint == 8)
sData = “Request”;
if (sDataint == 10)
sData = “Request with Copy”;
if (sDataint == 14)
sData = “Notify”;
if (sDataint == 15)
sData = “Escape”;
if (sDataint == 21)
sData = “Reply, not validity checked”;
if (sDataint == 22)
sData = “Reply, validity checked”;
if (sDataint == 23)
sData = “Message Default Used”;
if (sDataint == 24)
sData = “System Default Used”;
if (sDataint == 25)
sData = “Reply from System Reply List”;
break;
Figure 3: Add these lines of code to the getColumnData method.


 More than ever, there is a demand for IT to deliver innovation. Your IBM i has been an essential part of your business operations for years. However, your organization may struggle to maintain the current system and implement new projects. The thousands of customers we've worked with and surveyed state that expectations regarding the digital footprint and vision of the company are not aligned with the current IT environment.
 TRY the one package that solves all your document design and printing challenges on all your platforms. Produce bar code labels, electronic forms, ad hoc reports, and RFID tags – without programming! MarkMagic is the only document design and print solution that combines report writing, WYSIWYG label and forms design, and conditional printing in one integrated product. Make sure your data survives when catastrophe hits. Request your trial now! Request Now.
 Forms of ransomware has been around for over 30 years, and with more and more organizations suffering attacks each year, it continues to endure. What has made ransomware such a durable threat and what is the best way to combat it? In order to prevent ransomware, organizations must first understand how it works.
 Disaster protection is vital to every business. Yet, it often consists of patched together procedures that are prone to error. From automatic backups to data encryption to media management, Robot automates the routine (yet often complex) tasks of iSeries backup and recovery, saving you time and money and making the process safer and more reliable. Automate your backups with the Robot Backup and Recovery Solution. Key features include:
 Business users want new applications now. Market and regulatory pressures require faster application updates and delivery into production. Your IBM i developers may be approaching retirement, and you see no sure way to fill their positions with experienced developers. In addition, you may be caught between maintaining your existing applications and the uncertainty of moving to something new.
 IT managers hoping to find new IBM i talent are discovering that the pool of experienced RPG programmers and operators or administrators with intimate knowledge of the operating system and the applications that run on it is small. This begs the question: How will you manage the platform that supports such a big part of your business? This guide offers strategies and software suggestions to help you plan IT staffing and resources and smooth the transition after your AS/400 talent retires. Read on to learn:
LATEST COMMENTS
MC Press Online