


More and more, we deal with Linux. This article provides a way to do that at your own pace.
The days of the standalone IBM i sitting in a closet are (almost entirely) long gone. While I do occasionally see a standalone box running a small business, more often it's a case of the IBM i being the central repository for enterprise data, sharing it with the outside world. One of the most common situations I run across is servers with so-called LAMP stacks: Linux, Apache, MySQL, and PHP. They provide everything from front-end web services to SQL databases for data warehousing. They often need to access the IBM i, and when they do, we're sometimes at the mercy of the Linux team when it comes to development. We get requests to provide data, but we really don't know how to test those environments. I don't know about you, but I can barely speak Apache.
Taking My LAMP on the Road
You can do a lot of the things the Linux folks do on the IBM i, either in the PASE environment or in a Linux partition. There are many experts on those topics in our community. But I found it's never quite the same; there are subtle and not-so-subtle differences between PASE and Linux, and I'm not prepared to carve out an entire Linux partition. Given that, I decided to go a different route. I decided to bite the bullet and build my own Linux server.
I have some ulterior motives for this as well; I'd like to be able to deploy my work in the cloud. I'd like to build an appliance, for lack of a better word, that can communicate with the IBM i and then be deployed on a host in the cloud, where I don't have to manage it. So how best to do that?
Well, it turns out that nowadays our personal computers, be they laptops or desktops, are more than powerful enough to host a web server. More importantly, plenty of virtualization tools exist that allow us to do it without compromising the integrity of our environment in any way. In fact, you can run a Linux server on top of any existing environment! You can be running a Windows desktop, a Mac laptop, or even a Linux client. You simply load a virtualization platform, install an operating system, and you're off to the races.
I could spend an entire article on the research I conducted when selecting the Linux distribution and the virtualization platform I would use to run it. Perhaps I'll do that another day. But in the interest of moving this article forward, I'm going to cut to the chase and give you my choice: I'm running Ubuntu version 16.04 LTS on Oracle's VirtualBox. Other options abound, including a different virtualization platform (VMWare), a different version of Ubuntu (18.04 LTS is the more current version), and even a completely different Linux, such as CentOS or Fedora. But that won't really change what we're doing.
Standing on the Shoulders of Giants
One other factor helped in my decision. There are a many how-to guides on the Internet, both written and video, for installing Linux. But after viewing a lot of them, I found Catherine Gaughan-Smith's YouTube video series from two years ago to be hands down the best available for non-Linux types (like me!). It's a series of four videos that you can see here: Part 1, Part 2, Part 3, and Part 4. In this series of articles (and there will be several!), I'm going to document what I've done while loosely following these fantastic videos. I say “loosely” because Catherine's requirements were different from what I needed, and a lot of what I'm going to be doing is identifying those differences. I hope in doing so I will help you understand in a bit more detail how those configuration options work.
The first video is 20 minutes long, and it primarily focuses on the initial installation of Ubuntu on VirtualBox. The phases of the video include downloading Ubuntu, creating a share folder (more on that in a moment), downloading VirtualBox, creating a VM, installing Ubuntu on the VM, logging in, performing basic initial operating system upgrades, and configuring SSH key files for SSH.
Please note that you could follow Catherine's videos exactly and get an Ubuntu server installed. However, she uses a Mac as her host computer and she accesses the virtual machine directly from her Mac quite a bit, using the ssh command, which isn't even available on Windows by default. Catherine instead suggests that Windows users install PuTTY. While PuTTY is an excellent terminal utility, I prefer installing the platform-independent Eclipse PDT (PHP Development Tools) because it provides so much more in the way of PHP and HTML editing. It can also be upgraded with the Remote Systems Explorer, which allows secure access to the virtual server using SFTP and SSH. I'll explain all that in a subsequent article.
A More Detailed Timeline, with Annotations
As I mentioned above, Catherine's first video goes through eight different phases (the last one being the longest and ironically the one I ended up diverging from the most).
Phase 1 runs from the beginning to approximately 1:00 and shows you how to download Ubuntu. Catherine does a very good job of explaining the basics of the Ubuntu release strategy, particularly the long-term support (or LTS) releases that come out every two years. If you were to go get the latest LTS version, you'd end up with 18.04 LTS. Catherine's videos, being two years old, use the previous version, 16.04 LTS. For a number of reasons, I stuck with 16.04 LTS. I may eventually update to the newer version, but if you want to follow along both with her videos and my articles, then I suggest you get the older version. It just so happens the Ubuntu site has a page dedicated to downloading older versions. Go to this page, and download the server version. You'll need the 64-bit version (and if that version doesn't run on your machine, then you may have hit an impasse that I don't yet have an answer for).
Phase 2 lasts about 20 seconds, until 1:20, and has to do with creating a folder to be shared between the host and the guest. I found this part to be a bit finicky, and if you plan to use Eclipse PDT like I do, you can skip it.
Phase 3 lasts another 20 seconds and directs you to download and install VirtualBox. While the version of VirtualBox has moved ahead (now on 6.0.4), it's still roughly the same process. Download the VirtualBox best suited for your machine and move ahead.
Phase 4 encompasses the remainder of the first four minutes and configures the virtual machine itself, as opposed to installing the operating system. This roughly equates to building the virtual hardware and marks my first real departure from Catherine's script. She sets her networking up to use port forwarding. To speak to her server, she uses the LOCALHOST address of 127.0.0.1 but changes the ports. For example, rather than use port 80 to communicate to the web server on the virtual machine, she chooses a different port, in this case port 8080. While that's fine for certain applications, it doesn't work for me. Instead, I configure the machine for bridged networking, in which my virtual machine actually gets its own static IP address. This is very important for my specific application because it allows multiple virtual servers to run at the same time and speak to each other using standard Internet ports. On the other hand, it requires you to use real IP addresses, and to do that on a work server you'd have to clear it with your IT infrastructure department. In my home office, where I do much of my research work, I have my own 10.xxx network, so I simply assigned my own addresses.
Phase 5 takes up the next five minutes and installs the Ubuntu operating system into the newly configured virtual machine. I follow this almost to the letter. The primary difference is the Software selection screen. There's a slight difference between what I see and what the video shows. I don't know why that difference exists, but I'll show you the options I take in a moment. The other primary difference is that Catherine names her server techbox, and I name my machine Test1.
Phase 6 lasts 30 seconds on the video to log in and check your network configuration. The big difference in this section is that I have configured the static IP address.
Phase 7 consists of two and a half minutes of updating various packages to get some additional packages you need. Some are essential, some are nice to have, but none of them hurt, so I just follow along here. In a later article, we’ll add more packages as we continue to build our development environment.
Finally, Phase 8 is the SSH setup. You can literally skip this entire section.
Going My Own Way
Throughout this article, I've identified a few places where I varied from Catherine's tutorial. In Phase 4, we create our virtual machine and I go off script to set up bridged networking as opposed to using NAT and port forwarding. The network configuration in the video goes from 2:50 to 3:35. It starts out easy; rather than configure NAT and port forwarding, instead simply select bridged networking. However, we'll have to configure our IP address manually, but we'll do that in Phase 5. Catherine also connects to the shared folder from Phase 2 here; you can just skip that part. Anyway, here's what the network configuration screen looks like on my machine (note that I'm on Windows and it looks a bit different from Catherine's Macintosh screens):
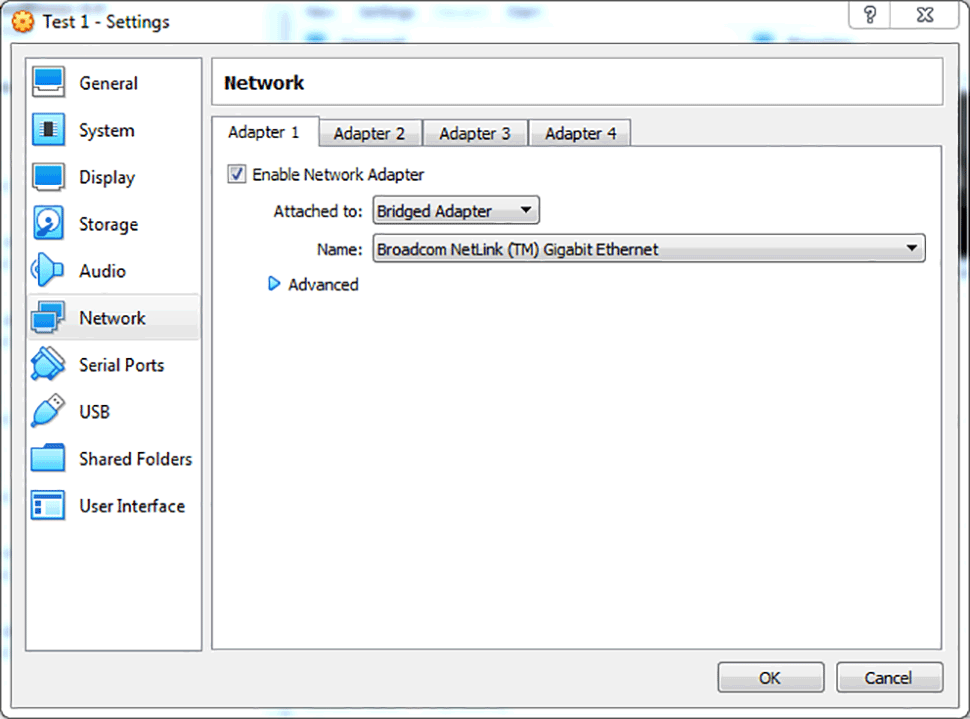
Figure 1: I configure a Bridged Adapter rather than using NAT and port forwarding.
Later, in Phase 5, I find that this installation process doesn't find my time zone. This is probably because I'm using a bridged adapter and I haven't yet configured it, so I have to manually select a time zone:
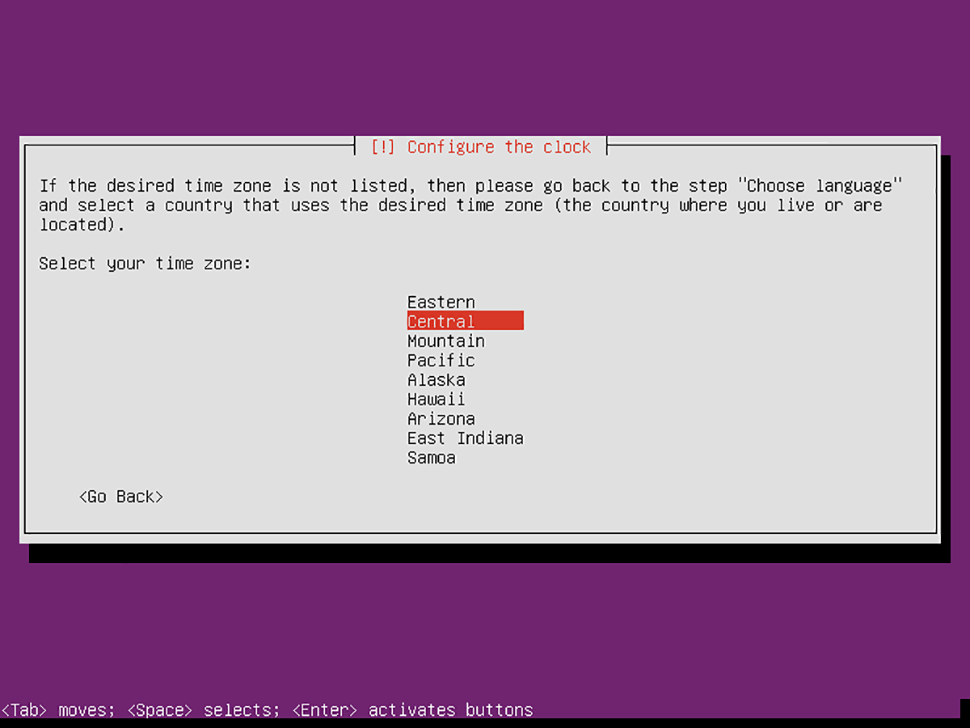
Figure 2: Manually select the appropriate time zone.
Near the middle of the process, we select the appropriate software pieces for our installation. As I noted earlier, the latest ISO image of Ubuntu seems to have a slightly different set of options than the one in the video. However, I've found the following combination of options to be successful.
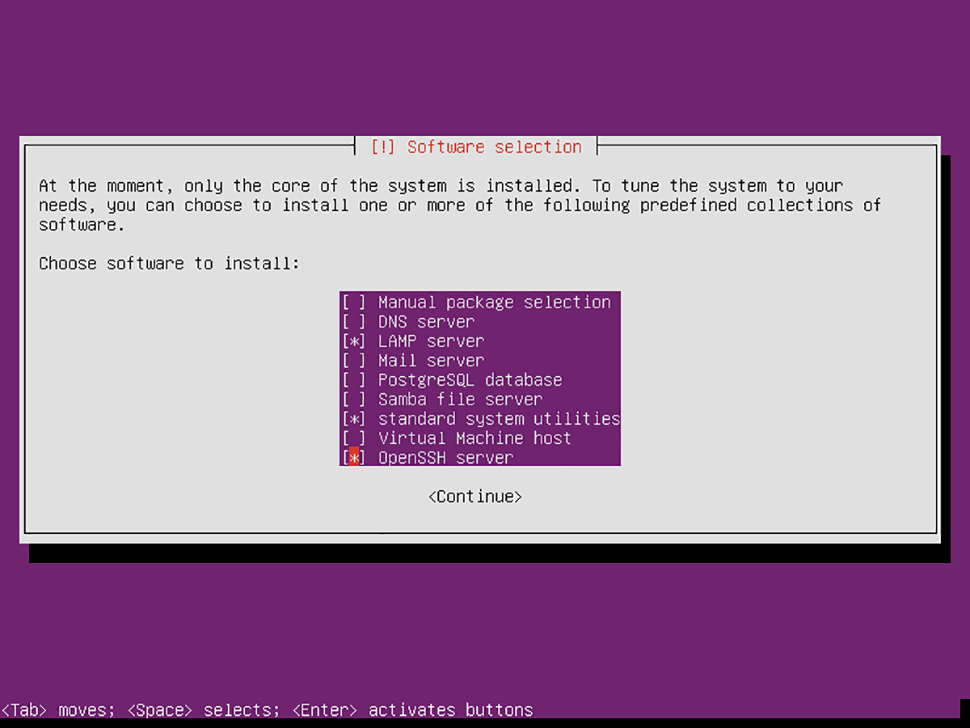
Figure 3: Use these options when installing the most current ISO image of Ubuntu 16.04 LTS.
Configuring Your Network Address
The final difference will be when you have to configure your static IP address. I'm just going to walk you through the commands. This hinges on a couple of things:
- You have an internal network, mask, and gateway.
- You can reserve one of the addresses on it for your new machine.
In my case, the internal network is 10.99.99, with a mask of 255.255.255.0 and a gateway of 10.99.99.1. If you don't understand these pieces, then you may not want to use a static address configuration and may instead want to stay with Catherine's NAT technique for the time being. But if you want a static IP, you simply have to execute a few steps.
First, log on to the machine as done in Phase 6. Take a look at your current configuration by typing the following command:
cat /etc/network/interfaces
The last few lines should look like this:
# The primary network interface
auto enp0s3
iface enp0s3 inet dhcp
This means my primary interface is named enp0s3 and it's set up for DHCP configuration. I need to change that interface to use a static IP. To do that, I have to edit the file, but I need superuser authority to do so. I use the sudoedit command:
sudoedit /etc/network/interfaces
I'm prompted for my password again, and then I edit the file. If you're unfamiliar with Linux editing, it's pretty straightforward. You can use your cursor keys to move around, and then just type in the pieces you need. Note that sudoedit invokes the current editor, which by default is nano, which in turn is a little different than other editors. For example, there's no overwrite mode in nano. Everything you type is inserted, and you have to delete the bits you no longer want. Anyway, once you've modified the file properly, it will look something like this (with your own IP address scheme in place):
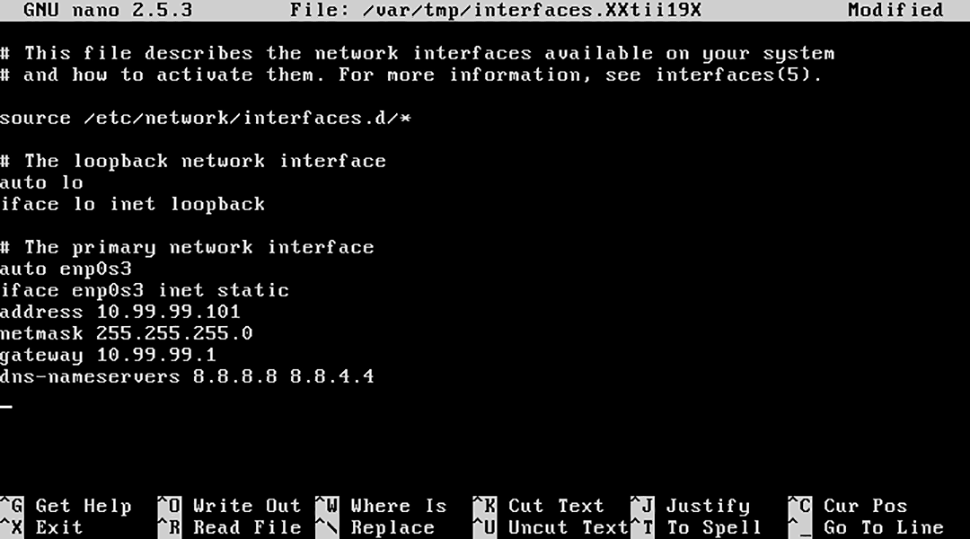
Figure 4: The interfaces file looks like this after being set up for static IP addressing in a 10.99.99 network.
Hit Ctrl+X to save the file, answering Y when prompted. The interfaces file will be overwritten, and you can boot your machine. Once it comes up, you can go to a command line in Windows and ping it:
ping 10.99.99.101
If you see ping responses, then everything has gone well and you can move on to the next step, which is configuring PDT to maintain your system. That will be covered in an upcoming article, but until then you can certainly move forward with Catherine's other tutorials. Have fun!

Joe Pluta is the founder and chief architect of Pluta Brothers Design, Inc. He has been extending the IBM midrange since the days of the IBM System/3. Joe uses WebSphere extensively, especially as the base for PSC/400, the only product that can move your legacy systems to the Web using simple green-screen commands. He has written several books, including Developing Web 2.0 Applications with EGL for IBM i, E-Deployment: The Fastest Path to the Web, Eclipse: Step by Step, and WDSC: Step by Step. Joe performs onsite mentoring and speaks at user groups around the country. You can reach him at
MC Press books written by Joe Pluta available now on the MC Press Bookstore.
 |
Developing Web 2.0 Applications with EGL for IBM i Joe Pluta introduces you to EGL Rich UI and IBM’s Rational Developer for the IBM i platform. List Price $39.95 Now On Sale
|
|
 |
WDSC: Step by Step Discover incredibly powerful WDSC with this easy-to-understand yet thorough introduction. Now On Sale
|
|
 |
Eclipse: Step by Step Quickly get up to speed and productivity using Eclipse. Now On Sale
|

 More than ever, there is a demand for IT to deliver innovation. Your IBM i has been an essential part of your business operations for years. However, your organization may struggle to maintain the current system and implement new projects. The thousands of customers we've worked with and surveyed state that expectations regarding the digital footprint and vision of the company are not aligned with the current IT environment.
 TRY the one package that solves all your document design and printing challenges on all your platforms. Produce bar code labels, electronic forms, ad hoc reports, and RFID tags – without programming! MarkMagic is the only document design and print solution that combines report writing, WYSIWYG label and forms design, and conditional printing in one integrated product. Make sure your data survives when catastrophe hits. Request your trial now! Request Now.
 Forms of ransomware has been around for over 30 years, and with more and more organizations suffering attacks each year, it continues to endure. What has made ransomware such a durable threat and what is the best way to combat it? In order to prevent ransomware, organizations must first understand how it works.
 Disaster protection is vital to every business. Yet, it often consists of patched together procedures that are prone to error. From automatic backups to data encryption to media management, Robot automates the routine (yet often complex) tasks of iSeries backup and recovery, saving you time and money and making the process safer and more reliable. Automate your backups with the Robot Backup and Recovery Solution. Key features include:
 Business users want new applications now. Market and regulatory pressures require faster application updates and delivery into production. Your IBM i developers may be approaching retirement, and you see no sure way to fill their positions with experienced developers. In addition, you may be caught between maintaining your existing applications and the uncertainty of moving to something new.
 IT managers hoping to find new IBM i talent are discovering that the pool of experienced RPG programmers and operators or administrators with intimate knowledge of the operating system and the applications that run on it is small. This begs the question: How will you manage the platform that supports such a big part of your business? This guide offers strategies and software suggestions to help you plan IT staffing and resources and smooth the transition after your AS/400 talent retires. Read on to learn:
LATEST COMMENTS
MC Press Online