


"America: the only country in the world where failing to promote yourself is regarded as being arrogant."
--Garry Trudeau
OK, the quote isn't 100% pertinent this month. But honestly, how often do we get to quote the creator of Doonesbury?
It's not completely unrelated, though. This article is about promotion. It's about promoting an application from WDSci to WebSphere Express. In it, you'll see where the strengths of the EAR model lie. In a later column, I'll present the issues surrounding change deployment, and that's where you'll see the weaknesses.
This is an example column. You'll be able to actually perform the steps I have here using the supplied code. However, there are a few prerequisites. You'll need to have WDSci on your PC and WebSphere Express on your iSeries. Most importantly, you're going to need to be able to map a drive to your iSeries. You can do all the following steps using FTP, but I highly recommend mapped drives. At the same time, mapped drives may pose certain security and management difficulties, so please consult with your security officer.
In this column, I'll cover...
1. Prerequisites, including a typical drive mapping
2. Installation, Phase 1: Importing the included EAR file into WDSci
3. Installation, Phase 2: Exporting the EAR file to the IFS
4. Installation, Phase 3: Installing the EAR file into WebSphere Express
5. Running the application
Prerequisites
As I said, you must have WDSci loaded on your PC. You'll need at least a passing familiarity with Eclipse to use WDSci. You should also understand the basic concepts of Web application design, including HTML, servlets, JavaServer Pages (JSPs), and JavaBeans. This is not entirely necessary, however; the included EAR file has all the pieces you need.
You must have WebSphere Express loaded and running on your iSeries, and you must have access to the administration interface (normally located on port 2001 of your server).
Finally, you must be able to map a drive to your iSeries with write authority. My personal preference is to map drive Q: to the folder /QIBM on the IFS. This prevents direct access to the root folder (and thus the entire machine) yet still gives you the ability to update not only the UserData folder, which holds all of your application information, but also the ProdData folder, which contains the various runtime properties of WebSphere.
Installation
In this section, you will install an application into WebSphere Express. Applications are typically delivered as EAR or WAR files; in this case, you'll be using an EAR file. In the standard J2EE environment, you would only need to copy the EAR to the IFS and then install it. However, in a real-world production environment, you need to make changes, so I'm going to show you how to import the application into WDSci, export it to the IFS, and finally, install it into WebSphere Express. If this were an in-house development project, you would skip the import step. You would create and test the application in WDSci and then export and install it.
Phase 1: Importing
Loading the EAR file is very easy. First, download the included EAR file into a temporary directory on your PC (I use c: mp). Then, start up WDSci, and in the Web perspective, execute the menu option File/Import. You'll see a prompt panel like the one in Figure 1; fill it out appropriately to import the Test1.ear file.
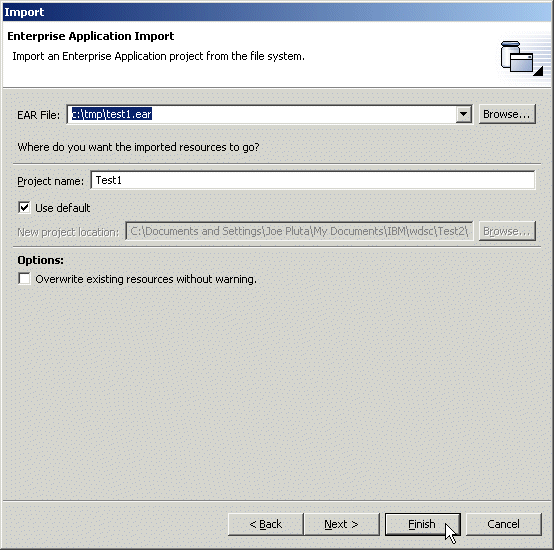
Figure 1: This is the Import wizard. Fill in the fields as shown. (Click images to enlarge.)
You've just created a project named Test1. If you look inside Test1 by expanding some of the components, you'll see a layout like the one in Figure 2. (To get this exact structure, expand Test1Web and then expand Web Content.)
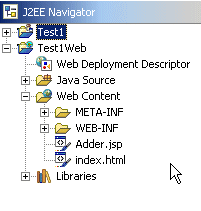
Figure 2: This is the layout of the Test1 EAR file.
This application has a number of components. If you look inside a little more, you'll see an index page (index.html), a control servlet (Adder.java), a data bean (AdderBean.java) and a presentation JSP (Adder.jsp). These are all the components required for this very simple application.
Phase 2: Exporting
Exporting is also a simple step, provided you've created the drive map to Q: as I suggested in the prerequisites section. You'd start at this step if you were creating your own in-house application. Well, you wouldn't start here. You would have already created your application in WDSci and tested it using the appropriate test environment(s). Having done that, you would then be ready to deploy the application to the iSeries, and that process starts with this step.
You'll need a scratch folder in the IFS. On my machine, I've created a folder called WarsNEars under /QIBM/UserData. To export, make sure the Test1 project is selected, then execute File/Export from the main menu bar. The first panel of the Export wizard asks for the type of export; select EAR file and press the Next button. The second panel of the wizard will appear. Fill it out as shown in Figure 3 and press Finish.
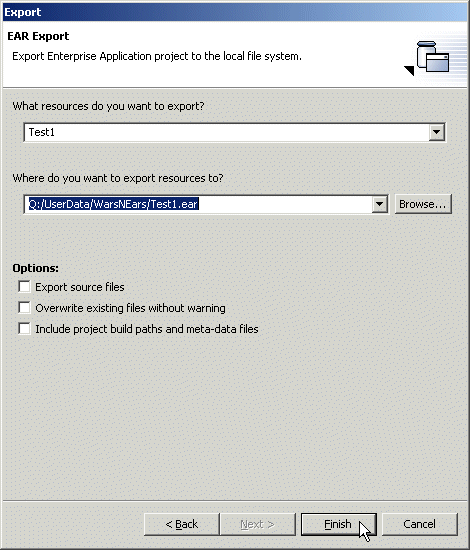
Figure 3: Here are the settings to export the EAR file to the IFS.
Note that all the Options flags are unchecked. This simply means you won't be sending your Java source files or any of the other pieces required for building your application. This is normal when deploying an application to production.
Phase 3: Installing
This bit is a little trickier, and it assumes that you have some knowledge of WebSphere Express. I'm going to expect that you have the ability to create and configure a new WebSphere Express server as well as install a new application. In my case, I created a new Express server called TEST1, with an associated HTTP server TEST1. I decided to let this particular instance use port 30000 for HTTP and 30001-30012 for the Web application server to make sure it didn't collide with any of my other applications.
(Note: If you're not acquainted with the various steps involved in creating a WebSphere Express Server, see the sidebar at the end of this article.)
Now, assuming you have a Web application server set up like mine, you can now install the application. Like creating a WebSphere Express Server, installing a new application makes use of a "wizard" from the Web-based HTTP administration configuration tool. Located at http://yourmachine:2001, this tool is used to create and manage all of your HTTP and Web application servers. The index screen is shown in Figure 4.
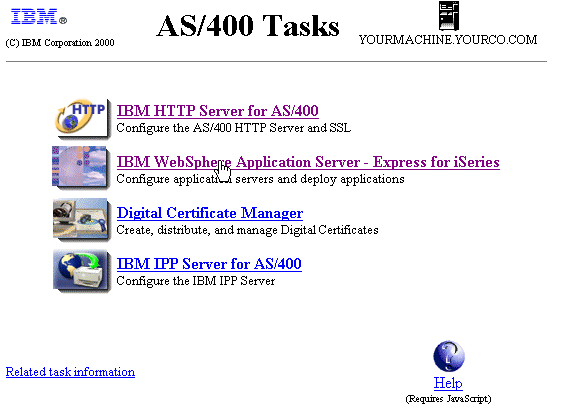
Figure 4: This is the Web interface for HTTP administration.
Select the option for IBM WebSphere Application Server - Express for iSeries to get to the WebSphere Express management page. Click on the Manage tab and then use the drop-down list to select your newly created WebSphere Express Server instance, as shown in Figure 5.
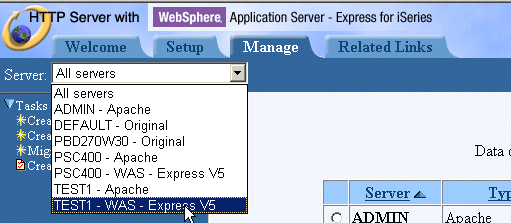
Figure 5: This drop-down list allows you to select a specific HTTP or web application server.
You should now be at the page shown in Figure 6.
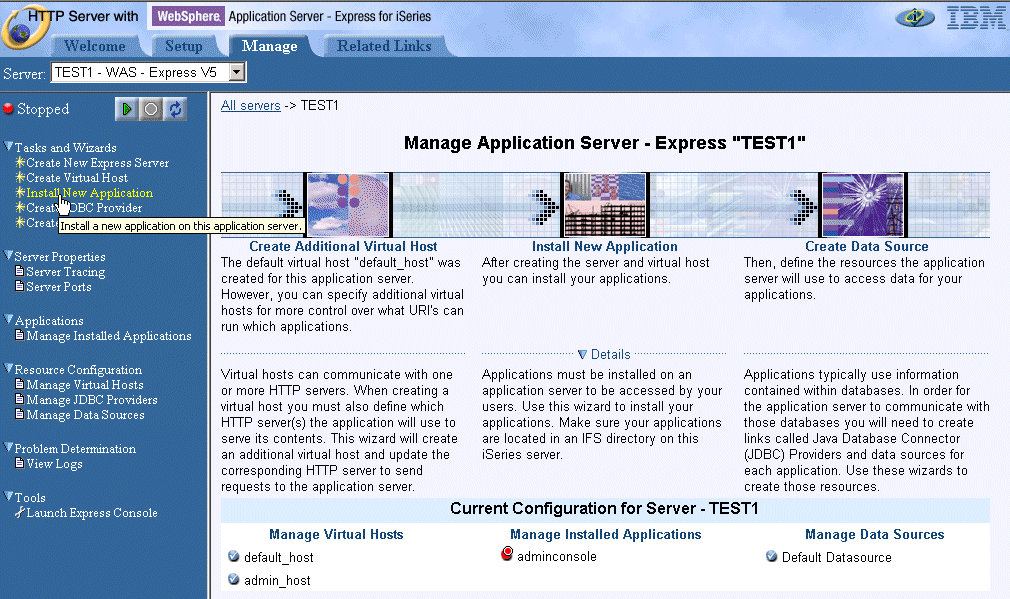
Figure 6: Select the Install New Application option from the left navigation bar.
Select the left navigation link for Install New Application. This will begin the application installation wizard. Figures 7 through 10 will guide you through that process. To summarize, you will install the application you exported in Phase 2. You'll install it in the newly created TEST1 server, using the default host (you can create other virtual hosts, but that's outside the realm of this discussion).
The screen in Figure 7 shows the location to which you exported the EAR file in Installation Phase 2. You can use the Browse button to search the IFS if you're not quite sure where the file is or if you just don't want to type the whole thing. IBM has provided a very nice IFS browsing widget.
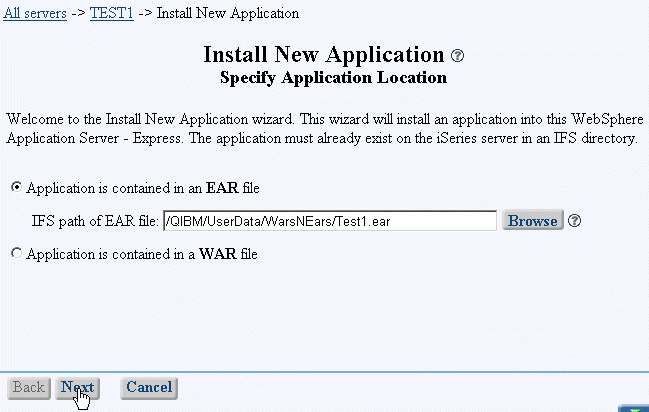
Figure 7: Enter the IFS path of your EAR file.
The panel in Figure 8 allows you to select the application name, which you can use to later manage the application. This is the name that will show up in the installed applications list when you manage this server. The application name does not have to be the same as the server name; it just happens to be that way in this case because I'm too lazy to come up with a cute, meaningful name.
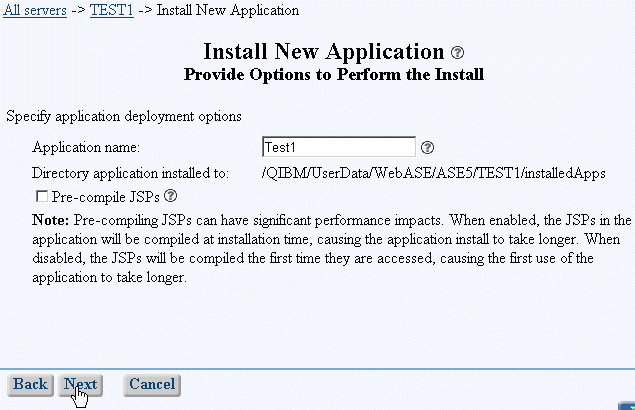
Figure 8: The defaults on this page are fine. Hit Next.
The Pre-compile JSPs option is important, but not for a tiny application like this. On a really large application, the Pre-compile option can take a very long time, but it will save you a little in your initial startup time. That's because normally a JSP is not compiled until the first time it is invoked.
However, the JSP is compiled once it is invoked the first time, so while that initial user may see a delay, others don't. In my environment, I always test a new JSP anyway, so the precompile step isn't a big deal. As time goes on, you'll make the decision yourself based on experience.
There are normally only two choices on the next screen (shown in Figure 9)--admin_host and default_host. You can add others, but that's a pretty advanced configuration. In the basic configuration like this, you'll probably always use the default_host option.
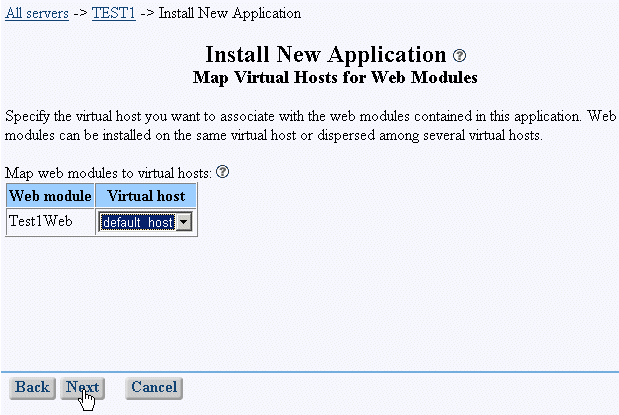
Figure 9: Defaults are fine on this page too.
Figure 10 gives you the opportunity to check your values before you press Finish.
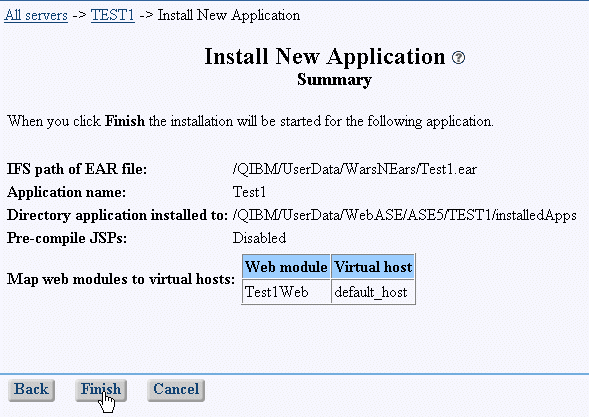
Figure 10: Make sure the values are correct (they should be!) and press Finish.
That's really all there is to installing an application. It's not that difficult, and as long as it's not something you do very often, it doesn't take very long. However, if you need to make a change, you will have to execute most of these steps again. You'll need to stop the server, uninstall the existing application, install the new version, and restart the server. Depending on your machine, this could take 20 minutes or more, and during that entire time, your application is down. That really makes incremental deployment difficult.
Running the Application
In an upcoming column, I'll discuss ways to get around that particular issue. But for now, you should probably test your application to be sure you executed all the procedures properly. First, start the server. You can use the admin page that you saw briefly in Figure 5. Remember to start not only your Web application server instance, but also the associated HTTP server.
After those have both started, you can then attempt to bring up the application. Use the following URL: http://yourmachine.com:30000/Test1Web. You'll see a page like the one in Figure 11.
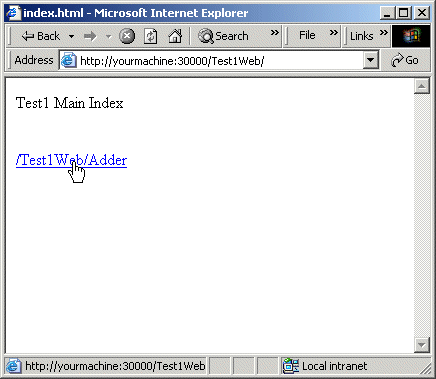
Figure 11: Be sure to use port number 30000 to invoke your application.
The application's name is Test1Web. You haven't seen that particular ID before now, although you could have found it by examining the Web application definition. You can do this either in WDSci or by using the WebSphere Express Administration Console, but that's not the focus for this article.
By invoking just the application, you will automatically be routed to index.html. This information is also in the EAR definition. The index.html page has just a simple title and a link to the Adder servlet. Click on that link to invoke the servlet. You'll see the page shown in Figure 12.
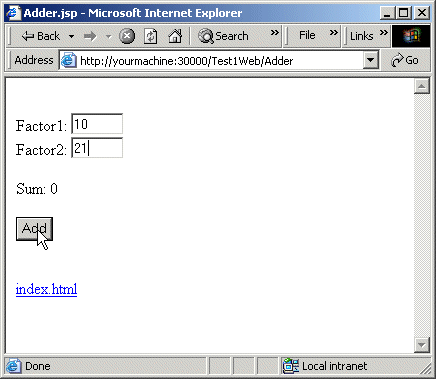
Figure 12: This is the Adder.jsp page, after a little data entry on my part.
The servlet fills the JavaBean (AdderBean) with data and then passes it to the JSP page Adder.jsp, which when viewed in the browser, looks like Figure 12. Well, actually, the first time through, the values for Factor1 and Factor2 are zero; Figure 12 shows the screen after I've entered a couple of values but before I've hit the Add button. After hitting Add, the page looks like Figure 13.
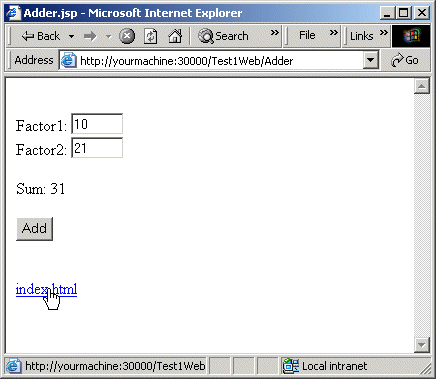
Figure 13: This page shows the result of the Adder application. The two values are added together.
Figure 13 shows the final result. What happened was that the servlet took the values from the form and then stored them in the AdderBean object. It then invoked the Adder.jsp page again to show the results.
Hitting the index.html link as shown will take you back to the index page of Figure 11.
Wrapping Up This Article
That's really all there is to deployment. This example walked you through all the required steps. Now, we have a common ground from which to work in future columns. In my next column, I plan to do some comparisons between WebSphere Express and Tomcat, but in the very near future, I'd like to cover the issue of deploying changes. If this topic is important to you, please let me know.
Joe Pluta is the founder and chief architect of Pluta Brothers Design, Inc. He has been working in the field since the late 1970s and has made a career of extending the IBM midrange, starting back in the days of the IBM System/3. Joe has used WebSphere extensively, especially as the base for PSC/400, the only product that can move your legacy systems to the Web using simple green-screen commands. Joe is also the author of E-Deployment: The Fastest Path to the Web and Eclipse: Step by Step. You can reach him at
Sidebar: Creating a New WebSphere Express Server
Even if you haven't done it before, it's pretty simple to create a new Express server. First, you log on to your HTTP administration instance, which is normally located at http://yourmachine:2001. Next, you select the option for IBM WebSphere Application Server - Express for iSeries. That brings you to the WebSphere Express configuration panel. On the left navigation bar is an option to Create New Express Server. The rest of the figures here show you the settings I used to create my server. Your settings may vary.
The settings shown here create a Web application server called TEST1 using a dedicated HTTP server (also called TEST1), running on port 30000. I won't go into detail for each of these settings, but they basically try to ensure that your new Web application server won't collide with anything else. I also didn't include any example applications (step 5).
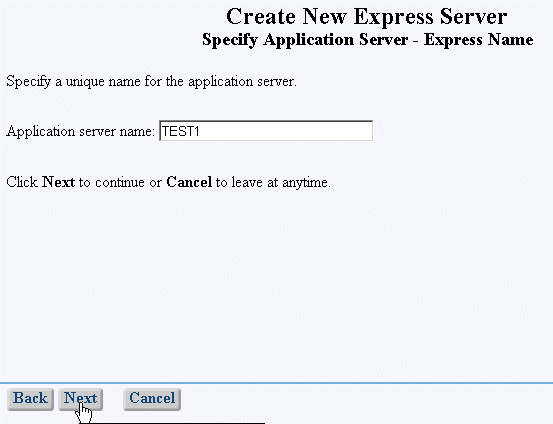
Step 1: Name the Web application server TEST1.
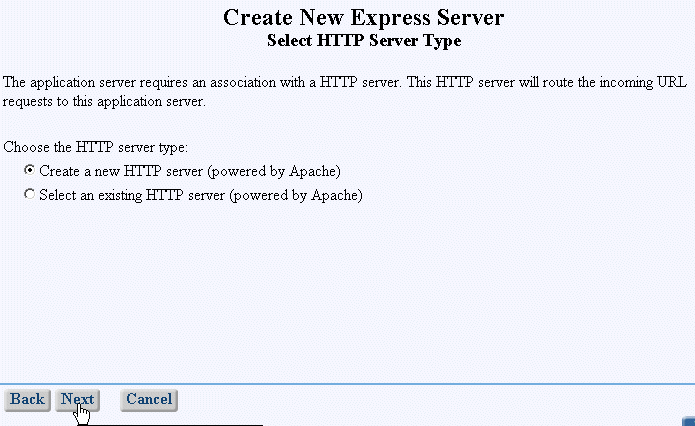
Step 2: Create a new HTTP server for this Web application server.
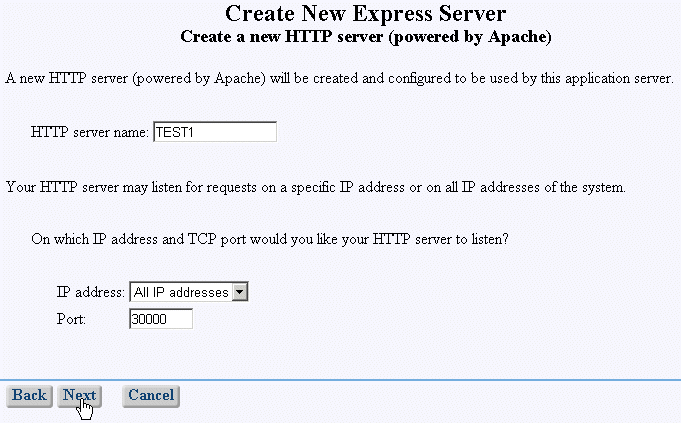
Step 3: Name the HTTP server TEST1, too, and use port 30000.
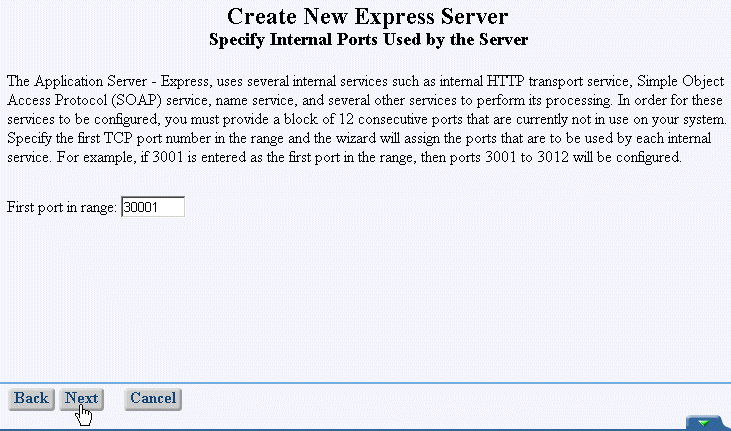
Step 4: Configure the Web application server to use ports 30001 through 30012.
Note: This configuration uses ports 30001-30012, not 3001-3012 as in the wizard's example.
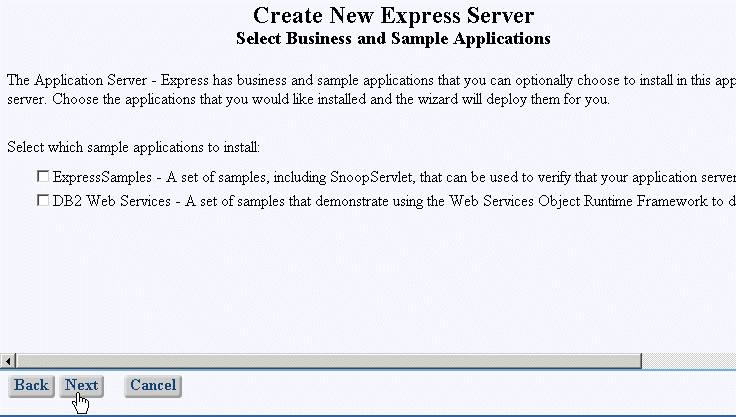
Step5: Don't include any example applications (make sure the checkboxes are unchecked).

Step 6: You've specified everything, so hit Finish to create the servers (Web and HTTP).
--Joe Pluta

Joe Pluta is the founder and chief architect of Pluta Brothers Design, Inc. He has been extending the IBM midrange since the days of the IBM System/3. Joe uses WebSphere extensively, especially as the base for PSC/400, the only product that can move your legacy systems to the Web using simple green-screen commands. He has written several books, including Developing Web 2.0 Applications with EGL for IBM i, E-Deployment: The Fastest Path to the Web, Eclipse: Step by Step, and WDSC: Step by Step. Joe performs onsite mentoring and speaks at user groups around the country. You can reach him at
MC Press books written by Joe Pluta available now on the MC Press Bookstore.
 |
Developing Web 2.0 Applications with EGL for IBM i Joe Pluta introduces you to EGL Rich UI and IBM’s Rational Developer for the IBM i platform. List Price $39.95 Now On Sale
|
|
 |
WDSC: Step by Step Discover incredibly powerful WDSC with this easy-to-understand yet thorough introduction. Now On Sale
|
|
 |
Eclipse: Step by Step Quickly get up to speed and productivity using Eclipse. Now On Sale
|


 More than ever, there is a demand for IT to deliver innovation. Your IBM i has been an essential part of your business operations for years. However, your organization may struggle to maintain the current system and implement new projects. The thousands of customers we've worked with and surveyed state that expectations regarding the digital footprint and vision of the company are not aligned with the current IT environment.
 TRY the one package that solves all your document design and printing challenges on all your platforms. Produce bar code labels, electronic forms, ad hoc reports, and RFID tags – without programming! MarkMagic is the only document design and print solution that combines report writing, WYSIWYG label and forms design, and conditional printing in one integrated product. Make sure your data survives when catastrophe hits. Request your trial now! Request Now.
 Forms of ransomware has been around for over 30 years, and with more and more organizations suffering attacks each year, it continues to endure. What has made ransomware such a durable threat and what is the best way to combat it? In order to prevent ransomware, organizations must first understand how it works.
 Disaster protection is vital to every business. Yet, it often consists of patched together procedures that are prone to error. From automatic backups to data encryption to media management, Robot automates the routine (yet often complex) tasks of iSeries backup and recovery, saving you time and money and making the process safer and more reliable. Automate your backups with the Robot Backup and Recovery Solution. Key features include:
 Business users want new applications now. Market and regulatory pressures require faster application updates and delivery into production. Your IBM i developers may be approaching retirement, and you see no sure way to fill their positions with experienced developers. In addition, you may be caught between maintaining your existing applications and the uncertainty of moving to something new.
 IT managers hoping to find new IBM i talent are discovering that the pool of experienced RPG programmers and operators or administrators with intimate knowledge of the operating system and the applications that run on it is small. This begs the question: How will you manage the platform that supports such a big part of your business? This guide offers strategies and software suggestions to help you plan IT staffing and resources and smooth the transition after your AS/400 talent retires. Read on to learn:
LATEST COMMENTS
MC Press Online