


Whether you simply want to add your AS/400 to an internal network to take advantage of TCP/IP connectivity or you want to harness the power of Internet technology, IP connectivity on the AS/400 is easy and straightforward. This article will provide an overview of the basic steps needed to configure TCP/IP on the AS/400 as well as go over the basic services and commands that are available.
Getting Started
While TCP/IP is a no-charge licensed program on the AS/400, it must be installed separately from the OS/400 installation media. Most shops install TCP/IP services as a normal part of an operating system upgrade or new system installation. To find out if you have the TCP/IP services installed on your AS/400, use the Go to Work with Licensed Programs menu (GO LICPGM) command on your system. For V4R2, this is program number 5769TC1-TCP/IP. From the Licensed Programs menu, select option 10, Work with Licensed programs, and then scroll through the resulting list to locate the program. If you don’t see it in this list, then it’s not installed, and you’ll need to install it from the installation media that came with your AS/400. Generally, this consists of several CDs containing your Licensed Internal Code and other licensed programs. (See OS/400 TCP/IP Configuration and Reference, SC41-5420-03, for details.) Once TCP/IP services have been installed, configuring your AS/400 for the basic services is a snap. The Configure TCP/IP (CFGTCP) command will get you to the main TCP/IP configuration menu. From here, you will need to do the following:
• Configure your communication line
• Configure your interface
• Set up your routes
• Assign domain names
• Assign host table entries (this may be optional)
• Activate TCP/IP and verifying services
Configuring Your Communications Line
Depending on your installation, this step may have already been performed. To verify your communication resource, use the Work with Hardware Resources (WRKHDWRSC *CMN) command. This will show you the resource associated with your LAN adapter.
From here, you will need to use a “create line” command such as Create Line Description (Ethernet) (CRTLINETH) or Create Line Description (Token-Ring) (CRTLINTRN) to create an Ethernet or Token-Ring line description for the resource you identified in the WRKHDWRSC command.
Configuring Your Interface
Option 1 on the CFGTCP menu is used to configure your interface. This is a logical interface that associates the direct connection to your AS/400 line description. Figure 1 shows an example of how to add a TCP/IP interface using option 1 from the Work with TCP/IP Interfaces panel. The key parameters in Figure 1 include the following:
• Internet address—Enter your IP address here. This address is provided by your Internet service provider (ISP) if you are connecting to the Internet. If you do not have an assigned IP address, use the standard 10.x.x.x configuration, which is reserved for private networks that do not use the Internet. In the latter situation, “x.x.x” is internally defined by your shop to create unique addresses for devices in your intranet or private network.
• Subnet mask—Enter the IP subnet mask here. A subnet mask is used for separating a network into more controllable portions called subnets. Entering a value of 255.0.0.0 would indicate that your entire available address space is on the same network. If you have a network administrator, you may need to verify this.
• Line description—Enter the name of the line description over which you will be running TCP/IP. The Work with Line Descriptions (WRKLIND) command can be used to determine the line description name as it is configured on your AS/400. When reviewing this, look for a line description type of *ELAN (for Ethernet networks) or *TRLAN (Token-Ring networks).
Setting Up Your Routes
Use option 2 on the CFGTCP menu to set up your TCP/IP routes. See Figure 2 for an example of the Add TCP/IP Routes panel. You can add up to 8 “default” routes that are used to route data being sent to a remote destination (IP address) that does not have a route defined. When adding a new default route using option 1 on Work with TCP/IP Routes, the key parameters are as follow:
• Route destination—Enter *DFTROUTE here.
• Subnet mask—This should be *NONE. Subnets are not used when defining a default route definition.
• Type of service—Enter *NORMAL. This parameter applies to data delivery methods, and what you enter here can impact throughput, delays, and reliability.
• Next hop (IP address)—If you are forwarding packets to other networks, enter the IP address of the router or bridge that you want them forwarded to.
Assigning Host Table Entries
You can now use option 10 on the CFGTCP menu to set up your host table entries. The host table is used to translate between host names (e.g., www.midrangecomputing.com) and host addresses (e.g., 207.212.90.2). You can use it in lieu of or in conjunction with a DNS server. It is optional if you are on a network that has Domain Name System (DNS) or your ISP provides this. Use this option to enter the IP and host names of all the hosts on
the network you want to communicate with. This can be an important step if you want to give meaningful “shortcut” names to the cryptic TCP/IP addresses on your network.
Assigning Domain Information
You can now use option 12, Change TCP/IP domain information, on the CFGTCP menu to set up your domain information. This is an important step that allows you to give a meaningful name to your AS/400 and to specify DNS servers to use. A DNS server is a centralized system that TCP/IP computers refer to when they need to translate between host names and host addresses. Think of DNS servers as centralized host tables. The AS/400 can be a DNS server. It can also use other DNS servers on the network or on the Internet. See Figure 3 for an example of the Change TCP/IP Domain screen. If your AS/400 is going to be part of an Internet connection, these parameters are (or need to be) registered with the various organizations that control this process; your ISP can set up and establish them. Here are some guidelines for setting up your domain:
• Host name—This can be the same name as your system but does not have to be. This parameter should be something meaningful and unique (NYCAS400, for example).
• Domain name—This is where you give your company the dot-com name (for example, mycompany.com).
• Host name search priority—According to the online documentation, you should enter *REMOTE here unless you have IP addresses that are not registered with the DNS or you have no DNS server on the network. In the latter case, enter *LOCAL here and specify the IP addresses using option 10 on the CFGTCP menu. However, since this is just the “search priority,” you should probably enter *LOCAL here so that local host table names take precedence over DNS entries. This should allow the override of duplicate names to be controlled via the hosts table.
• Internet address—This parameter refers to the IP address of remote DNS servers that may be attached to your network. You can specify up to three.
Starting TCP/IP and Verifying Services
Entering the Start TCP/IP (STRTCP) command will start the subsystem QSYSWRK and job QTCPIP. This, in turn, will automatically start all interfaces configured with AUTOSTART set to *YES when you set up your TCP/IP interfaces using option 1 on the CFGTCP menu, Work with TCP/IP interfaces. Remember that TCP/IP activation may take a few minutes. Once it is started, you can verify that it is operating correctly on your AS/400 by using PING or Verify TCP/IP Connection (VFYTCPCNN) from a command line. Verification can be done in three easy steps by entering the following commands:
• PING LOOPBACK—Verify that the IP layer is operational on the local system.
• PING ‘xxx.xx.xx.xx’—Replace the xxx.xx.xx.xx with the TCP/IP address you assigned to the AS/400 in the first step. This will verify that the network adapter is working on the local system.
• PING (host name)—The host name was assigned when you assigned domain information. This will verify that your network is operational!
AS/400 Services
A wealth of services are provided to you once you have configured your TCP/IP connection. You can review and configure most of these services from option 20 on the
CFGTCP menu, Configure TCP/IP applications. The following is a brief overview of the most popular connectivity services, protocols, and utilities available:
• Telnet—This application allows you to establish virtual terminal sessions with the AS/400. This can also be used to establish an interactive session on a remote host. The most common types of Telnet in the AS/400 world are 5250 or 3270 (mainframe) emulation sessions. A PC attached to the network can configure a 5250 terminal session using any of the large number of Telnet clients available. (See the Midrange Computing Yellow Pages at www.midrangecomputing. com for a list.) By using the Start TCP/IP TELNET (STRTCPTELN) command from a terminal on the AS/400, you can also establish sign-on to a remote system. To allow virtual devices to connect to your AS/400, the system value QAUTOVRT (Auto Configure Virtual Devices) must initially be set to 1 to allow virtual devices to be created.
• FTP—This service will allow you to transfer files between two TCP/IP systems. FTP can be used to PUT or GET, so transfer can be bidirectional.
• SMTP—By setting up routing entries in a SNADS system distribution directory, you can use Simple Mail Transfer Protocol (SMTP) to send mail between your remote hosts and the AS/400. Use this service to send messages, notes, and text documents. Check out the article “Email: The AS/400’s Unsung Hero” in the November 1999 issue of MC for more information on configuring your AS/400 as an email server.
• HTTP—This will allow local or remote browsers to access objects (files) from AS/400 file systems. These can include index directory files, video, Java, graphics, and audio. With Common Gateway Interface (CGI), Net.Data JavaServer Pages (JSPs), and other methods, this function also integrates nicely with DB2/400 using SQL to create interactive Web applications.
• DHCP—Dynamic Host Configuration Protocol allows you to configure your AS/400 as a DHCP server and helps manage and automate TCP/IP configuration tasks over the entire network.
• BOOTP—This is the AS/400 Bootstrap Protocol, which enables central administration of TCP/IP clients. This includes a server looking up the hardware address for a client as well as other configuration information. This protocol was developed for clients without media, such as the IBM Network Station (see D. Ellis Green’s “Automate TCP/IP Addressing with BOOTP” in the August 1998 issue of MC).
• POP—This allows the AS/400 to act as a POP3 server for clients that use the POP3 mail protocol. This also includes the support of Multipurpose Internet Mail Extension (MIME) between OfficeVision/400 and POP clients that use the AnyMail/400 Mail Server Framework.
• LPR/LPD—Line Printer Requester (LPR) and Line Printer Daemon (LPD) allow printing from/to the AS/400 and remote systems and TCP/IP printers. By using the Send TCP/IP Spooled File (SNDTCPSPLF) command or by setting up a remote OUTQ, you can print an AS/400 spool file using LPR/LPD.
• REXEC—This protocol allows the running of commands on a remote system from the AS/400, including non-AS/400 systems running an REXEC server. See the CL command Run Remote Command (RUNRMTCMD) for more information on this protocol.
TCP/IP Commands
See Figure 4 for an overview of most of the available TCP/IP commands to get to the various TCP/IP services and administration functions you will need to manage TCP/IP on the AS/400. In most cases, you simply need to remember the command GO TCPADM to get to the TCP/IP administration main menu. Keep in mind that, if you’re on V4R2 or later, you can use Operations Navigator, shipped with Client Access, to configure and administer your TCP/IP connections. This will provide quick and easy configuration wizards to help you get started.
As you can see, the configuration of a basic TCP/IP connection on your AS/400 is not too difficult. Because of the tremendous popularity of TCP/IP on the AS/400, you will find a tremendous amount of resources and literature already available (from IBM, on the Internet, and in back issues of Midrange Computing) to expand your TCP/IP knowledge.
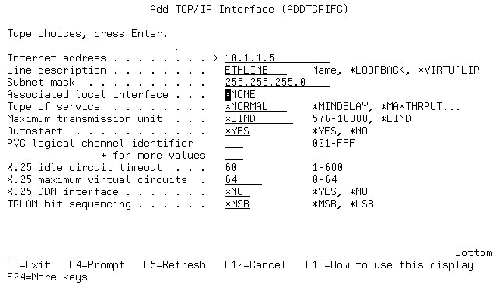
Figure 1: The Work with TCP/IP Interfaces screen lets you add entries.
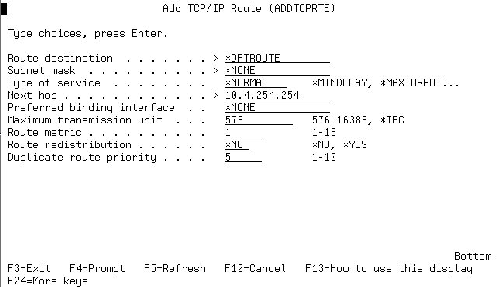
Figure 2: The Work with TCP/IP Routes panel lets you set up your TCP/IP default routes.
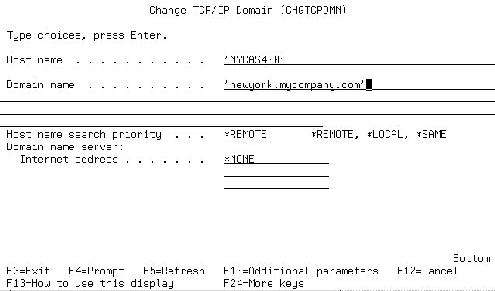
Figure 3: The Change TCP/IP domain option allows you to set up your domain information.
AS400 TCP/IP Commands
Command Function Command Function Command Function
GO TCPADM Access the TCP/IP Administration Menu CFGTCP Configure TCP/IP
CFGTCPAPP Configure TCP/IP Applications NETSTAT Work with TCP/IP Network Status PING Verify TCP/IP Connection CFGTCPBP Configure TCP/IP BOOTP CFGTCPFTP Configure TCP/IP FTP CFGTCPHTTP Configure TCP/IP HTTP CFGTCPLPD Configure TCP/IP LPD
CFGTCPPTP Configure TCP/IP Point-to-Point CFGTCPRTD Configure TCP/IP RouteD CFGTCPRXC Configure TCP/IP REXEC CFGTCPSMTPConfigure TCP/IP SMTP CFGTCPSNMPConfigure TCP/IP SNMP CFGTCPTELN Configure TCP/IP TELNET CFGTCPWSG Configure a TCP/IP Workstation WRKTCPPTP Work with TCP/IP Point-to-Point WRKTCPSTS Work with TCP/IP Network Status STRTCP Start TCP/IP
STRTCPFTP Start TCP/IP File Transfer STRTCPIFC Start TCP/IP Interface STRTCPPTP Start TCP/IP Point-to-Point STRTCPSVR Start TCP/IP Server STRTCPTELN Start TCP/IP TELNET
ENDTCP End TCP/IP
ENDTCPCNN End TCP/IP Connection ENDTCPIFC End TCP/IP Interface ENDTCPPTP End TCP/IP Point-to-Point ENDTCPSVR End TCP/IP Server MRGTCPHT Merge TCP/IP Host Table CHGTCPA Change TCP/IP Attributes CHGTCPDMN Change TCP/IP Domain CHGTCPHTE Change TCP/IP Host Table Entry CHGTCPIFC Change TCP/IP Interface CHGTCPRTE Change TCP/IP Route ADDTCPHTE Add TCP/IP Host Table Entry ADDTCPIFC Add TCP/IP Interface ADDTCPPORTAdd TCP/IP Port Restriction ADDTCPRSI Add TCP/IP Remote System ADDTCPRTE Add TCP/IP Route
Figure 4: These are most of the TCP/IP commands you will need to manage TCP/IP on the AS/400.

 More than ever, there is a demand for IT to deliver innovation. Your IBM i has been an essential part of your business operations for years. However, your organization may struggle to maintain the current system and implement new projects. The thousands of customers we've worked with and surveyed state that expectations regarding the digital footprint and vision of the company are not aligned with the current IT environment.
 TRY the one package that solves all your document design and printing challenges on all your platforms. Produce bar code labels, electronic forms, ad hoc reports, and RFID tags – without programming! MarkMagic is the only document design and print solution that combines report writing, WYSIWYG label and forms design, and conditional printing in one integrated product. Make sure your data survives when catastrophe hits. Request your trial now! Request Now.
 Forms of ransomware has been around for over 30 years, and with more and more organizations suffering attacks each year, it continues to endure. What has made ransomware such a durable threat and what is the best way to combat it? In order to prevent ransomware, organizations must first understand how it works.
 Disaster protection is vital to every business. Yet, it often consists of patched together procedures that are prone to error. From automatic backups to data encryption to media management, Robot automates the routine (yet often complex) tasks of iSeries backup and recovery, saving you time and money and making the process safer and more reliable. Automate your backups with the Robot Backup and Recovery Solution. Key features include:
 Business users want new applications now. Market and regulatory pressures require faster application updates and delivery into production. Your IBM i developers may be approaching retirement, and you see no sure way to fill their positions with experienced developers. In addition, you may be caught between maintaining your existing applications and the uncertainty of moving to something new.
 IT managers hoping to find new IBM i talent are discovering that the pool of experienced RPG programmers and operators or administrators with intimate knowledge of the operating system and the applications that run on it is small. This begs the question: How will you manage the platform that supports such a big part of your business? This guide offers strategies and software suggestions to help you plan IT staffing and resources and smooth the transition after your AS/400 talent retires. Read on to learn:
LATEST COMMENTS
MC Press Online