


It’s Wednesday morning. Your sales director walks into your office and says, “What would it take for me to come in first thing tomorrow morning, click a button, and see the total of yesterday’s orders by sales region?”
“Shouldn’t be too tough,” you tell him, already thinking about how you might accomplish the request.
“What I’d really like is to get the information out to all the regional managers too.” And, before you can respond, he’s darting off to a meeting, already assuming you’ll make it happen. After a little research, you discover that information contained in four different files needs to be combined and summarized to produce the desired result. An impossible task? No, because you have a tool at your disposal that can accomplish this task in a matter of minutes with little set-up and no programming: the Client Access Data Transfer function.
In this article, I’ll show you how to use the Data Transfer from AS/400 function to satisfy the sales directors of the world. The Data Transfer function provides flexible retrieval of AS/400 information to a desktop, network, or printer. This flexibility includes the ability to join multiple files, as well as to select, sort, group, and summarize data. And it can all be done quickly and to your specifications.
Powered by SQL
The Client Access data transfer function, accessed through the Data Transfer from AS/400 icon in your Client Access folder, is a powerful tool that provides dynamic retrieval of AS/400 data. Every time data is accessed using the Client Access Data Transfer function, SQL statements are sent to the AS/400 for execution. SQL is a standardized database access language used by most of today’s relational database products, including OS/400. Regardless of whether you purchase the optional SQL development environment, SQL support is included with the OS/400 operating system and can be used with the Data Transfer function.
SQL, the language of relational databases, is constructed in a manner similar to another language: English. An SQL statement is like a sentence. Instead of nouns and verbs, SQL statements are constructed using a verb and clauses. SQL provides verbs that perform numerous database functions like updating, inserting, deleting, and selecting records. The data transfer function utilizes the Select verb with associated clauses to define the information to be downloaded. Figure 1 shows the clauses used to form an SQL select statement.
Combining Files in a Single Data Transfer
When downloading AS/400 data, the information you request is always returned as a single file. However, this does not mean that you are limited to selecting information from only one file. Up to 32 individual AS/400 files may be joined to create the file you wish to download. Figure 2 shows an entry for defining multiple files that will be used in the data transfer function. Each file must be defined in the standard library/file name format, and each AS/400 file name must be separated by a comma. You can manually type this information into the File name field or you can use the Browse button feature on the Data Transfer screen to select files from your target AS/400.
You combine information from multiple files by designating key fields from each file as join fields. For example, an order detail file may contain a customer number. To get the customer’s name, you must join the order detail file to the customer master file. Since both files contain the customer number, it is used as the join field. The result of this join is that, for each order detail record, the master information for the specific customer is added to the downloaded record. The fields to be used for joining are defined on the Change Data Options window, accessed by pressing the Data Options button on the Data Transfer From AS/400 screen.
Data Options
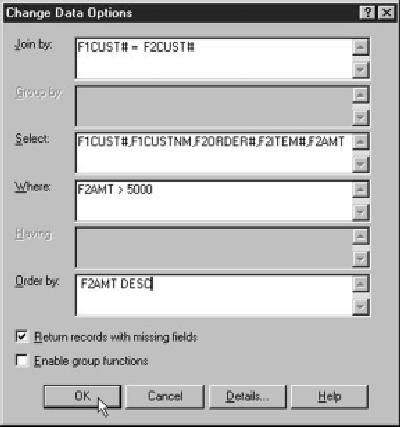
From the Change Data Options window, you may specify join fields, selection criteria, sort order, and grouping functions. The criteria are entered into the Join By, Group By, Select, Where, Having, and Order By panels on the screen. I’ll look at what each function does and some syntax for entering these clauses. Figure 3 illustrates the use of the Change Data Options criteria panels to define a data transfer.
The Join By Panel
The Join clause allows you to specify the fields from multiple files that are to be used to join the records. At least one join field must be identified for each set of two files being combined. The join fields you specify must have common attributes. A character field in one file must be joined to a character field in the second file. Likewise, a numeric field can only be joined to another numeric field. An attempt to transfer data using incompatible join fields will result in a system error message. Unlike the join function of the Query/400 product, the lengths of the fields being joined do not have to be identical. When defining the join fields, you supply an operator that defines the relationship that must be met to combine the files. The most commonly used operator is the equal sign (=), telling the query processor to join records when the value of the join field of the first file is equal to the value of the join field in the second file. You may also join files based upon a field value that is greater than (>), greater than or equal to (>=), less than (<), less than or equal to (<=), or not equal to (<>) the value of the second join field. For example, to get the customer name from a customer master file to go with a customer number in an order detail file, the Join By clause looks like this:
INNER JOIN custmast ON orderdtl.cust# = custmast.cust#
Return Records with Missing Fields
On the Change Data Options window, there is a check box labeled “Return records with missing fields.” This check box specifies the type of join that is to be performed. If the box is left unchecked, an Inner Join is performed. Inner Join simply means that the only records returned are those having a match between the first and second files. If the box is checked, a Left Outer Join is performed. A Left Outer Join simply specifies that all records from the first, or leftmost, file are returned regardless of whether a match is found in the
second file. If a match is not found in the second file, the fields from the second file are initialized automatically with blanks or zeros.
The Select Panel
The Select Panel allows you to specify which fields you want to include in your data transfer. When you first display the Data Options window, an asterisk appears in the Select Panel. This is an SQL standard default that specifies all fields for inclusion. To include only specific fields in the transfer, you must key the desired field names into the Select Panel. In addition to the fields in the files, you may also select from a number of built-in summary functions. These functions allow you to return the average, sum, minimum, or maximum value of a field within a group of records. You can also return the record count for a group.
The Where Panel
The Where clause in the select statement specifies the selection criteria to be used for the data transfer. You may condition the selection based on comparing the value of one field to another field, a field to a constant value, a field to a function value, or a function value to a constant. SQL provides a number of built-in functions that allow you to avoid hardcoding comparison values. They include numerous date, timestamp, and substring functions. For example, to select records having a date field equal to yesterday’s date, you would employ the Current Date and Day functions. The Where clause would look like this:
WHERE ((CURRENT DATE - 1 DAY) = datefield)
The Order By Panel
The Order By clause in the Select statement allows you to specify the order in which returned records are to be sorted. Each sort field specified can be sorted in ascending (ASC) or descending (DESC) order. If a value is not defined, ascending value is used as the default. The sort order specified must be a field included in the select clause and can be a field or a built-in summary function. These functions allow you to sort the resulting file by the average, sum, minimum, or maximum value of a field within a group of records. You can also sort the records by record count for a group. For example, to sort an order detail file by the sum of the order amount field in descending order, the Order By clause would look like this:
ORDER BY SUM(orderamt) DESC
The Group By Panel
The Group By clause allows you to define the resulting file as a summary file. To use the Group By clause, you must check the Enable Group Functions box on the Change Data Options window. List the fields by which you want to group and summarize records. For example, to summarize an order detail file by sales region, you would specify the sales region field in the Group By clause. If you wanted to show totals for each salesperson within a sales region, you would simply specify the sales region field, then the salesperson field. The Group By clause for this example would look like this:
GROUP BY region, person
The Having Panel
The Having clause works in conjunction with the Group By clause. If you have defined a record group using the Group By clause, the Having clause allows you to provide criteria that must be met by the group to be included. It works the same way as the Where clause except that the selection criteria must be met by a group of records rather than by each
individual record. For example, if you are summarizing orders by salesperson and you only want to return totals for salespeople having a total order amount greater than $5,000, the Having clause would look like this:
HAVING (SUM(orderamt) > 5000)
Details, Details
If you are not familiar with the syntax of SQL statements, specifying the criteria for your data transfer can seem a bit intimidating. While you can key the values of your criteria directly into the clause panels on the Change Data Options window, there is a shortcut available to help you. The button labeled Details provides a helper to save you from having to remember the syntax of the criteria you wish to enter.
When pressed, the Details button displays the Receive Request Details window. This display allows you to build each clause simply by clicking on the prompts provided. For more in-depth information about using the Receive Request Details window, see the sidebar that accompanies this article on page 10.
On Your Desktop—One-click Access
Once you have created your data transfer request, the criteria can be saved for later execution. From the File menu, select Save As to save your request. You may store the request on your local PC or on the network. Remember the sales director who wanted one- click access to summarized sales data? Once the request has been created, a windows shortcut can be created on the desktop of each sales manager’s PC. To create a shortcut, simply select the saved request file in Windows Explorer. Right-clicking the selected file will expose the option to create a shortcut. Doing so will create a clickable icon on the desktop that will launch the data transfer request, providing one-click access to vital data.
CA Data Transfer Help for the SQL-impaired
In “Click Here for Powerful Data Transfer” on page 9, I discussed the different SQL statements you can program into Client Access’s Data Transfer from AS/400 function to join multiple files and select, sort, group, and summarize data. However, if using SQL statement syntax to create Client Access Data Transfer requests leaves you scratching your head, help is on the way. The Receive Request Details window (Figure A, page 12) inside the Client Access Data Transfer program provides a wizard-like interface to walk you through the SQL criteria definition process. In a nutshell, then, here’s how you let the Data Transfer program do the SQL definition work for you.
To get to the Receive Request Details window, define your AS/400 tables to be used the same as you would for any other download. After you press the Data Options menu to enter your selection criteria, click on the Details button on the Change Data Options window. When this button is selected, the Data Transfer function connects to your AS/400 to retrieve the database information used to prompt your selections. The Receive Request Details window (Figure A) then provides up to six tabs corresponding with each clause of the data transfer criteria. Here’s how you use each tab to build your SQL requests without programming the SQL yourself.
The Select Tab
Clicking on the Select tab presents you with a list of the fields in the files you have selected for your data transfer request. Figure A shows the Select tab on the Receive Request Details window. If your transfer uses multiple files, each field name displayed is prefaced with a file identifier. This identifier is used to distinguish which file the field is from. For example, the fields from the first file specified have a prefix of T1 (for Table 1) followed by a period. The fields from the second file have a prefix of T2, and so forth. To select fields to be included in your data transfer results, you simply double-click on the desired fields from the list. In addition to selecting file fields, you can return built-in function results as query-result fields. The
functions available are Average (AVG), Count (COUNT), Maximum (MAX), Minimum (MIN), and Summation (SUM), with each function behaving as follows:
Average Function
When selected, the Average function prompts you to select the field from the selection list you wish to average. The data transfer automatically calculates the average value for the specified numeric field for each group of records transferred.
Count Function
The Count function returns a count of the number of records that pass the selection criteria for each defined group or for the entire transfer.
Maximum Function
The Maximum function prompts you to select a field from the selection list. The transfer request returns the highest, or maximum, value found for the selected field in each defined group of records.
Minimum Function
The Minimum function prompts you to select a field from the selection list. The transfer request returns the lowest, or minimum, value found for the selected field in each defined group of records.
Summation Function
When selected, the Summation function prompts you to select the field from the selection list you wish to sum. The data transfer automatically calculates the combined total value for the specified numeric field for each group of records transferred.
The Where Tab
Like the Select tab, the Where tab presents you with a list of the fields in the files you have selected for your data transfer request. To build a selection criteria expression, you simply double-click on the desired fields, operators, and functions from the lists. The Where tab orchestrates the building process by controlling the sequence of your selections. For example, it won’t allow you to select a comparison operator until after a field or function has been selected. A number of built-in functions are available to perform numerous date, time, and string operations. For a complete list of available functions, view the online help text.
The Order By Tab
The Order By tab presents you with a list of the fields in the files you have selected for your data transfer request. To select fields to be used for determining the sort order of your data transfer results, you simply double-click on the desired fields from the list. In addition to selecting file fields, you can also sort by built-in function results. The functions available are Average (AVG), Count (COUNT), Maximum (MAX), Minimum (MIN), and Summation (SUM).
The Join By Tab
The Join By tab presents you with a list of fields from which to choose. To select fields to be used for determining the joining of each selected file, you simply double-click on the desired fields from the list. In addition, you can specify different arithmetic operators (not just the equal [=] sign) and multiple join conditions to be used in your generated Join By statement. The Join By tab will not appear unless you are working with multiple AS/400 tables.
The Group By Tab
The Group By tab allows you to select fields to be used for determining the grouping of your data transfer request. Grouping is commonly used to perform subtotal functions or to divide the result file into desired pieces. The Group By tab will not appear unless you specify the Enable Group Functions check box on the Change Data Options window.
The Having Tab
Used in conjunction with the grouping criteria, the Having tab allows you to define a selection criteria expression for the defined group. The Having criteria is often confused with the criteria specified in the Where tab. The important distinction between the two is that the Where tab defines the selection criteria at the record level and the Having tab defines the selection criteria for an entire group of records. The
selections you make are always based upon the results of summary functions because the comparison is for a group of records. Like the Group By tab, the Having tab requires you to specify the Enable Group Functions check box on the Change Data Options window.
A Better Mousetrap
If you intend to use the extended functionality of the Client Access Data Transfer Function to interrogate your database, the Receive Request Details window is a valuable tool. Mastering its use will allow you to unleash the power of SQL without forcing you to learn a complex syntax. The online help text, accessed by pressing F1 while using the data transfer windows, provides additional information to help you tap into this powerful utility.
—Mark McCall Figure A: The Retrieve Request Details window provides a wizard-like interface to create your data transfer SQL definitions for you.
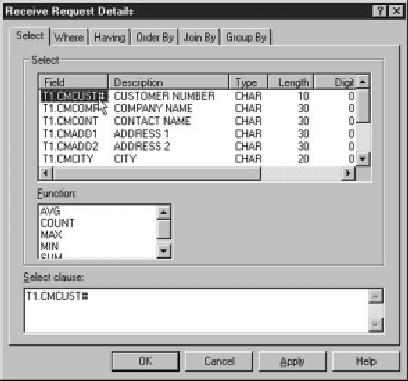
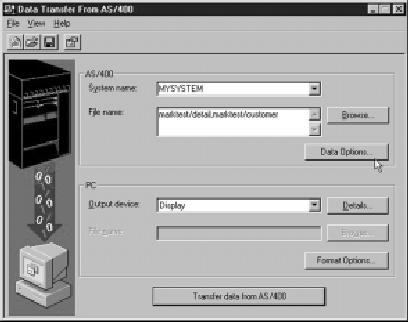
Figure 1: This is the breakdown of a basic SQL select statement.
Figure 2: You may select multiple files for data transfer.


 More than ever, there is a demand for IT to deliver innovation. Your IBM i has been an essential part of your business operations for years. However, your organization may struggle to maintain the current system and implement new projects. The thousands of customers we've worked with and surveyed state that expectations regarding the digital footprint and vision of the company are not aligned with the current IT environment.
 TRY the one package that solves all your document design and printing challenges on all your platforms. Produce bar code labels, electronic forms, ad hoc reports, and RFID tags – without programming! MarkMagic is the only document design and print solution that combines report writing, WYSIWYG label and forms design, and conditional printing in one integrated product. Make sure your data survives when catastrophe hits. Request your trial now! Request Now.
 Forms of ransomware has been around for over 30 years, and with more and more organizations suffering attacks each year, it continues to endure. What has made ransomware such a durable threat and what is the best way to combat it? In order to prevent ransomware, organizations must first understand how it works.
 Disaster protection is vital to every business. Yet, it often consists of patched together procedures that are prone to error. From automatic backups to data encryption to media management, Robot automates the routine (yet often complex) tasks of iSeries backup and recovery, saving you time and money and making the process safer and more reliable. Automate your backups with the Robot Backup and Recovery Solution. Key features include:
 Business users want new applications now. Market and regulatory pressures require faster application updates and delivery into production. Your IBM i developers may be approaching retirement, and you see no sure way to fill their positions with experienced developers. In addition, you may be caught between maintaining your existing applications and the uncertainty of moving to something new.
 IT managers hoping to find new IBM i talent are discovering that the pool of experienced RPG programmers and operators or administrators with intimate knowledge of the operating system and the applications that run on it is small. This begs the question: How will you manage the platform that supports such a big part of your business? This guide offers strategies and software suggestions to help you plan IT staffing and resources and smooth the transition after your AS/400 talent retires. Read on to learn:
LATEST COMMENTS
MC Press Online