


Line Printer Requester (LPR) and Line Printer Daemon (LPD) have become the default printing standards for the TCP/IP world. When IBM introduced TCP/IP (which contained LPR/LPD) to the AS/400 in OS/400 V3R1, it also introduced the capability for an AS/400 to send printed output to any LPD print server and to receive printed output from any LPR client. This fact means that any AS/400 that is configured for TCP/IP can now print reports from and send reports to any other network computer that is also configured for LPR/LPD. LPR/LPD produces an exponential increase in OS/400's printing capabilities, making it a valuable member of the TCP/IP printing community.
In this article, I will explain how LPR/LPD printing works and cover the specific steps that are required to successfully configure this type of printing support in a Windows NT 4.0 network as well as on your AS/400. By reviewing the information I will present, you will be able to configure your network so that you can start printing AS/400 reports to Windows NT printers and Windows NT network reports to AS/400 system printers. LPR/LPD printing allows you to easily exchange printed documents between these two systems.
So What Are LPR and LPD, Anyway?
LPR and LPD are the two components of a TCP/IP-based printing facility. LPR is the TCP/IP utility used by a sending machine (the client) to communicate and send print requests over an IP network. LPD is another utility that runs on a receiving machine (the server) that deals with processing incoming print requests from LPR clients. To process print requests, the LPD service listens on TCP/IP port 515 for any printer jobs coming in over a TCP/IP network from an LPR client.
The LPR/LPD specification—which is documented in Internet Request for Comments (RFC) 1179—describes the method by which an LPR client that is sending print data and an LPD server, which is receiving print data, should work together. When an LPR print client contacts an LPD server requesting permission to send a print file to the server, the target printer queue on the server will be included in the request. If the request to send a print file is granted, two items will be provided by the sending system:
• Control File—Information about the print job, which can include a wide variety of items such as user ID information, banner page requirements (if necessary), number of copies, type of formatting, etc.
• Print File—The actual data to be printed
LPD/LPR Support in an AS/400 Network
The OS/400 operating system (V3R1 and beyond) provides both LPR and LPD support as part of the TCP/IP module that ships with the base operating system. For AS/400 TCP/IP configuration information, see "AS/400 TCP/IP Configuration Is Easier Than You Think," by D. Ellis Green in the May/June 1999 issue of AS/400 Network Expert. Another valuable reference for configuring TCP/IP and LPR/LPD on your AS/400 is the OS/400 TCP/IP Configuration and Reference V4R3 (SC41-5420-02, CD-ROM QB3ANL02), which is available online at publib.boulder.ibm.com/pubs/html/as400/online/ homeeng1.htm. Windows NT 4.0 Server and Windows NT 4.0 Workstation also provide LPR and LPD support via the Microsoft TCP/IP Printing Network Service. This service is shipped as part of the base operating system.
Windows 3.x, Windows 95, and Windows 98 do not offer LPR and LPD services as part of their base operating systems. This functionality can be added, however, through the use of purchased third-party software or via shareware.
Creating an LPR Remote Writer on the AS/400
The requirements for using AS/400 LPR support are a TCP/IP interface configured on your AS/400 system and a target IP address of a server system that has a TCP/IP LPD service running. AS/400 LPR support also requires you to configure a local domain name for your AS/400, because LPR needs to put this information in any control files sent to an LPD server. Again, see D. Ellis Green’s AS/400 TCP/IP configuration article for more information on how to configure these items.
The next step, then, is to configure an OS/400 remote output queue that specifies the connection properties for the output queue on your target LPD server. You print your AS/400 spool files or network printouts to this output queue and AS/400's LPR support sends them to the LPD service on the target system. In this way, an AS/400 can easily send printouts to another system, even if it's a Windows NT server.
To create a remote output queue, type in the Create Output Queue (CRTOUTQ) command on a command line and press F4 to prompt. On the screen that appears (Figures 1 and 2), you will be required to enter some basic information that will help OS/400 locate the target LPD print server, which will be receiving print files from your AS/400. There are several important parameter values that you need to enter here, including the following:
• Remote System—Specify *INTNETADR to cause the AS/400 to prompt you for an IP address.
• Remote Printer Queue—Specify the target queue name on the LPD server. When the target is a print server such as a Hewlett-Packard JetDirect card, specify the name that will select the proper printer port in the print server, such as raw1 or text1. Frequently, this name is case-sensitive. To enter lower-case values, you must use the apostrophe character before and after the text.
• Writers to Autostart—If this parameter is left at the default *NONE, you will need to execute the Start Remote Writer (STRRMTWTR) command to enable your output queue. Entering a numeric value of 1 allows the AS/400 to automatically start the writer for you.
• Connection type—Specify *IP.
• Destination type—Specify *OTHER.
• Transform SCS to ASCII—Specify *YES if the printer is an ASCII printer.
• Manufacturer type and model—Choose a print driver that closely matches the functionality of your target printer. You can press the F4 key on this field to produce a list
of manufacturer types and models for which OS/400 can automatically transform output by using the Host Print Transform function.
• Internet Address—Insert the IP address of the target LPD print server.
• Destination options—Determine whether the XAUTOQ or XAIX parameters are required for your situation. XAIX is a special function for requesting that multiple copies of a spool file be printed when working with IBM Network Stations and print servers (such as Hewlett-Packard JetDirect) that have no disk storage capability. These types of hardware devices support the streaming mode of LPD. In this implementation of LPD, the server asks for the control file first (before the data file) so that it can know how much information is included in the file to be printed. It then verifies for the LPR client that the whole file was successfully passed to the printer. Because these types of hardware devices cannot store the file to be printed, multiple copies of a file are created by sending the whole file to the printer a multiple number of times. The AS/400 XAIX parameter activates this support. XAUTOQ lets you automatically recover when a network link to an LPD server times out before an AS/400 spool file has been processed and printed. If this happens, the writer will end or the spool file can begin looping and remain in a SND status without ever being printed. The XAUTOQ function causes the AS/400 to send the spool file to the LPD server running on your AS/400 and then it automatically requeues the job in the appropriate AS/400 output queue without operator intervention.
After you have entered all the required information and verified that it is correct, you can press Enter to create your output queue. If you find that you need to make changes to this information at a later date, you can do so with the Change Output Queue (CHGOUTQ) command.
In addition to creating an output queue to process your AS/400 LPR requests, you can also use the AS/400 Send TCP/IP Spooled File (SNDTCPSPLF) command to send individual spool files to LPD output queues on the fly. This command can be used the same way you use an LPR command on other systems and you can use this command from an AS/400 command line or inside a CL program.
Accepting LPR Requests Using LPD
In order to receive LPR requests from other systems, an LPD daemon must be active on your AS/400. The AS/400 LPD jobs run in the QSYSWRK subsystem and will be named QTLPDxxxxx, where xxxxx represents a unique number.
To view the jobs running in QSYSWRK, execute the Work with Active Jobs (WRKACTJOB) command with the subsystem parameter as follows:
WRKACTJOB SBS(QSYSWRK)
If you do not find any LPD jobs running, you can start the LPD service individually by executing the Start TCP/IP Server (STRTCPSVR) command as follows:
STRTCPSVR *LPD
This command will return an error if the TCP/IP services are not currently running on your AS/400. The general command to start all TCP/IP services on the AS/400 (OS/400 V4R2 and below) is to execute the Start TCP/IP (STRTCP) command with the *ALL
parameter, such as
STRTCP *ALL
With OS/400 V4R3 and above, the STRTCP command eliminated the *ALL parameter so to start all TCP/IP services on the machines by using STRTCP, enter the command this way:
STRTCP STRSVR(*YES)
To specify the number of LPD servers that are automatically started with either of these commands, type in the Change LPD Attributes (CHGLPDA) command and press F4 to view the current parameters. This command allows you to specify the number of LPD servers OS/400 will start when it activates the LPD service. IBM recommends that you have at least two LPD servers running on your AS/400 so that LPD can receive a new print job while it is processing another print job. You can also specify whether your LPD servers are started automatically whenever TCP is started (through the STRTCP command) by specifying *YES on the Autostart servers parameter on the CHGLPDA command. However, if you are starting the LPD servers through the STRTCPSVR command, the Autostart servers parameter is ignored.
When an AS/400 receives an LPD request from a client, the LPD server will first check for the existence of an AS/400 user profile in the request. If a valid user profile exists, it will receive the printer job command under that profile and attempt to print the job to the AS/400 output queue designated in the request. If a valid user profile is not included with the LPD request, OS/400 will attempt to receive the file under the QTMPLPD user profile provided that the QTMPLPD profile has *PUBLIC access. Once the LPD request is validated by the user profile, OS/400 will attempt to send the printer file to the output queue designated in the request. If there is no library designated in the request, the LPD server will look for the output queue in the default user's library list. If the LPD server cannot find the output queue, it will send the printer file to the QPRINT output queue in the QGPL library.
LPR and Windows NT 4.0 Server or Workstation
The first step in creating an LPR printer under Windows NT is to verify that the Microsoft TCP/IP Printing Service has been installed. Highlight Network Neighborhood on your desktop, right-click your mouse, and choose the Services tab from the dialog box that is displayed. This choice will bring up the Network panel screen shown in Figure 3.
If the Microsoft TCP/IP Printing service is not listed, press the Add button on the Network panel. Highlight the Microsoft TCP/IP Printing service and press OK. You will be prompted by the system for certain Windows NT information from your installation media (CD-ROM or diskette) to complete the installation.
After adding the service, you can now choose the Windows Start button, Settings, Printers, and double-click the Add Printer icon to start the Add Printers Wizard. The first dialog box will ask you whether the printer will be managed by My Computer or Network printer server. It is very important that you choose My Computer because the LPR client, which will send your print jobs to an LPD server on the network, needs to be run locally from your machine. You can then press the Next button.
The next dialog box will ask you to select the port you want to use for your printer. Don't select any of the available ports but, instead, click on the Add Port button. (See Figure 4.) From the list of available printer ports that is displayed, choose the LPR Port option and then press the New Port button. The Add LPR compatible printer dialog box will be displayed (Figure 4). The field entitled Name or address of server providing lpd: expects an IP address or a recognized host name that will designate the network destination where the target LPD server is running. The field entitled Name of printer or print queue on that server: expects a queue name on a machine like an AS/400, a printer name if the target is another Windows NT machine, or a port name (raw1) if the target is a print server like a Hewlett-Packard JetDirect card. You can now press the OK button to return to the Available Ports dialog box.
You should now see the new port you have just created. Follow the instructions to click in the check box next to this port and then press the Next button in the Add Printer Wizard dialog box. You will now be asked to choose the manufacturer and model of your
printer. Highlight the appropriate information and press Next. The last three dialog boxes will guide you through the selection of a name for your printer, choosing whether it should be shared, and printing a test page. After you have successfully completed these steps, your Windows NT LPR printer will be created by your system.
LPD and Windows NT 4.0 Server or Workstation
Similar to creating an LPR port for Windows NT computer, you also have to install the Microsoft TCP/IP Printing Service to activate an LPD server service on your NT computer. To verify that the TCP/IP printing service is active, choose the Start button, then Settings/Control Panel/Services, which will bring you to the Windows NT Services panel, shown in Figure 5. Scroll down through the listed services until you find the Microsoft TCP/IP Print Server. Verify that its status is Started. If it is not started, highlight the entry and press Start. It is also possible to specify the automatic starting of the LPD server as part of Windows NT boot process by pressing the Startup button and choosing Automatic as the startup type. Once the service is started, your Windows NT machine is ready to accept LPR print requests.
Interesting Uses for LPR/LPD
Because the LPR/LPD specification defines a print serving service for receiving printed output, it can be used to overcome network obstacles. For example, assume there is a Windows NT 4.0 LAN that includes a Windows NT 4.0 Workstation machine with a twinax connection to an AS/400. There are no direct cabling links between the Windows NT LAN and the AS/400. If users with the twinax-attached Windows NT 4.0 Workstation machines were to enable Microsoft TCP/IP Printing services in their machines, they could choose to create printers that would be accessible to LPR requests coming from the LAN. If they used a package like Client Access to create a network printer definition in their machine, which was linked to an AS/400 defined printer, other LAN users would be able to use the printer as well by defining an LPR printer on their own machines.
One of the benefits of the Internet Engineering Task Force (IETF) standardization process has been to allow computer environments that are very different to work well with one another. Printing can sometimes be a very difficult operation to manage even within a single operating system environment. With the use of an industry-standard printing transport protocol such as LPR/LPD, it is probable that output can be reliably passed from an AS/400 to another computer environment like Windows NT or vice versa.
Related Materials
"AS/400 TCP/IP Configuration Is Easier Than You Think," D. Ellis Green, AS/400 Network Expert, May/June 1999
OS/400 TCP/IP Configuration and Reference V4R3 (SC41-5420-02, CD-ROM QB3ANL02), available at the AS/400 Online Library at publib.boulder.ibm.com/pubs/html/ as400/online/homeeng1.htm
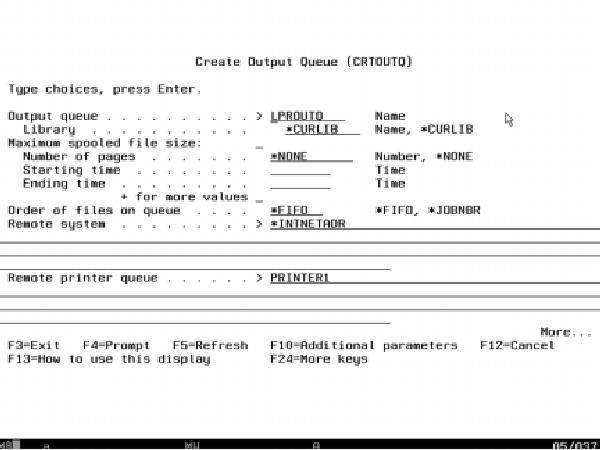
Figure 1: This is the AS/400 command prompt for using the CRTOUTQ command to create an LPR remote output queue to redirect OS/400 spool file output to an LPD printer queue.
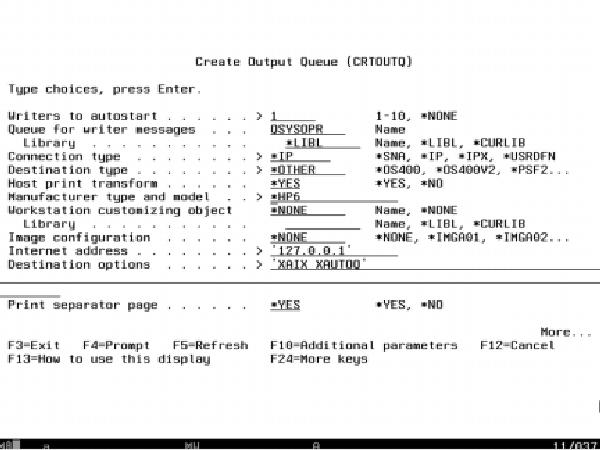
Figure 2: Use the second screen on the CRTOUTQ command to create an LPR remote output queue to redirect OS/400 spool file output to an LPD printer queue.
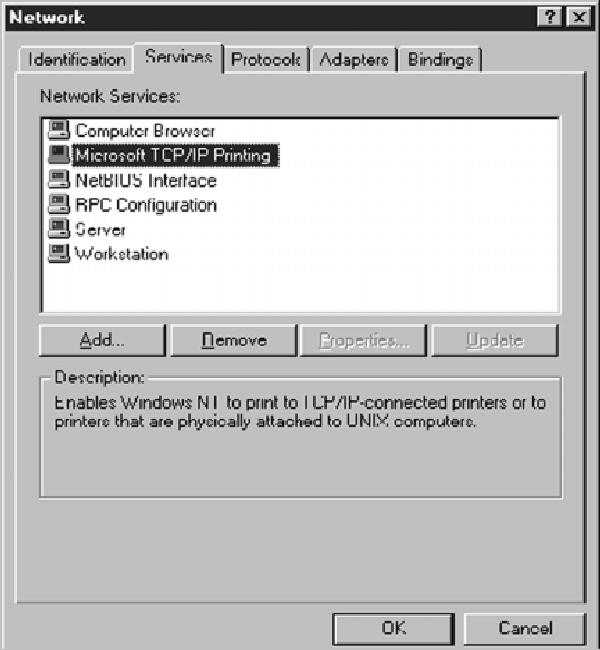
Figure 3: This is the Windows NT Network panel where you add the Microsoft TCP/IP Printing Service.
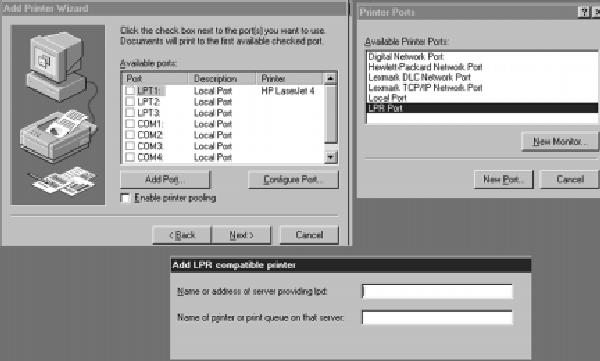
Figure 4: When you add a printer using the Windows NT Add Printer Wizard, you can specify it as an LPR printer.
Figure 5: You can check to see that Microsoft TCP/IP Printer Services are active through the Windows NT Services panel.


 More than ever, there is a demand for IT to deliver innovation. Your IBM i has been an essential part of your business operations for years. However, your organization may struggle to maintain the current system and implement new projects. The thousands of customers we've worked with and surveyed state that expectations regarding the digital footprint and vision of the company are not aligned with the current IT environment.
 TRY the one package that solves all your document design and printing challenges on all your platforms. Produce bar code labels, electronic forms, ad hoc reports, and RFID tags – without programming! MarkMagic is the only document design and print solution that combines report writing, WYSIWYG label and forms design, and conditional printing in one integrated product. Make sure your data survives when catastrophe hits. Request your trial now! Request Now.
 Forms of ransomware has been around for over 30 years, and with more and more organizations suffering attacks each year, it continues to endure. What has made ransomware such a durable threat and what is the best way to combat it? In order to prevent ransomware, organizations must first understand how it works.
 Disaster protection is vital to every business. Yet, it often consists of patched together procedures that are prone to error. From automatic backups to data encryption to media management, Robot automates the routine (yet often complex) tasks of iSeries backup and recovery, saving you time and money and making the process safer and more reliable. Automate your backups with the Robot Backup and Recovery Solution. Key features include:
 Business users want new applications now. Market and regulatory pressures require faster application updates and delivery into production. Your IBM i developers may be approaching retirement, and you see no sure way to fill their positions with experienced developers. In addition, you may be caught between maintaining your existing applications and the uncertainty of moving to something new.
 IT managers hoping to find new IBM i talent are discovering that the pool of experienced RPG programmers and operators or administrators with intimate knowledge of the operating system and the applications that run on it is small. This begs the question: How will you manage the platform that supports such a big part of your business? This guide offers strategies and software suggestions to help you plan IT staffing and resources and smooth the transition after your AS/400 talent retires. Read on to learn:
LATEST COMMENTS
MC Press Online